|
|
|
Installing Fixed Windows
in a Beetle
~~~
Note: This procedure is for window rubber WITHOUT the chrome trim, sometimes referred to as "Cal-look."
~~~
First of all, it will save lots of frustration to realize that this job is very difficult, if not impossible, to do by yourself. Find yourself a good buddy, and then go about it slowly and methodically.
Secondly, it is important that you understand how the rubber seal works. Following is a picture of the seal in cross-section
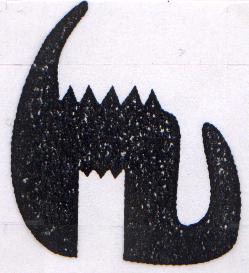
Window Seal Cross Section
~~~
In the picture, the left surface of the seal is what you will see on the outside of the car between the body and the glass. The groove on the bottom with the square bottom is where the glass goes. The groove on the right is where the flange of the body will go, and the flap on the right is what must be pulled around to the inside of the car.
To quote John Henry (The Bug Shop) - The seal is placed on the window, the molding is placed in the seal groove and the window is then placed in the body opening. It would be great if it were that simple, but it is not.
How right he is! It is the intent of this article to give a few pointers that will make this job just a little bit easier. I will try to write a step-by-step procedure, with notes as appropriate. We suggest that you practice on the rear quarter windows first, as they are the easiest to install.
Note: Warming the rubber seal will definitely make installing it on the glass much easier (unnecessary on a hot summer day, of course). We did it in a cool garage during the winter without warming the seal, and it was very difficult. If the rubber is cold and stiff, put it in the sun or a warm room to soften it before installing it.
- Inspect the seal carefully and make sure you understand the orientation of the grooves and which one goes where.
- Find the seam in the seal. It doesn't really matter where this goes, but I like to put it either at the top or the bottom, in the middle of the window.
- Carefully install the seal on the window, using no lubricants (so it will hold on the glass without slipping). Make SURE that the outside of the seal is on the outside of the window (see the picture above). It is possible to put it on backwards I have done so, and it's a "mumble-under-your-breath" moment!
Note: Find a place to work that has sufficient space and is padded remember you are working with glass! Putting the rubber seal on the glass is a bit of a chore and tough on the thumbs, but take your time and make sure the edge of the glass is seated fully in the proper groove, all the way around.
Note: If you are using the rubber with the chrome strip insert, place this in it's groove BEFORE putting the rubber on the class. (The "no chrome strip" seals are much easier to install.)
The next step is what John Henry calls "The String Trick." This is the key to successful installation of windows in the Volkswagen.
Take another look at the cross-section of the seal above. Note the groove on the lower right. What you have to do is put the window in place in it's opening and then pull the flap on the right side of this groove around to the inside of the car. This can be very difficult to do.
Experience has shown that this can be done most easily by inserting a very strong, flexible cord of some kind (e.g., plastic washing line cord, venetian blind cord, etc.), 1/8" or less in diameter, in the lower-right groove (see above), all the way around. The cord can then be used to pull the rubber around the window flange and into the car. I have successfully used ordinary 16-gauge insulated automotive wire. So
- Starting at the bottom of the window works best from our experience (though others have had best luck starting at the top. Whether top or bottom, start in the middle and insert the thin, flexible cord into the groove in the seal, all the way around, with the two ends of the cord overlapping (i.e., the ends crossing and each extending about 18 inches or so beyond the center point) so you can get a good grip on the cord.
Note: John Henry recommends overlapping the cord along the entire LOWER edge of the glass he has found that the ends of a cord used on a windshield should be at the lower corners, overlapping the whole bottom edge.
John comments, concerning installation of the windshield - By starting the cord along the bottom edge, you get the lower two corners done early in the whole deal and (I believe) and reduce the stress on them. If you start from the top, you have a pretty tight pull to get the lower corners in, and having broken at least 3 windshields at those corners in my lifetime, I will do anything to lessen that risk.
Start at the bottom and it doesn't get tight until you start rounding the upper corners, and the glass is quite a bit stronger there, I believe.
We've tried it both ways, and we found that overlapping the cord at the top worked best for the rear window and the rear side. You will probably have occasion to try both!
- Lubricate the groove over the top of the cord that you have inserted with a suitable lubricant like K-Y Jelly. The seal will become very tight as you work around the window, so it helps to have some lubrication. A squirt bottle of plain water is also useful for this purpose.
John Henry - Mix about a 10% solution of dish soap and water (90% water) and spray it like holy water. Do not use heavy soaps or silicones. KY is fine, but a bit harder to clean up than light water/soap especially if you use a lot of it. I use just a bit of KY around the edges of the seal at first (and the window opening in the body) and just water/soap mix after that. Avoid silicone spray or WD40 etc., as it will leave a mess on your interior and paint work and possibly stain the headliner.
- Place the window squarely in the window opening, making sure that the outside flange of the seal fits properly over the body and that the ends of the cord fall inside the car. Dont start pulling the cord until, from inside, you can see that the whole seal, all the way around, is butted up against the flange in the body opening.
- Have an assistant hold the window firmly in place and GENTLY press (open palm) the window at the point where you are working. Have your assistant push just enough to ensure the seal seats the rest of the way in as you go.
Note: Be careful with the lower corners of the windshield -- this is the most common area that breaks. Do not put too much pressure on it there.
- Start pulling inwards on one end of the cord. As you go, the cord is freed, and the inner lip of the seal is pulled in and over the body opening flange.
- Work slowly to the first corner, then pull the other end of the cord to the opposite corner. Work all around the window in this way, having your assistant press firmly on the glass with a flat hand at the point at which you are working so that the lip of the seal pulls over the frame edge. Don't let one side get too much farther up than the other.
Note: You may find it useful to use a plastic glass installation stick to help pull the rubber around to the inside. As you work around the rubber will become very tight, and with K-Y Jelly all over your hands you may find it difficult to pull the cord! It is helpful to wrap the cord tightly around a stick or around your arm to give you more leverage. The last inch or so is the most difficult.
A warning from John Henry: The glass edge, especially where you "close the gap" on the seal lip pulling is under lots of stress, do not whack it with anything (including you hand or fist) at this point. Once the lip is fully pulled over and the cord out, some additional and slapping of the glass with bare hands may be needed to fully seat the window.
- Clean the window and seal well, both inside and out, to fully remove any lubricant you have used.
- Enjoy the endorphin rush!
*
* * * *
|
|
