|
||

|
|
Backup Lights(Reversing Lights)Discussed herein are the following topics -
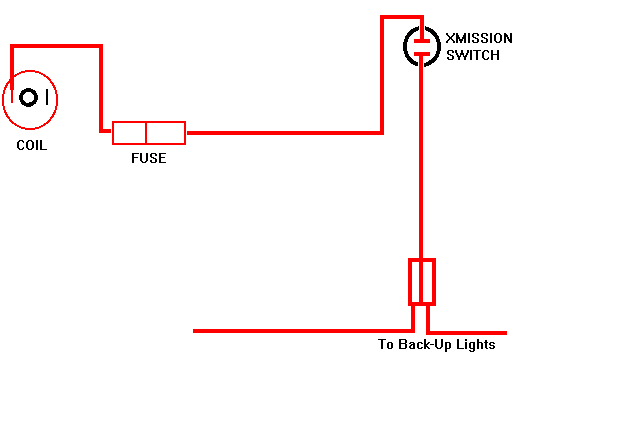
System DescriptionBackup lights (reversing lights as they are called in Australia) are required by law in the U.S., which was one of the reasons why Dave restored them in his '73 Super Beetle. But the main driver, in our minds, for making sure the backup lights work is simply to provide light when backing up. We've learned the value of that on many occasions! Some general notes regarding the backup lights - A concise description of the system - Open the engine lid and look for a in-line fuse in a wire running from the positive terminal on the coil, behind and over the top of the carburetor, and around the right side of the fan shroud. This wire needs to have a good fuse in it (8-amp). When you start the car, juice is supplied to this line, which proceeds forward under the car to the backup switch located in the nose cone of the transaxle. From a second terminal on the switch the line returns rearward, splits behind the engine compartment insulation, and on to each of the two backup lights. You can test the switch by pulling the wires and putting an ohm meter across the two connections and putting the car in reverse with the engine shut off. Also, check the connections on the switch, as they are usually corroded and look green. Discussion (From Dave's Experience)Dave had a bit of a bee in his bonnet about the backup lights. When he pulled the right tail light lens off to do a little inspection, he found that the bulb was completely missing and the backup lenses were painted over. His son thought the lenses looked "cool," but Dave wagered his opinion would change when law enforcement hands him a ticket for improper equipment, or the car fails a safety inspection. The taillights are there for a reason, and it's not to "look cool"! These lights inform other drivers of your intentions (stopping/turning/reversing/etc.) If the light assembly is even partially obscured, visibility is dramatically reduced. We decided that new lenses would be cheap insurance to help prevent an accident. Towing a rear-ended pile of bent steel off to the junkyard or spending a week or two in the hospital certainly isn't cool. Before biting the bullet and ordering new taillight lenses, Dave did try to remove the black paint from the lenses. Paint thinner, Easy-Off oven cleaner (which is sodium hydroxide), and cleaners such as Fantastic and 409 were recommended for the job. None of these were effective in removing the black paint on the tail light lenses, so Dave purchased new lenses. When Dave checked the condition of the wiring, he took off the wire from the positive terminal on the coil (#1) and in-line fuse holder that runs behind the carburetor, as it was just hanging there. The wire that the other end of the fuse is supposed to connect to was just curled up on the right side of the fan housing. With high hopes Dave reconnected all of the wiring (including a new in-line fuse and holder) and installed new bulbs in the tail lights, but to no avail. Note: Neglecting the in-line fuse can someday lead to a short that will heat up the wire (instead of the light) until the insulation burns, or worse. Several times we have seen a blown a fuse at that location because the bulb holder came into contact with the backup light's housing. Dave finally found the backup switch, right where everybody said it was on the nose of the transmission. There are two wires attached to the backup switch, of course -- one to the switch from the hot side of the coil and one from the switch to the connection for backup lights. The lights are grounded through the body of the light socket, completing the circuit. When you shift into reverse, the switch closes the circuit and supplies power to the lights. There is a "sheath" that emerges from the firewall and proceeds forward along side the starter motor and solenoid and then along the right side of the transmission to the backup switch. This sheath contains TWO wires, one running forward to the backkup switch, the other returning rearward from the switch to the backup lights. Note: The wires run along the bumper bracket and sometimes get pulled off. Also, the wires run along the front of the fan shroud and then through the fire wall. People sometimes break the wires when pulling the engine, or they don't connect them properly putting the engine back in. Each of these two wires has a female connector on the end that connects to one of the two spade connections on the backup switch. Dave found these wires to be disconnected. He reconnected the wires to the backup switch, turned on the key, put the tranny in reverse, and ran back to check. Still no lights. A voltmeter showed no juice at the light sockets. Since Dave had corrected every other problem, the only thing left was the backup switch itself. Installing the new switch was not the easiest thing to do lying on your back under the car with about two inches of clearance. Jacking the car up a little higher would have helped. Important Note: Make absolutely certain that the car is firmly supported on jack stands. The car falling on you will NOT be a pleasant experience! As indicated above, Dave also installed new elephant-foot taillight lenses. He had to fold over one of the metal parts inside, as the lenses wouldn't go completely onto the taillight assembly. (He got the hint from the old lenses.) And finally, success! Backup Lights Restoration ProcedureNote: Youll have to raise the car to do this. Make sure it is resting SECURELY on jack stands before you crawl under it! Note: The two wires -- the one running forward from the 8-amp fuse to the backup switch, and the one running back from the switch to the junction in front of the engine compartment insulation -- run together inside of a black plastic sheath, along side the starter motor and solenoid and then along the right side of the transmission to the backup switch.
|
||
|
|