|
||

|
|
Adjusting VW BrakesSee also our discussion and procedure regarding Topics covered in this article are as follows - Brake Shoe AdjustmentRob's brake adjustment method - I find it better to remove the drum and de-dust the brake drums and then do the adjusting from the outside, rather than crawl under and use the adjuster holes. I tighten the adjusting stars (one at a time for the complete process here) a couple of clicks and slide the drum back on and then spin it. Pull the drum off and tighten again until it just binds with the drum back on. Tramp on the brake pedal hard to realign the shoes (the stars push only one side of the shoe so they go off-centre as the stars are turned), then spin the drum again. Sometimes you need one more click before it binds. Once I'm sure I have it JUST binding, I back off one click so it spins free. I do this with each shoe separately. Doing it this way makes it easy to remove dust from the brake drums. Removing the dust reduces any noise or squeal from the brakes. Dust isn't a problem if you have disc brakes on the front -- they're exposed so there's no dust hanging around. Note: Tramping on the brakes I've found to be important if you need more than 1-2 clicks, since only one side of the shoe is being moved and it will then be fractionally off-center (tramping on the brakes makes the shoe slide to the center between the star adjuster and cylinder pushrod). It sounds complicated, but it means I can sit on a stool next to the wheel instead of crawling under several times (so I can do it just on the jack, and not bother with axle stands since I won't be underneath). It's actually quite quick, since I can see the stars and don't have to find them with the screw driver through the hole. I have disc front brakes of course, so for drums all round, try it at one click loosened, rather than two. Discs run VERY close to the pads and so have very little movement before they work so the drums can be a fraction looser -- about two clicks. If you feel the drums are still scraping a little, THEN back off an extra click, but this of course increases the piston movement inside the master cylinder before the brakes work, so you want the minimum shoe clearance that will still prevent brake-binding. While adjusting his front (drum) brakes, Dave found the process difficult because the lower strut support interfered with his screwdriver -- he could't move the adjusting star on the front shoe. He found that a screwdriver won't work unless it's bent 30 degrees or so. Dave went through several brake adjusting tools before he found one with a blade slim enough to fit through the holes in the backing plate. They are out there, but you have to look for them. On one occasion Dave found both of his rear brakes were quite a ways out of adjustment (four clicks or so). Rob said this could just be the shoes wearing in, as there was also plenty of dust. This was obviously part of the pedal travel problem that Dave had (see below). Brake Pedal Travel AdjustmentDave wrote to Rob expressing concern over the excessive pedal travel his son was experiencing in his Bug -- the pedal was going almost all the way to the floor before there was any actual braking action. His son found that if he pumped the brakes several times it would bring the brake pedal up. Dave read the Bentley Manual (in the troubleshooting section) that this problem probably because the linings are worn and the brake shoes are in need of adjustment. Note: Once again, the pedal travel being discussed here is not to be confused with "brake pedal freeplay," the 5-7mm of play at the top of the brake pedal (which translates to 1mm of play between the brake push rod and the piston in the master cylinder). See discussion of brake pedal freeplay at the link above. Rob responded with a little treatise on brake pedal travel - Pumping the pedal usually means air in the lines, which is not good. A thorough bleeding of the braking system should take care of that problem. After that, the next thing to check is the reservoir -- maybe it's lost enough fluid for one or both sections to be uncovered. It may be as simple as a leaky slave (wheel) cylinder; if so, you can at top up the reservoir so you get SOME brakes until you can get it fixed. I don't like the idea of "needs a couple of pumps in the morning" to get it working! The brake pedal "travel" (as opposed to the "freeplay") is the amount of piston movement (taking up the adjustment gap in the shoes/drums) before the brakes start to bite. That's maybe 10mm on my pedal -- it can be much worse if the brakes are out of adjustment. The total pedal movement can't be much more than that, so that if one brake circuit should ever fail you have enough pedal travel left for the remaining circuit to work (one circuit failing will always result in the pedal sinking closer to the floor as it bottoms out the "dead" piston in the master cylinder). The slack has to be the brake shoe adjustment -- it's the only place to take up the slack between the piston starting to move and the brakes starting to work. Try the shoe adjustment routine before you replace anything else. I know it's a pain with four shoes to adjust, but that SHOULD fix it. After that, the Brake Troubleshooting section of the Bentley Manual gives only three possible reasons for excessive pedal travel -- worn linings, insufficient brake fluid, and defective master cylinder. After completely replacing all of the brake components in his '73 SB and bleeding the brakes several times, Dave found that he still had excessive brake pedal travel (i.e., travel in the pedal before braking action begins). Rob wrote to say that with all new components and the brakes properly bled, the only thing that could be causing excessive brake pedal travel is the brake adjustment, since the pedal travel is directly related to the distance between the brake shoe and the drum that must be traversed before braking can begin. Dave's experience confirmed this. He recalled only partially adjusting the brakes after replacing the front brake components and before bleeding the brakes. When he remembered this and then completed the brake adjustment per the Brake Adjustment Procedure, the brake pedal travel was reduced to within normal limits. Brake Pedal Assembly AdjustmentWhere the pedal cluster meets the floor there is an adjusting plate and attendant bolt. In the pictures below you can see the brake pedal adjuster that is bolted to the floor pan.
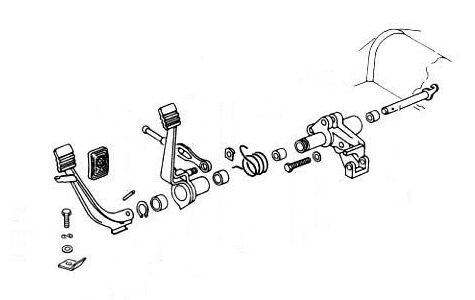 Pedal Assembly - LHD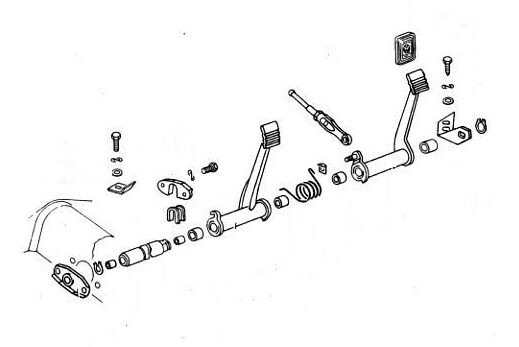 Pedal Assembly - RHDFrom the sketches it appears to me that the "elongated hole" is in the clamp, allowing the clamp to slide forward and back on the stationary bolt in the floor. Indeed the Bentley Manual says, "To adjust pushrod clearance, simply loosen the clamp bolt and move the brake pedal's stop bracket... Tighten the bolt when freeplay is correct." Does the whole pedal assembly then move? No, it looks like the little stop bracket impinges on the bottom of the brake pedal shaft, thus affecting only the brake pedal. Moving the clamp in and out moves the brake pedal back and forth, thus changing the distance between the end of the pushrod and the piston in the master cylinder. (See Fig. 4-4, p. 5-5 in the Bentley Manual). At least that's the way I think it works. However, the right-hand drive (RHD) pedal cluster has a different arrangement. The clamp on the outer end of my cluster does not appear to have any adjustment to it at all -- in fact there doesn't appear to be any method of adjusting the pedal cluster and/or brake pedal at all. I've used the pushrod for the adjustment of the freeplay, and it's always worked (I've only needed to touch it 2-3 times in 30 years, so there's not been much need to fiddle with it anyway). I took a look at the left-hand drive (LHD) and RHD pedal cluster designs on the "Old Beetle" page (see above). The two are completely different. My pedal cluster (RHD) is a lot longer than yours (LHD), since it has the throttle arm projecting right through the middle of the cluster and has to go right across the tunnel to the throttle cable link on the left side -- same place your cable is (your throttle pedal "surrounds" the clutch operating "tube" I think), and the outer clamp on mine is just to fix the outer end of the cluster. In the LHD design the brake pedal is offset slightly to the left and there is a ring of metal around the shaft that the RHD design does not have. It is this ring that has irregular cam-like shape that the adjusting clamp impinges on. The RHD cluster has three concentric tubes, one for each pedal, and both the clutch and throttle cables have to work on the left side of the tunnel (so they go right through). The brake pedal has a short tube as the master cylinder is about one inch to the left of the pedal.
|
||
|
|