|
|
|
Clutch Cable Replacement
Condition: You depress the clutch pedal and there is
no resistance -- the clutch cable is broken.
~~~
Note: Do not attempt to replace the cable on the road unless you have the proper tools, especially jack stands to support the rear of the car while you're working under it.
- Loosen the lug nuts on the left rear wheel. Raise the rear of the car and support it securely on jackstands. Remove the wheel.
- Crawl under the car and removing the clutch adjusting wingnut completely from the cable. Pull the rear end of the broken cable out of the car.
Note: Be sure to save the rubber boot that slips over the end of the tube (called the "Bowden" tube) that the cable comes out of.
- Move into the cabin to the pedal cluster under the driver's feet. Find the forward end of the clutch cable attached to the clutch pedal shaft. Unhook the cable from the shaft.
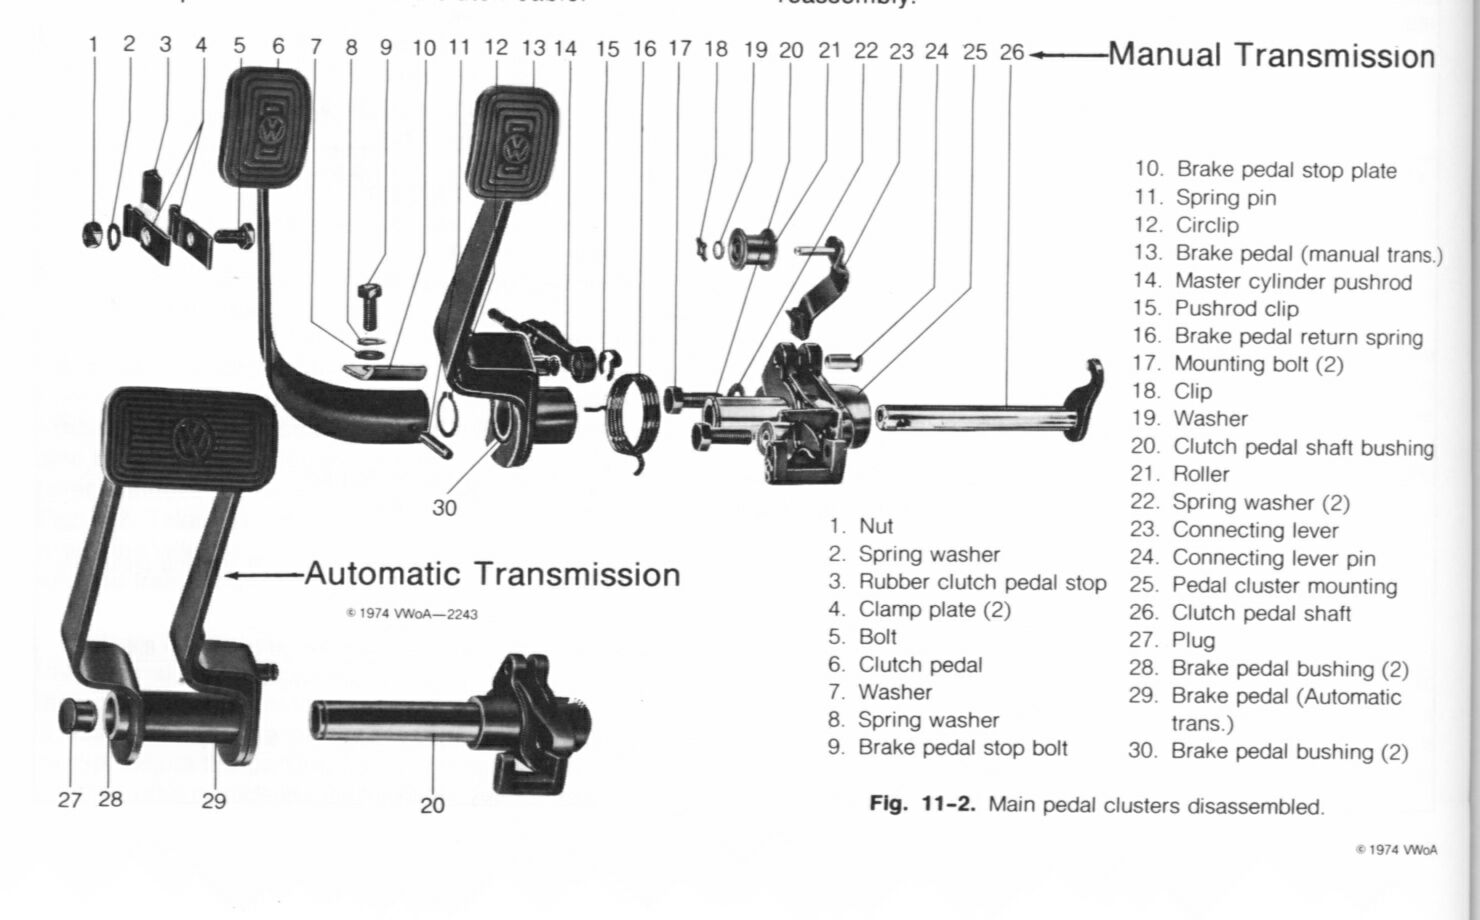
Pedal Cluster Showing
the Clutch Pedal Shaft
(Part #26)
~~~
- Note the location of the forward end of the clutch cable guide tube that the cable goes in to, as you will need to guide the new cable back into this tube.
- Pull the clutch cable forward and out of the car.
- Guide the end of the clutch cable (the one with the threaded fitting on it) into the clutch cable guide tube under the pedal cluster.
- Push the cable to the rear, coating it with multi-purpose grease as you go.
Note: Be very careful not to get grease on the upholstery or carpeting.
- Sometimes the threaded end of the clutch cable will hang up inside the Bowden tube, making it difficult to push the cable through. The solution to this is fairly simple: the Bowden tube is removable--if you can't get the threaded end of the cable to go through it, grab the Bowden tube at the gearbox end and push/bend it towards the front to free it from the holding bracket on the gearbox. You can then pull it rearward and remove it from the car completely. (Make sure the car is resting firmly on jackstands -- it will take some umph to compress the Bowden tube enough to get it out of the holding bracket, and you certainly don't want to push the car off of it's supports and down onto you!.)
- Reinstallation of the Bowden tube is the reverse -- first thread the new cable through the Bowden tube, push the tube itself into the hole that it fits in at the front end, then thread the cable thru the holding bracket on the gearbox and push/bend the Bowden tube forward so that it can be fitted back into the holding bracket. Be careful not to kink the cable as you bend the Bowden tube to get the sleeve into the gearbox bracket.
- When the cable is pushed all the way rearward, hook the forward end of it onto the clutch pedal shaft.
- Crawl under the left side of the car again and make sure the cable is protruding from the Bowden tube.
- At this point it is important to check the "sag" in the Bowden tube. This is a downward bend in the tube that imposes a little friction on the clutch cable and minimizes clutch "chatter." The bend also allows the engine/gearbox to rock on the rubber mounts without tugging on the clutch cable (which would cause bunny hops as you use the clutch.) This "sag" should be 25-45mm. To alter the "sag," install or remove "C" shaped washers between the holding bracket (on the gearbox) and the sleeved end of the Bowden tube. You can make "C" washers by cutting a section out of a suitable washer. Using "C" washers allows you to adjust the Bowden tube tension withough having to completely remove the clutch cable - just push/bend the Bowden tube forwards until it clears the gearbox bracket, and slip the "C" washer over the cable, then slide it forward on the Bowden tube sleeve section, then re-insert the sleeve end of the Bowden tube back into the gearbox bracket.
- Slip the rubber boot over the end of the clutch cable and seat it firmly over the rear end of the Bowden tube.
Note: This is quite difficult, as the hole in the boot through which the clutch cable passes is very small. I've had good success with resting a little quarter-inch hex fitting with a small pointy end (like a Phillips or Roberts) on the end of the cable, then pushing this assembly through the hole in the boot. The little pointy fitting starts the assembly through the hole, and then the clutch cable fitting follows along.
- Insert the rear end of the clutch cable through the hole in the clutch lever and screw the adjusting wingnut onto the cable.
- Adjust the clutch in accordance with oour Clutch Adjustment Procedure.
*
* * * *
|
|
