Clutch Removal and Installation
Please
see our Clutch-Related Procedures.
~~~
Note: Any time the engine is removed, check the clutch for wear and replace worn components as necessary. The relatively low cost of the clutch components compared to the time and trouble spent gaining access to them warrants their replacement -- unless they are new or in near perfect condition -- anytime the engine is removed.
~~~
Clutch Removal
- Remove the engine from the car (see our Engine Removal and Installation procedure).
Note: The pressure plate assembly and clutch disk remain on the flywheel when you remove the engine. The clutch release (throw-out) bearing and related parts stay in the transmission.
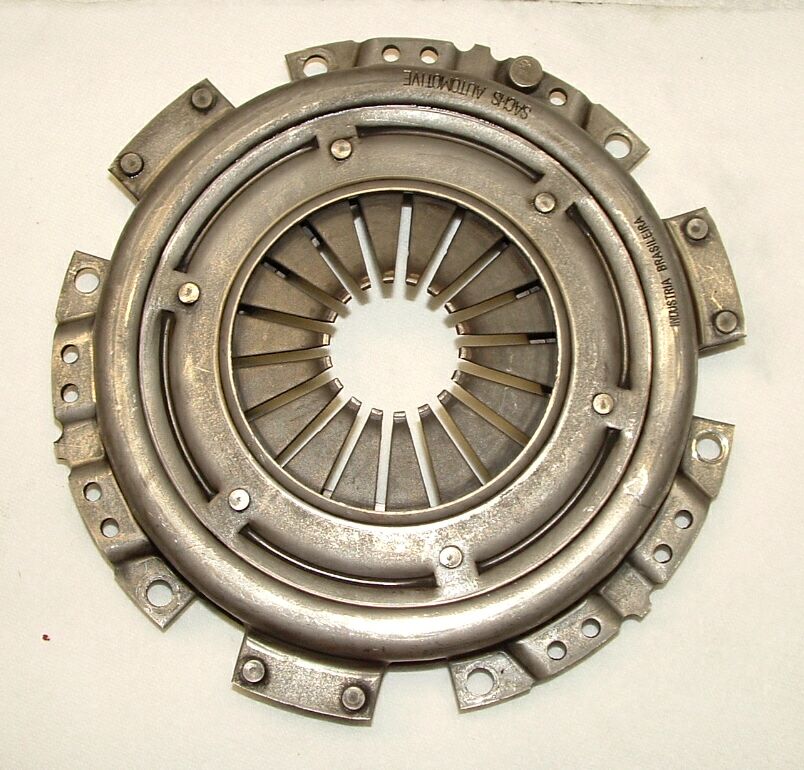 |
 |
Pressure Plate
|
Clutch Disc
|
- If the old pressure plate is to be reused, scribe or paint alignment marks on the pressure plate and the flywheel to ensure proper realignment of the pressure plate during reassembly.
- Hold the pressure plate securely and completely, then loosen the pressure plate-to-flywheel bolts by turning each bolt only a little at a time. Work in a criss-cross pattern until all spring pressure is relieved. Then remove the bolts, followed by the pressure plate and the clutch disc.
Caution: The pressure plate is under a great deal of spring pressure. If you work your way around the plate, removing each bolt one at a time, it will warp.
- Clean the friction surface on the flywheel and inspect it for wear, cracks, heat checking, grooves, and other obvious defects. Alternating brigt and dull areas indicate a warped plate. A machine shop can machine the surface flat and smooth (highly recommended, regardless of the surface appearance). Light glazing can be removed with medium grit emery cloth.
- Inspect the diaphragm spring fingers for excessive wear and make sure they are not distorted.
- Shake the pressure plate assembly and verify that the diaphragm spring, which should be under tension, does not rattle. If the pressure plate is defective in any way, replace it.
- If you will be reinstalling the engine you removed, clean the flywheel and pressure plate friction surfaces with lacquer thinner or acetone.
Caution: DO NOT use oil or grease on these surfaces or on the clutch disk lining. And clean your hands before handling the parts.
- Inspect the clutch release (throw-out) bearing. If it feels gritty when you turn it, or if it has been making noise, replace it. Never wash the bearing in solvent since this will remove the factory-installed lubricant. If the bearing is unserviceable, replace per the procedure.
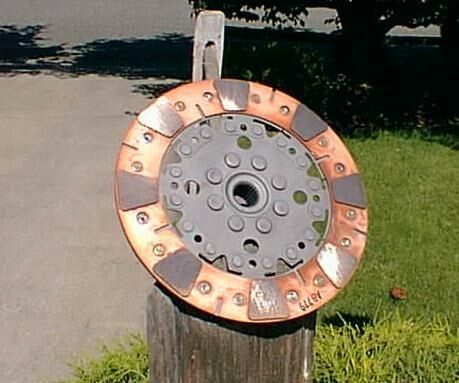
- Inspect the lining on the clutch disk for wear. There should be at least 2mm of friction material remaining above the rivet heads.
- Check the clutch disk for loose rivets, distortion, cracks, broken springs and other obvious damage.
Note: As mentioned above, ordinarily the clutch disk is routinely replaced, so if in doubt the condition, replace it with a new one. If you're planning to re-use the old clutch disk, it's a good idea to check it for runout.
- Carefully inspect the splines inside the hub of the clutch disk and the splines on the transmission input shaft. They must not be broken or distorted. Lubricate the splines in the disk hub and the splines on the input shaft with graphite or molybdenum disulfide powder (Rob's last replacement clutch plate came with a tiny tube of special "spline" grease to be smeared sparingly on the splines).
- Verify that the clutch disk slides freely on the drive shaft splines without excessive radial play. If the clutch disk is in any way unservicable, replace it.
Note: You're probably replacing the clutch disk anyway, but if the splines on the input shaft are damaged, you'll have to replace the input shaft as well.
Note: If you are replacing the main oil seal, remove the flywheel at this point and replace the clutch after the flywheel has been reinstalled.
~~~
Clutch Installation
- Install the flywheel, if removed.
- Clean the flywheel and pressure plate friction surfaces with lacquer thinner or acetone.
Caution: DO NOT use oil or grease on these surfaces or on the clutch disk lining. And clean your hands before handling the parts.
- Position the clutch disk and pressure plate against the flywheel with the clutch held in place with an alignment tool (the best alignment tool is an old input shaft, or there is a commercially-available inexpensive one made of plastic).
Note Product Instructions from Aircooled.Net -
Clutch Pilot Tool - Using the clutch alignment tool can take a lot of the headache out of installing an engine. Instead of eyeballing to see if the clutch is centered, simply install the clutch alignment tool into clutch disc, and tighten the pressure plate (a turn per bolt, rotate around). The tool will keep the clutch disc centered so the engine goes onto the transmission easier. After you are finished, simply pull the tool out, clean, and save for the next time you need it!
Note: Lacking a centering tool, you can just get down to flywheel height and "eyeball" it. The worst that can happen if it's not exactly centered is that the last inch or so of engine installation might take a little more shoving.
- Make SURE the clutch disk is installed properly (most replacement clutch plates will be marked "flywheel side" or something similar. If not marked, install the clutch disk with the damper springs towards the transaxle.
- If you're reusing the old pressure plate, make sure the marks you made on the pressure plate and the flywheel are matched up.
- Install a clutch alignment tool into the center of the clutch disc you intend to use. With the clutch disc on the alignment tool, install the tool into the end of the crankshaft. Make sure that the alignment tool extends through the splined hub and into the needle bearing in the gland nut. Wiggle the tool up-down and/or side-to-side as needed to bottom the tool into the gland nut.
- Make sure that the clutch disc is against the flywheel, then install the pressure plate.
- Loosely start the six mounting bolts in the flywheel. Tighten them "crosswise", back and forth across the plate to prevent distorting the cover. After all the bolts are snug, torque them first to about 10 ft-lbs and finally to 18 ft-lbs.
- Center the clutch disk by ensuring the alignment tool extends through the splined hub and into the needle bearing in the gland nut. Wiggle the tool up-down and/or side-to-side as needed to bottom the tool into the gland nut.
- Loosely install all of the mounting bolts. Tighten them "crosswise", back and forth across the plate to prevent distorting the cover. After all the bolts are snug, torque them first to about 10 ft-lbs and finally to 18 ft-lbs.
- Install the clutch release bearing if removed. Be sure to lubricate the bore of the release bearing and the outer surface of the central guide sleeve with high-temperature grease, and apply multi-purpose grease to the contact areas of the forks on the release shaft.
- Reinstall the engine in accordance with our Engine Installation Procedure.
- Adjust the clutch pedal freeplay in accordance with our Clutch Cable Adjustment Procedure.
*
* * * *
|
