|
||

|
|
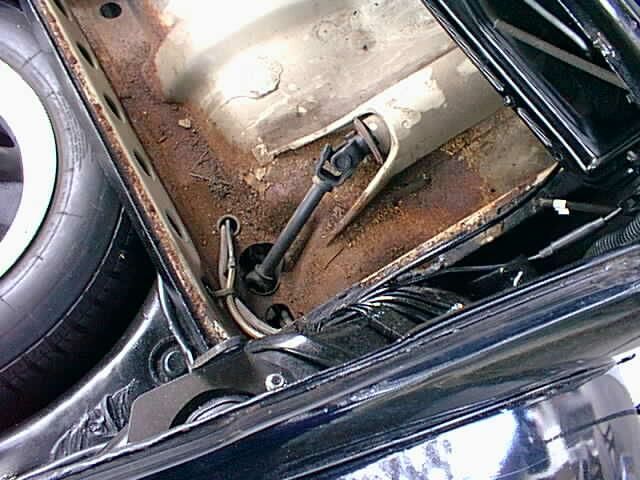
Fuel TankFuel Tank DescriptionThe fuel tank in an aircooled VW Beetle is located in the front of the car in the luggage compartment. It is held in place by four retaining plates and bolts, two on each of the side flanges of the tank. Between the flange and the body of the car, all the way around, there is a foam rubber seal that must be replaced whenever the fuel tank is removed, as it is difficult not to damage it. The fuel tank filler, up to the 67 model, is on top of the fuel tank, inside the front luggaage area. From 68 onwards the filler port is on the right side of the tank; it connects through a heavy rubber tube (with hose clamps) to the filler, which passes through the body of the car on the right side and is held in place by the filler neck seal. Depending on the model and year of your car, there may be a number of vent ports on the rear side of the tank with associated tubes running to an expansion chamber or the like. Up to 1961, the car has no fuel guage, but has a reserve tap mounted on top of the tunnel near your feet. Upright is the main tank, and 45 degrees to the right is the reserve, which is 5 litres (about 1.5 US gallons). If you use the reserve tap, remember to move it upright to "main" after you fill up! On 1962 through 1967 cars a cable attaches to the fuel gauge indicator mechanism under a cover in the top of the fuel tank. On 1968 and later models the sender is electric - up to about 1972 there is a single wire connector, and after that a two-wire circuit is used. This mechanism is discussed further in our Fuel Tank Removal and Refurbishment Procedure. Fuel exits the tank through a port and rubber tube at the bottom of the tank; this tube protrudes through the body to the underside of the car, where there may be a fuel filter. The rubber line from the fuel filter attaches to a metal fuel line running to the rear of the car. Please see our article on the Fuel Line for more information. Note: On standard bugs, the fuel tank outlet has a wire gauze filter mounted on top of it, inside the tank. This is a course filter, and does not prevent fine particls entering the fuel lines. Fuel Tank ExperienceDuring the restoration of Dave's '73 Super Beetle, it became necessary to replace the universal shaft in the steering assembly. To replace this shaft, the fuel tank must be removed. Dave decided that as long as he had the fuel tank out of the car he might as well refurbish it, inside and out. In addition to complete refurbishment of the fuel tank, this little project evolved to include replacement of all of the rubber and hoses associated with the tank, as well as refurbishment of the area underneath the tank, which was quite rusty (see picture). Our Fuel Tank Removal and Refurbishment Procedure was developed from Dave's experience with this fuel tank refurbishment process. Other pertinent notes related to this experience are given here. One of the more difficult aspects of this job was getting the fuel filler tube off of the tank. It was here that we discovered the source of the gasoline smell in the cabin -- the fuel neck seal was badly deteriorated and allowing gasoline to leak into the area underneath the fuel tank on every fill-up. Dave was finally successful in finding the replacement filler neck seal at Wolfsburg West. One of our various contacts recommended grounding the car before draining fuel from the tank and removing it. Fuel creates static electricity as it runs out during defueling, and static electricity plus fuel vapors create large explosions. Another contact wrote - When you run the tank down near empty you are also allowing any sediments and general crap to enter your fuel lines. Almost any gas tank in any car has depression areas in the bottom of the gas tank. The crap and water that has condensed is supposed to settle into these low areas and not enter the system. Rob responded - This is true in a general sense, but running the tank low should not make any difference here -- the fuel outlet in the tank would still be ABOVE the sump area, so contaminants still should not get into the line. And if there is so much crud in the tank that it's filled the sump area, it would get into the fuel line with a full or near empty tank, and show up in your filters. There was an excellent article about refurbishing the VW fuel tank in the June 2000 issue of "VW Trends". Dave ordered all the POR-15 cleaning and refurbishing chemicals from John Connolly (Aircooled.net). Another contact recommended - "While you've got the tank out, this would be a real good time to change the hoses that go from the brake fluid reservoir to the master cylinder. Be sure to use actual brake-fluid hose and not fuel hose! (John at Aircooled.net has it)." Once his tank refurbishment was complete, Dave had a problem with clearing the vent lines. See the note to Step #20 in the Fuel Tank Removal and Refurbishment Procedure to learn how Dave finally got the vent lines cleared. With the vent lines cleared, Dave wondered if it might not be a good idea to rinse the tank thoroughly with gasoline before reinstalling it. Rob advised that it would indeed be a good idea, but cautioned that "even then you may not get all of it out (unless you use a lot of fuel!) as it will tend to stick as it's sloshed about, but I'm sure it would help. The filter under the tank would take care of anything left behind, but it might be a good idea to change this after a few thousand miles or so, just so the whole system is then clear of rubbish." Dave refurbished not only the fuel tank, but also the area beneath it, which was quite rusty. With all of the nooks and crannies there, Dave found it necessary to wire brush by hand, with very small brushes. He found that there were some places he just couldn't get to; for instance, right in front of the gas tank the cross member is in two parallel parts, with dollar-size holes in the tank side. Dave found that it was rusty in there, and not a great deal he could do about it. Rob recommended using Fisholene (de-smelled fish oil from the auto shop) in those areas that couldn't be completely cleaned. Outstanding stuff, Rob said, even though it does still smell a bit for a week as it slowly dries. It soaks right into the rust and seals it. (Dave couldn't find it in his local auto parts store in the US.) Regarding the various fittings and vent lines and such -- Dave installed an L-fitting in the large piece of tubing that fits onto the filler neck and goes around to the top vent in the tank. He found that the new tubing won't bend sharply enough without crimping to go around to the vent nozzle on the tank, so he installed this fitting to make sure the line is clear. Rob said that if you HAVE to use flexible tubing for a sharp bend you can prevent it kinking by wrapping the tube in thin fencing wire like a spiral at the bend area. May not look really neat, but it works. Dave secured all of the filler hoses and vent lines with hose clamps. He used a total of eighteen hose clamps to do the job!
|
||
|
|