|
||

|
|
Surface Prep and Paintwith the surface prep and painting of "Black Beauty," his 1973 Super Beetle. Topics discussed in this article are as follows -
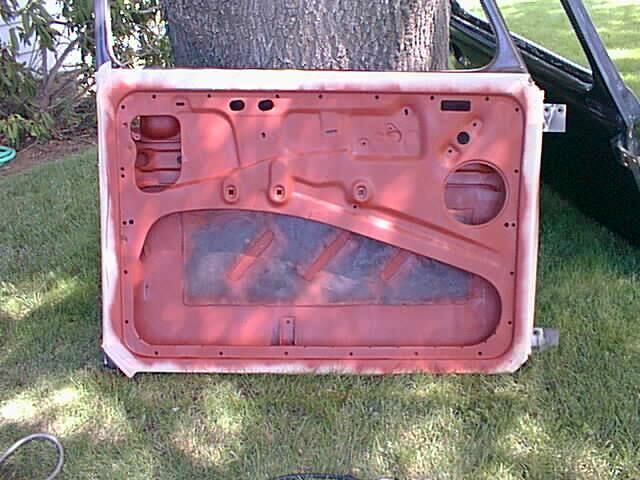
Preliminary Thinking... DecisionEarly on, Dave wrote - Someday Id like to strip this car down, remove all the rubber and the chrome and everything, and do a decent paint job. The paint job we have is very poor. When we get to that point, I plan to do most of the prep work myself -- I'd like to strip the car right down to the bare metal. I don't have enough confidence in my painting ability to do that part of the job myself -- I'll leave the actual painting to the pros. Bottom line -- I want to clean everything up nicely and give it a nice paint job so that when I put it all back together it will be way beautiful. Rob - I'm toying with the idea of doing the painting myself, but I'd have to get the right gear -- Ive only got a low pressure ('reverse vacuum cleaner') type of spray gun -- not quite up to auto-paint standards. And compressors are expensive to hire or buy. I should join up with one of the VW clubs -- sure to be some gear for loan out there someplace. I have painted cars before with moderately good results, and would love to do it for the 'ownership' of the resto work, but I also want a great result, and this can be difficult for any vehicle which has had silicone polish used on it anytime in the past. This stuff soaks in to the paint and prevents a proper sticking of new top coats, despite several methods of coping with it. Much better to strip the paint down to bare metal and start again, but this adds another element -- getting all that paint off -- sand blasting or paint stripper = more work and expense. More cogitating necessary. Dave - My wife and I have been talking, and I think weve decided were going to get the Bug painted right away (actually it was her suggestion!). Its a logical time to do it. I already have one window out and two fenders off, so it would be smart to just remove the rest of the windows and the two rear fenders, then get the job done. I'm very worried about the cost, though -- the kid across the street restored a beautiful rust-colored Ford Fairlane -- he did all the prep work himself, and the painting still cost $2500. I've gotta find a place that will do a good job for me for less than that. My wife says I oughta buy a spray gun and do it myself! I don't think so! That's WAY beyond my level of incompetence! Rob - It's really not that hard, but you DO need a still warm day (no dust), out of the direct sun, and be prepared to do it again if you get it wrong. (practicing on one fender is a good idea). I've painted cars on two occasions, both with little experience, but both came out looking OK. The second time was my '68 Bug. Years later THAT paint started to peel and I found out THEN about anti-silicone etc. :-( Cleaning/Painting UndersideDave - I've almost got the underside cleaning done -- what a job! I went to the auto parts store at noon today and bought a spray can of corrosion-resistant paint -- I'm going to use that to paint the underside of the body and the deep inaccessible places. Painting is next on the list -- first the underside of the car, then the heater boxes and and muffler and associated stuff with heat-resistant paint (after thorough wire brushing). That will represent the turning point from tear-down to re-install. (Later) This high-temperature paint is very slow drying. I put on two coats. Overspray/MaskingDave - I'm sure I'm going to have to do a lot of sanding and paint touch-up when I remove the front and rear windows. The other day I wire brushed the top of the engine lid in place, as there were a few chips and the old yellow paint was showing through. Then I carefully masked all along both sides of the joint between the lid and the body and painted the lip with spray paint. To my dismay, I discovered when I took off the masking tape it was too narrow (I thought 2" would be wide enough), and I got some overspray on the finish. I think I should be able to rub it out with some very fine rubbing compound, but I want to make sure I don't mess up even more, as I've put some fine scratches in the finish of this car with rubbing compound before. I've got to start getting real smart when it comes to body/finish work, as I have lots of it to do. Any suggestions? Rob - There's no easy solution once the paint has dried, but if the car had been polished previously the spotted paint won't stick very hard and could be carefully picked off spot by spot with a sharp knife or razor blade scraper. I always use a two-strip method of masking. Use a strip of masking tape to get a fine edge (just as you've done) and then get newspaper and more masking tape, place the masking tape half over the edge of the newspaper and then stick it along the first layer of masking tape. Then use bits of masking tape to hold the opposite edge of the paper so it doesn't flap in your face when you are painting. Spray paint will drift quite a distance. On the new finish - I've also seen special paint masking stuff in the hardware shops here -- soft stick -- but this is usually a fold out strip with sticky on one edge so it lays out from the skirting board on to the carpet etc. -- you have a 3-4 inch anti-splash zone. Designed for use in the house really -- around windows and such. Probably not quite right for the car. I only mentioned it because it has a soft sticky strip which won't pull paint off. A "finger trick" I learned when making model aircraft -- too much sticky would rip the tissue paper wing coverings. Run some masking tape through your fingers to reduce the sticky and make it easy to remove. You can keep pulling the masking tape through your fingers until it just holds -- like the paste on a post-it note. Regarding protecting the interior - Yesterday I covered the hood and the windshield opening with plastic. I found that I had to pull back the headliner from around the window opening, as the masking tape wouldn't stick to it. Wouldn't stick to the yellow paint under there either, so I had to sand it a bit. I'll have to reglue the headliner after the car is painted. (I've become very adept at using contact cement!) Surface PreparationAs he contemplated the prep work, Dave wrote - It's looking more and more like I'm going to have to do all of the prep work myself. Having never prepared a car to be painted before (sanding, etc.), I'm just a bit apprehensive about this. I know I'm going to have to remove all of the windows and the rubber (all of which will be replaced). And I'll remove the fenders and the hood and I guess the rear bonnet. Rob - It's hard to advise about this, since the quality of the current paint is unknown. If it's in poor condition it might be better to take it off and start again, but it might be OK with just a good scuffing with 400 wet/dry or thereabouts so the new stuff will key properly. You certainly won't need to take it back to base metal - the VW paint system was very good. But you have to make sure the paint guys use a paint that is fully compatible with the VW paint - enamel I think. Dave - I really need to find a good book that explains exactly how to sand the car, what tools to use. I know that the prep work is by far the most important part of the refinishing process. Rob - You got that right -- it's about 90% of the job, and the coat of paint is the other 10%. Dave asked - Of course I will have to grind out the rust spots and prime them, and (as you say) give the existing VW paint a good scuffing so the new paint will adhere properly. So - what tool should I use? I have a disk for my drill that is designed for removal of paint. Will that be adequate for most areas, with exception of the rusted spots, of course? Rob - Should be OK. It will probably clean up the rust too, though sanding the metal with dull the paper fast. I looked at a car magazine at lunch time (browsing at the newsagent :-) They were using a special paint (forget what it was called but something like Prep-paint) in a contrasting colour to the primer -- to lightly cover an area, then block sand it (rubber block etc). Any hi-low spots show up in the shading, so then they refilled with a thin coat of filler, repainted with the pre-paint and sanded it again until ALL the prep-paint came off evenly. Each time using a finer paper - down to 400 I think. Then it was re-primed before the top coat went on. Four paint and sand operations before the top coat! Paint StripperDave (ever the chemist) wrote regarding the use of methylene chloride as a stripping chemical - My Merck Index says that methylene chloride is soluble in 50 parts of water, also miscible with alcohol and ether. Sax's "Dangerous Properties of Industrial Materials" adds that methylene chloride is soluble in water and miscible with alcohol, acetone, chloroform, ether, and carbon tetrachloride. Rob - The stuff I used on the veranda said that for plastic paints it worked best if mixed with a little water -- and it was miscible/soluble (turned slightly milky in appearance). Bob Hoover said that when methylene chloride is used as a carburetor cleaner it uses kerosene as a carrier, and that it also dissolves in diesel fuel. Your list doesn't include straight hydrocarbons. So does that mean as a carburetor cleaner is would be better to use acetone? I have several litres of 99% methylene cloride left, and I thought it might be worth using as a carburetor cleaner. My 30-year old carburetor has never had a deep immersion clean before, and I bet it would look like new. Dave - The American Conference of Governmental Industrial Hygienists (ACGIH) lists methylene chloride as a suspected human carcinogen, and the Threshold Limit Value in air (above which it is dangerous to breath the stuff) is only 50 ppm. It is an eye and severe skin irritant. Rob - It certainly IS an irritant. I was standing well clear and using a long wand on the high pressure cleaner as I removed the paint from the walls. A few spots on the back of the hands was enough to ensure I kept my distance! :-) I used rubber gloves when painting it on the walls. Using it on cooler days proved better than warm days -- it evaporated more slowly and so did a better job on the paint. Dave reported on a little sample of "environmentally-friendly" paint remover - I smeared a little of it on the top of the car. It didn't appear to do anything after about an hour, so I let it work overnight. I was very ineffective as a finish remover. Dave went after the right rear fender of his car with methylene chloride. He decided that the paint remover route is the ONLY way to go, and methylene chloride is the paint remover of choice. The stripped fender and the entire stripped car are shown in picturesbelow. Dave completely covered all of the window and door openings before I starting to strip the body in earnest. It is very important to keep the methylene chloride stripper from getting into the car, as it tends to bleach things that it comes in contact with. BOTTOM LINE on paint removers - Methylene chloride is clearly the paint remover of choice for stripping the paint from a VW body. However, methylene chloride is very nasty and must be used with appropriate personal protective equipment. Read and follow the label instructions!
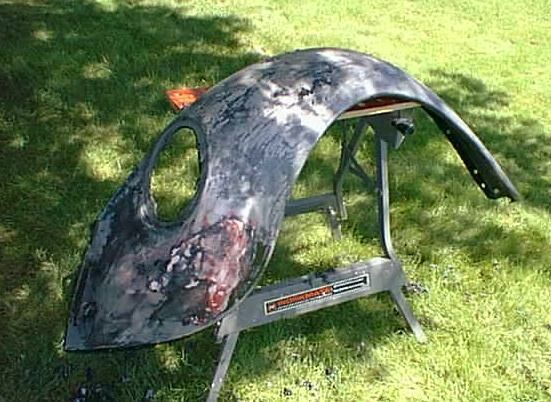 Stripped Fender
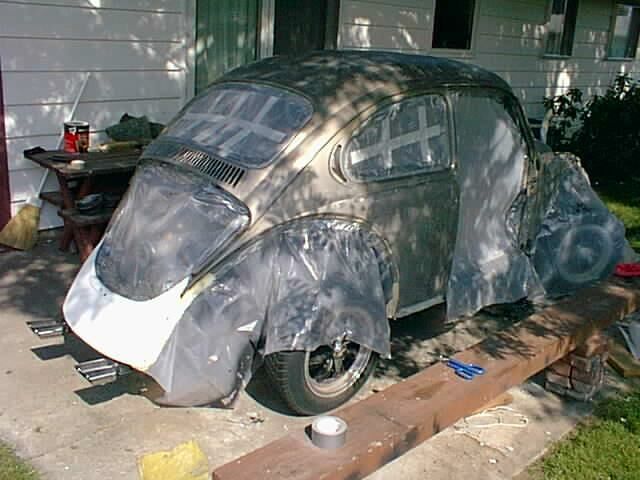 Stripped BugGrindingRob wondered whether the grinder discs clog up easily, or does is just turn to dust and fly away? Dave - For the areas to which I needed to add bondo I used a 120-grit sanding wheel on the grinder. Unlike the sandpaper that I use on my sanding blocks (and by hand), the sanding wheel doesn't clog up very readily. It's made up of a whole bunch of overlapping pieces of sandpaper. But it does create a lot of dust. Old PaintDave wrote regarding the black paint that was then on his car - It's VERY poor. In places like the inside of the door jams it peels off in chunks -- it's almost like a thin layer of plastic. Rob - The previous paint hadn't been "keyed" properly, and the new paint probably was not treated with "anti-silicone" to cope with the polish on the old paint (silcone polish can be a real problem I'm told). Air VentsDave had a particularly hard time stripping out the paint inside the rear air vents, above the hood lid. Someone else expressed the same frustration - "How in the world do you prep the area behind the louvers above the engine? No one has fingers that small! Rob - Yes, it's area difficult are to get to. The sand blasting with a very small nozzle is probably as good as you'll get. I've also heard restorers say that the "internal panel with the slots can be removed by drilling out the spot welds, then the area can be fully restored before re-welding the panel back in. Sounds like a LOT of work to me though! Dave primarily used the small steel cleaning bushes (a bit larger than a toothbrush) coated with the methylene chloride-base stripper, but even these were too large. Dave had some success cutting the brush down a bit, but he never was as successful as he would have liked in getting this area clean. Lots of patience, and lots of elbow grease, unless you have access to a sandblaster with a very small nozzle. Fender UndercoatDave - I got some "Paintable Rubber Undercoating" in a spray can (what WON'T they think of next! :-) that I'm going to use to undercoat the new front fenders, since they are only primed. Paint NotesDave found a recommendation regarding paint - Use a high-quality paint, like Spies-Hecker two-stage base coat/clear coat ... Rob - I've heard this stuff is good (don't know if it's available here in Australia) and can be had in genuine VW colours. John Henry (The Bug Shop) mentions this paint. Dave finally settled on his paint -- a 1999 BMW color called "Cosmos Black Metallic" -- really beautiful -- black with tiny blue flecks. Painting ConditionsRob wrote regarding hot and dry weather relative to painting - Hot and dry weather is excellent, except when it comes to painting. Painting needs to be in a booth in that kind of weather -- there is too much dust otherwise. When I painted my Bug (out in the weather) many years ago I chose a warmish but very still day. Even so I still got a few dust particles in the paintwork -- I could notice it even though no one else did. Dave asked - I'm doing the prep work outside, and it will probably take me several days to sand the body. Is there danger of rust forming on the bare metal before I finish? Rob - It won't be a problem unless you get some moisture in the air. If they do the job right they'll wipe it with solvent before priming, just to get rid of any remaining dust/grease/rust particles. The DoorsDave asked - What about the doors? I know I'll need to take the panels on the inside off, but what about the doors themselves? I worry about painting the hinges. Rob - The doors are easy enough to remove (once you can unstick those large Phillips Head screws!) and would make it easier to paint, but you might be better off checking on this with the paint places. Dave - Tonight I'm going to clean/sand/paint down inside the window openings in the doors where the felt channels and scrapers go. Then I'm wondering what you think -- should I reinstall door latch mechanisms and the window channels (clip in on the rear side of the window, felt channel fits in) and regulators before I have the car painted? Rob - Better to have the door stripped totally for the painting. Means there's less masking, and less chance of bad edges. It will look a lot more "professional" to your critical eye to have no overspray etc on the mechanism and so on. The only thing is that once it's painted you'll have to take care not to scratch it whilst reassembling the door -- but you'd be taking care anyway.
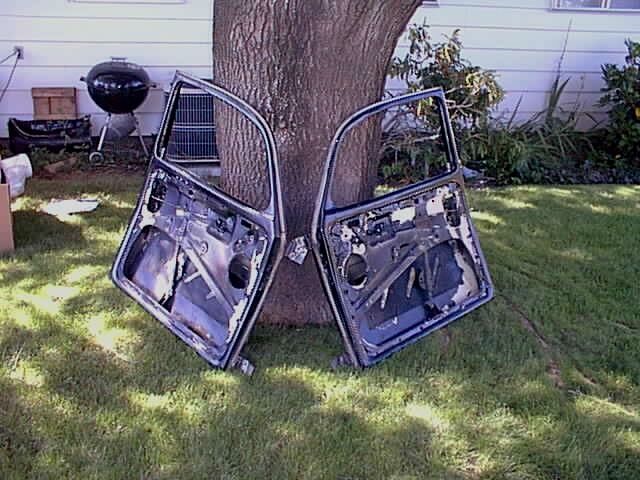
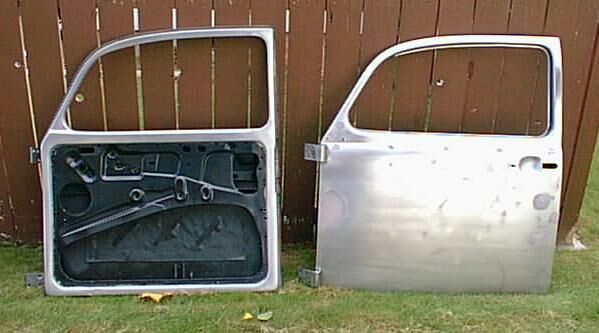
Doors RemovedDave - Today I'm going to apply some more paint remover to the right door. I hope to get all of the paint off of it before day's end, then I will spent tomorrow sanding and filling and sanding and sanding and sanding...
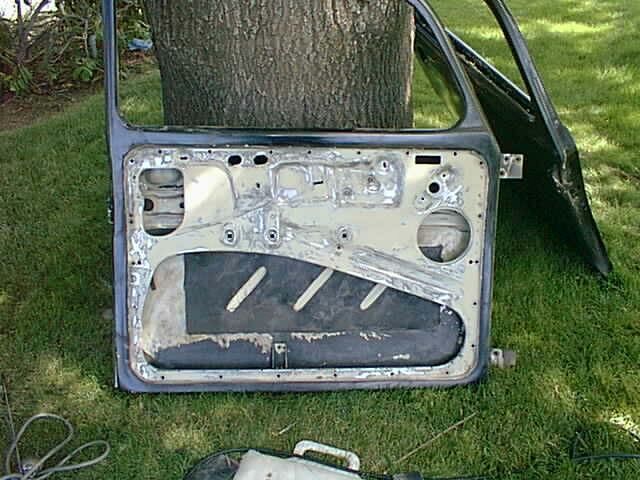
The Driver's Side Door - Ready to Prime
The Driver's Side Door - PrimedAt about 2pm, no matter where I am (!), I'm going to quit and take the doors to the shop. There's only so much fun a guy can stand! :-) The hood is next. I know that there's been a lot of repair to the front of it - I'm going to be very careful there so as not to damage the existing filler too much. I think I will try to just sand the paint off in that area, as the paint remover tends to soften the filler and damage it. . . I started working on the doors at 7 o'clock this morning, and I finally got them to the shop at 5pm!
The DoorsRob - What a great job - those doors look clean enough to eat off! Interior ProtectionDave - My biggest worry -- how best to protect the interior during all of this. Rob - A good question. I guess it would be best to mask off/seal the whole interior, but once again, the paint shops could advise you on this. I was delighted to find a donor body with a suitable colour (either white or blue was my choice and it's white) so I dont have to try and change the interior paint colour if I decide to repaint the outside. Dave - I am as concerned about keeping the mess from the sanding, etc. out of the interior of the car as I am keeping the overspray out. The black interior will show the dirt and overspray very clearly. I suppose it may be a good idea to put in the new dash cover while I have the windshield (windscreen :-) out -- I think it would be MUCH easier. Dave's ProgressDave reported his progress with his painting project - By the end of the day tomorrow I should have the car completely torn down and ready to have the paint removed. I'm sure glad I'm doing this -- I'm finding yellow paint under the black everywhere... Tomorrow I'm FINALLY going to begin removing the black paint in earnest. I'm going to start with the rear fenders. A progress report - I just got off the phone with the manager of the paint shop over in the neighboring town where I took the fenders. He said I did a pretty good job of surface prep on the fenders... I worked some more on paint removal last night. I'm working on the driver's side door. I've got the inside of the door all stripped down (around the window and the center part that I finished off previously and now have covered with masking tape and plastic). I started on the outside surface of the door last night, but didn't get very far before I got tuckered out and quit. That black paint is REALLY hard to get off -- required three stripper coats in some cases. I worked to the nose of the hood with #80 grit sandpaper) this afternoon and got a surprising amount done in an hour or so. I wanted to define the limits of the bondo - didnt outline all of it, but I found the extent of in, anyway. Not too bad, except for one little area on the lower left where its cracked and will have to be replaced. Its really interesting to sand down through the layers. From the metal up, there are two coats of primer, then the original VW topcoat (cream color on this part of the car). Then a coat of black directly over the cream - followed later by bondo where necessary directly over the black, then a coat of primer, then a second black coat (undoubtedly applied later), and a clear coat. Its no wonder Im having a hard time getting the paint off! . . . Rob - I'll say -- it's got quite a history! And the black/bondo/primer/black says it's had a hit after it was painted black the first time. Progress, continued - I came home a little early this afternoon and got a couple of hours in on the Bug. I'm making good progress on stripping the hood. There sure is a lot of paint on that car! It's a good thing I'm doing the prep work, as arduous as it is - I'm sure the shop would charge me an arm and a leg if they had to do it! I'm having a problem deciding just where the inside/outside interface should be. Rob - I can understand that -- it was one of the reasons I decided to keep my current body white rather than paint it the light sky blue (60 colour) I would really like -- just too expensive for me to have to paint the interior too. Dave - It's the door frames that I'm unsure about -- like the surface of the frame where the interior light switch is on either side. It wraps all the way around into the car - I'm not sure I want to go that far. As soon as I get the steering wheel hub painted and the rear apron replaced, I'll be going after the main part of the car big time -- and it won't be long before I'll be able to show you a picture of Black Beauty without the black! Note: Dave installed a tow bar on his Bug and towed the car to the paint shop behind his Little Red Truck. See the picture below. (Please see our article on Towing.)
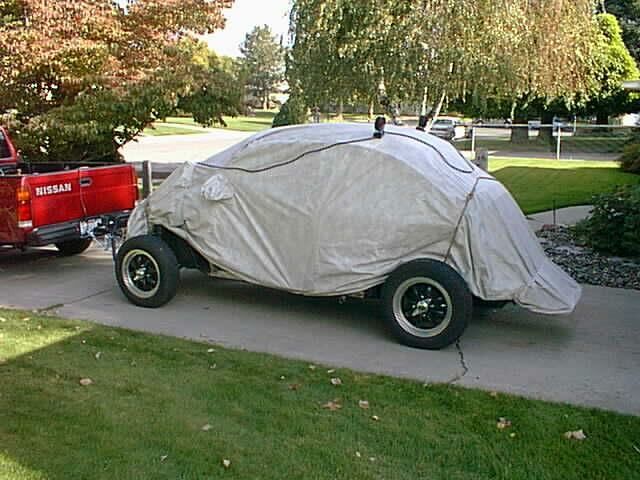
Off to the Paint ShopProgress, continued - I'm getting more and more excited about seeing the car roll out of the paint shop! The shop is doing the final touches on the body work -- they are going to sandblast the air intake vents on the back of the car with a small sandblaster. I did SO much work on the body -- probably got it 90% there or so; now the pros are going to make it perfect. The car is going to be SO gorgeous! Anyway, the paint shop guy said that they are going to "shoot" (i.e., paint) the car with the color and clear coats on Tuesday or Wednesday of next week. BUT -- they have the old fenders cleaned up and stripped, and the antenna well is now WELDED in place! They also got the holes in the top of the fenders where the turn signals were filled with round pieces of metal, welded in place. So MUCH better quality than before. . . The car is going into the paint booth TODAY! "How exciting!" The manager of the paint shop took me into the shop to look at the fenders and doors and hood and stuff. I just can't describe to you how gorgeous they look! Beautiful, shiny black, with tiny, tiny blue flecks when you look at them obliquely. Nine coats altogether. The following Spring, after initial painting, curing and reassembly -- Black Beauty has been returned to the paint shop!! I asked the guy there to go over her with a fine-toothed comb, and he promised me that he would.
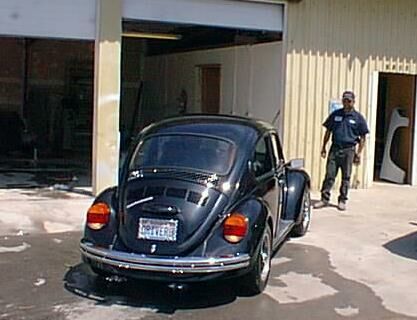
Out of the Paint Shop for the Last Time!Rob's comments did Dave's heart good - What a top looking Bug! he said. The blue fleck just shows up in the pic - outstanding. I can well imagine you turning a few heads driving that home... Congratulations on a great job! CuringDave - The Bug is really looking great -- even though I can see it still needs a polish (after a cure period), it looks so even and mat-shiny it's obvious it will look outstanding when finished. Rob - If he said it needs to cure first I think he must be a "real" paint specialist - so many would give it a quick buff a day or two after the paint and call it complete - a year or two later you'd be wondering why it was looking very dull. ConclusionDave - The experience that I NEVER want to repeat is the removal of SIX layers of paint! And then all the Bondo and sanding -- not exactly what I'd want to do for a living! I got it about 90%, then let the paint shop finish it up. I was MIGHTY sick of it by then, believe me! I wish I had all the $$ I spent on methylene chloride in my bank account! I took my son over to the paint shop and introduced him to the proprietor and showed him the place where his car was worked on. There is a chip on the hood now, probably a rock ding or something -- I had the paint shop guy look the car over and give me an off-the-top estimate to repair everything -- $250! Sounds a bit steep to me! I'm going to see if I can get a bottle of touch-up paint and fix it myself. Dave went to the paint supplier and got a pint of the paint used on his car -- BMW "Cosmos Black Metallic," PPG #9949 -- for use on very small dings and such. Much better than the little bottles of touch-up paint you can buy, which never match exactly and tend to dry up after only a few applications. As time permits, Dave is grinding any rust out of the several small dings or scratches with his Dremel (mostly on the edges of things), then applying primer, and finally finishing off with the "Cosmos Black Metallic" paint, applied with a small brush.
|
||
|
|