|
||

|
|
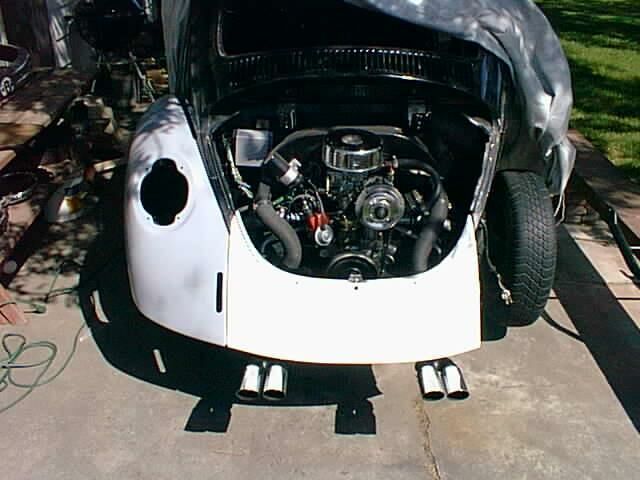
Rear Apron ReplacementDave wrote regarding his first inspection of the rear apron on his '73 SB - While laying on my back looking up at our Sports GT muffler I noticed from the inside the two little cutouts (I don't know what to call them) that the peashooters on the stock muffler extended through towards the rear. Whoever "customized" this car installed a new rear apron right over the top of these cutouts so that the bottom of the apron is level all the way across. The four large chrome bells on the GT Sports muffler (two on each side) extend out the back below the lower edge of the rear apron. On closer inspection Dave found that some enterprising PO filled the apron with a thick layer of body putty, and it was cracking badly (which it will do if applied too thick or with insufficient care, according to Rob). "The rear apron has just been a piece of garbage riding around on the back of the car!" Dave wrote.
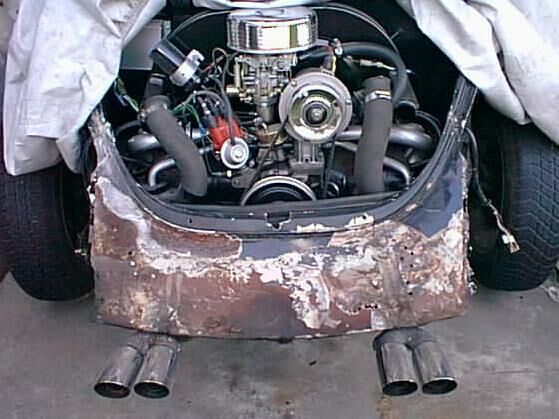
Old Rear ApronA couple of years passed; Dave finally decided that the best way to fix the rear apron was simply to replace it. Finding a replacement apron without the "peashooter" cutouts, however, proved to be a problem. The following conversation documents Dave's progress while replacing the rear apron on his '73 SB. Dave wrote to Rob - West Coast Metric gave me a list of places to try for the rear apron. One was Innovations in Fiberglass in Phoenix, Arizona, who make specialty parts for Volkswagens. And they make a fiberglass rear apron without the cutouts (that's the only way they make them) for $69, so now one of them is on it's way. The guy said you can attach the apron with some kind of quick-release fastener to facilitate engine removal. Rob - Now that's interesting. I wonder if it makes any difference to the stiffness of the rear of the car if it's just "quick release". Might still be OK once the fenders are bolted on. I'm thinking about the bumper mounts here -- wouldn't want them wobbling about with the weight of the bumper hanging off them. The ends of the body panels with the bumper hangers on them have very little of their own sideways strength -- and would use the rear apron and the fenders to provide this. If the stiffness is OK, being able to remove it for engine removal would be great. The early Busses (up to '71 I think) had this feature, so you could remove rear bumper, rear engine support (not used on beetles), and apron; and just roll the engine backwards out of the van. Dave - I don't see how this would be possible in the Bug. Removing the rear apron would make the job easier (especially in our car, with the Sports GT muffler), but I'm not sure it's wide enough, even with the rear apron removed, to pull the engine straight back. Rob - Looking at mine I thought it might, but my rear end may be a little different to yours. Different engine tin so maybe the rear apron is a little different too. Dave posted to the RAMVA Newsgroup - I would like to make my rear apron removable on my '73 SB. I have found a supplier for the quick release fasteners, but I would like some ideas and pictures on how to cut and form the sheet metal. Someone responded - I did mine and you cannot tell. The first thing to do is remove the rear bumper and the rear fenders, then the engine so you have room to work and the deck lid seal and it is easier if you remove the back part of the firewall insulation. Now, if you look you will see the rear apron is spot welded on by a dozen or so spot welds on each side. You can buy a spot weld cutter or for much less, a split point drill that is big enough to drill out the welds. Drill carefully until you have drilled through one layer of the weld. Look on top and you see the beginning of a weld that welds the panel on and runs down the inside of the apron inside the engine compartment. Use a cutoff wheel to cut through this weld and the inner part of the apron metal. The apron will pull aft when this is done completely, and the spot welds are all removed. Clean up the cuts so you don't have jagged edges to cut your fingers or you will!! The rear apron can now be replaced and held in place with two fender bolts on each side when you reinstall the rear fenders. From this time on, all you have to do is loosen the rear fender bolts about three turns each except for the two on each side that hold the apron on. Remove them and the bumper, pull the apron off and you have a clear shot at the engine. Pulls out of my '70 Bug as easily as my '71 Bus. You might have to do some sanding or wire brushing to find all the spot welds but once you start they will be pretty evident. Once I got started the job was easy. You don't have to, but it looks neater if you weld in the holes where you drilled out the spot welds and dress them flat. They need to be flat so they don't interfere with the fit of the apron. Dave wrote - I got started on removal of the rear apron -- got all of the welds down the right side drilled out. This is going to be interesting -- the instructions from the guy on RAMVA said to take out the engine -- and now I see why. There are a series of welds on the FRONT (front) side of the apron, inside the engine compartment. And there are a couple of small seam welds at the top which will need grinding carefully to remove. Drilling out the welds in the engine compartment is going to be a challenge. I'm going to hold off going after them until the new apron comes so I know it's exact configuration -- then I may just cut the old apron to pieces to get it off. Its impossible to get in there for a straight shot. I'm going to try the bendable attachment I have for my drill, but that's very awkward (holding the bit end of the thing with a vise grip or something while operating the drill with the other hand). I can more easily grind at a right angle. But if you're wanting to salvage/reuse the piece you're removing you wouldn't want to do it this way, as it grinds away a lot of metal in addition to the weld. VW REALLY over did it with the spot welds it seems to me -- a half dozen or so would have sufficed. Just as with the front apron, there are on the order of 20 on each side, some as close together as an 1/8th of an inch! Possibly needed for stiffness, perhaps. Dave purchased a right-angle attachment for his drill, which worked very nicely for drilling out the welds in the engine compartment. "Between the right-angle attachment and a little judicious cutting with my grinder, the apron was soon laying on the concrete!" Dave wrote. Dave worried about body stiffness with the metal rear apron removed. He asked Rob whether installing a stiff metal bracket from one side to the other underneath the apron might be wise. Rob - A good idea I think. The original apron is a double skin, and I can't image VW bothering with that unless it needed the stiffness. No obvious method of connecting comes to mind (flush fitting) unless you use some king of taper head bolt and a slightly enlarged hole so it sinks into the metal almost flush. Dave did fabricate and install a metal reinforcing bar -- see the picture below -- but he didn't secure it well enough and it eventually came loose, so Dave removed it.
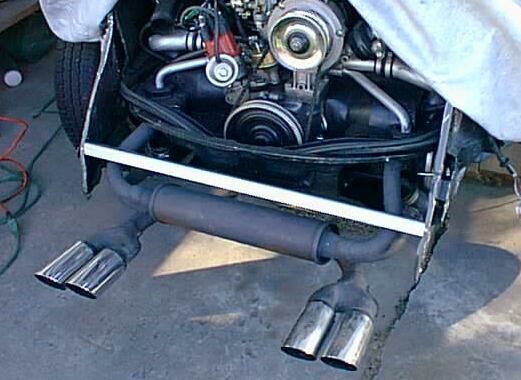
Reinforcing Bar That Dave Installed |
||
|
|