|
||

|
|
Seatsand Seat Back Refurbishment procedures. The following topics are discussed in this article -
Note: Southern California Imports has prepared a great video that shows step-by-step how to refurbish VW seats. This video was VERY helpful to Dave when he redid the seats in his '73 SB.
IntroductionThe seats in Dave's '73 Super Beetle are the kind that rest on three points, two on either side in the rear that slide forward and back in tracks, and one in the front-center with a piece running longitudinally down the center with holes in it for front-to-back adjustment. The seats had a number of problems when Dave bought the car. The seats were rocking badly from side-to-side, and they were badly "dished" (there had been too many big, heavy bottoms in them!). And they were shedding horse hair all over the place, making a real mess. So Dave had a project! (And fortunately, an indulgent wife!)
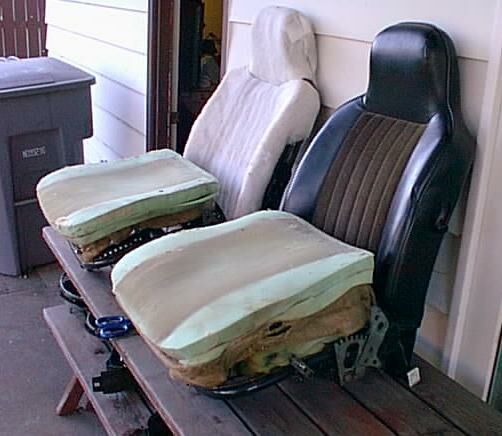
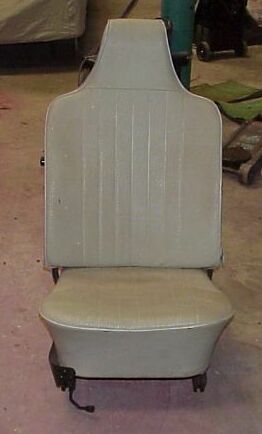
Dave's Old Seats
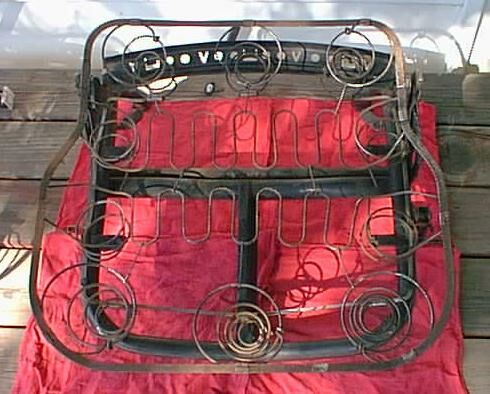
Front Seat BottomsDave removed the old upholstery from the seat bottoms, then pulled out all of the padding and the horse hair stuff, all the way down to the springs. When Dave got into the drivers side seat he found that someone had stuffed a roll of foam padding into the springs. It soon became apparent why -- the springs were badly broken and some were missing. A roll of foam stuff into the springs is sure a poor fix! The first time Dave did this he wired the broken springs up as best as he could, then stuffed some rolled up high-density foam between the broken springs that he couldnt wire together, fully realizing that it was only a stop-gap. Someone reported that he had repaired his broken springs with JB Weld. The stuff is good, but we remain skeptical that it can be used in this application (we haven't tried it, so we reserve judgement). Dave found a wonderful source of used VW parts -- Russ' Recycling in Duarte, California. Dave was able to procure a used VW front seat spring from Russ. It was a slightly different design from the old one -- MORE springs, with a somewhat different configuration. Dave cleaned up the springs and painted them a nice shiny black.
Regarding the foam to be used in the seats, Rob advised -- If they have different grades of foam make sure you get reasonably dense stuff -- it packs down with age, and if too soft to start with the covering upholstery might go limp and loose. With the new/used seat springs cleaned up and painted, Dave then rebuilt the padding with foam and a nice bun. A fun job, and it sure improves the seats. Dave completed both of his front seat bottoms in just one morning.

New Seat Bottoms
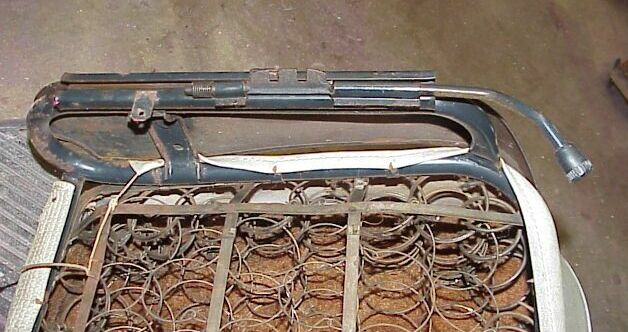
Front Seat Backs
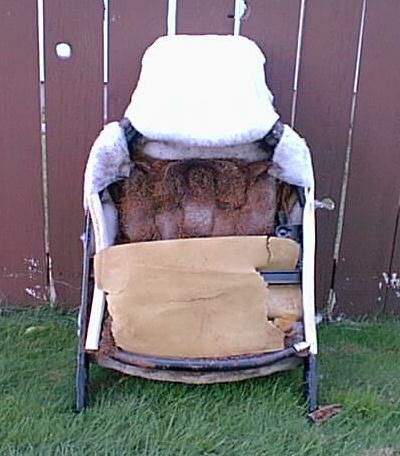
Dave's Old Seat Back
As with the seat bottoms, Dave sanded the seat back frames and springs and giving them a nice coat of black paint. "I know nobody will ever see them, but being the perfectionist that I am..." After much fussing and fuming with the seat backs from his 1973 model Bug, Dave made an interesting discovery! While re-watching the seat upholstery portion of the "Interior Restoration" video from So. Cal. Imports, Dave discovered that the seats in his car are from the 1974 model year, not 1973! That explained why the seat covers Dave ordered did not work! The '74 seat backs are significantly different to the '73 backs, and Dave found that the seat back covers were about two inches too short. Some dialogue is interesting - Rob wrote - What a shame -- the seats are obviously only superficially similar then. VW seems to have made a lot of seat changes between '71 and '74 -- safety regulations perhaps? Dave responded - Here's the way it is -- according to the chassis number the car is a 1973 model. According to the engine number, the engine is a 1971 1600cc dual port engine. And now I've discovered that the seats (the front ones, at least) are 1974, and the back rests have a different headrest than the 1973 and apparently are longer, as the 1973 seat covers will NOT fit on them (much to my dismay and the detriment of my pocketbook! :-( Rob responded - The chassis number makes it a very late 73 model, so maybe it's got "original" seats -- VW making a change as the 74 model year got close. There was change-point in the 73 model year for other stuff I know -- did that include the seats I wonder. The mix of parts can certainly be annoying, and that's a large part of why I've tried to keep mine as original as possible -- I don't need to remember what year any particular part is when I need a replacement. (Dave ended up having to buy a new set of front seat covers -- backs AND bottoms to make sure they would match -- for $95! LESSON LEARNED -- make sure you know what model your seats are! They may NOT be the same as the model year of your car! Dave put the extra padding on the head rests (contact cement and duct tape), but he found the covers to be VERY tight. He removed them and wrapped the foam padding with some slick plastic (dry cleaner bag) and warmed them with a hair dryer so the covers would slip on more easily. Dave wrote to the RAMVA Newsgroup - I find that it is virtually impossible to stretch the front portion of the seat back cover down to the bar with the spikes that hole it in place. I may have been a bit over-enthusiastic with the padding. A response - This may help -- worked for me. I slipped an ordinary kitchen garbage bag over the seal and insulation. This acted like a dry lubricant and the cover went on "slicker than fresh boogers on a doorknob." I then removed the bag. Another response - '73/'74 seats are hard to re-upholster. I too thought I had put in too much padding. First, set the covers out in the sun until they get soft. Start them over the headrest as far as you can. Careful to not pull the stitching apart. If you get stuck, place the seatback with partial-installed cover back in the sun. Again massage and pull a little at a time until they are on. Takes lots of massaging. The hardest part is getting the cover over the spikes. May have to cut off a bit of the padding. Keep at it, it will finally work. I have done two '74s so I know it can be done. If you have a helper he can shove the padding back up inside the frame while you pull over the spikes. Another response - I couldn't pull the bottoms onto the hooks either and I ended up using some of those plastic zip wire ties to hold it on. Worked good and they are barely noticeable. Dave took this suggestion and it worked wonderfully well. He ran a piece of heavy coat-hanger wire through the bottom of the upholstery, then snugged it up with several cable ties. Cable ties work well because they can be snugged progressively tighter until the gap is minimal.
Seat ReassemblyDuring reassembly of the seats, Dave had a hard time finding replacement springs (i.e., the springs that hold the seat adjusting mechanism to the seat frame). The used seat bottom that Dave purchased from Russ' Recycling had them, but neither of the seats in Dave's car had them when he bought the car. "SO many little things missing from this car!" Dave wrote. "It's amazing that it even held together!" Dave was able to find replacement springs at a local hardware store. An experience -- There is a bar under each seat that runs from one side to the other -- it wasn't positioned properly in Dave's seats. It has a square head on the end the has to set in the square hole just right. Dave found it much easier with the seats up on a table where he could work on them. All of that ugly adjustment mechanism along the sides of the seats was exposed when Dave bought the car. He finally got tired of looking at it and got some nice plastic covers that really make the seats look nice.
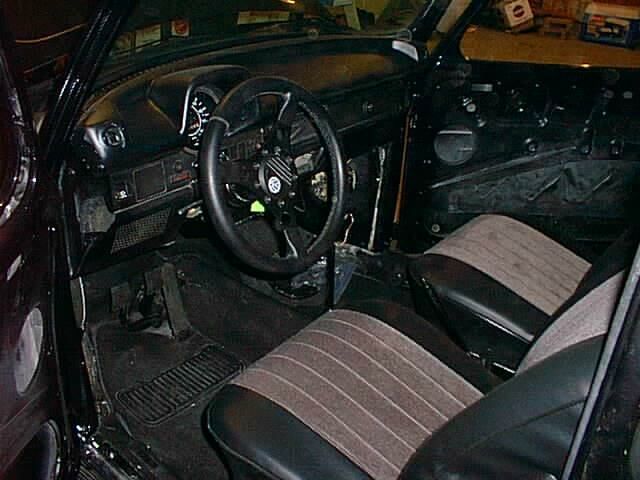 The Finished Product!
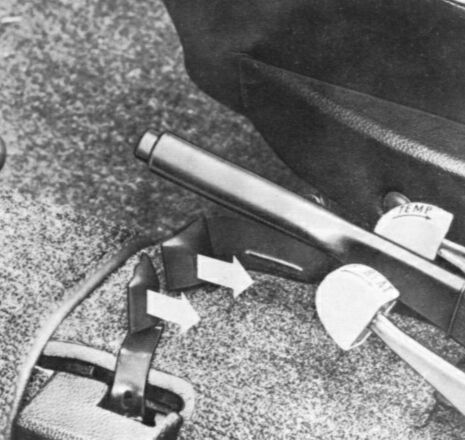
Front Seat MountsRob explained the seat mounts and their changes over the years - The seat mounts changed a lot with the 73 model. Up to then, they are mounted on slide rails which have matching fore/aft sliders on the floor. Then in 73 they put your type in, which I understand has a large floor frame mounted across the car under the seats. And they altered the seats quite a bit in 73. Slightly more 'dished' back too if I remember. And different headrest shape. In Australia, the 71 and 72 models got the high back rests, but have 'my' kind of floor rails, so these are the only alternatives I can use in VW seats. And if I remember, these still have only the three-position back rest. Dave elaborated - If we're talking about the same seats (73-type), there are pedestal kind, mounted on the floor right under the front of each of the seats, oriented from side-to-side. The seat is a three point affair -- two points that ride in the tracks on either sides in the back, and the third point that consists of a rail running fore-to-aft under the seat This rail has holes in it for fore-to-aft adjustment; it slips into a mounting on the top of the afore-mentioned pedestal and is held in place with a removable pin. It's this rail that I wish we could lengthen by about two inches so the seat could be pushed back further. I don't remember my 65 Beetle being quite so cramped (maybe I wasnt quite so big back then! :-) Dave's seats were rocking badly from side-to-side when he first bought the car ('73 model); this problem was easily fixed with little plastic clips on the points that slide through the runners. These clips are available from Mid-America Motor Works and most other VW parts suppliers. Dave was unclear regarding the function of the Y-shaped clip that comes in the kit. Someone in the RAMVA Newsgroup cleared it up - The third Y-shaped piece goes where the center track slide in -- where the pin is that makes the position adjustments for you. There should be a hole in the Y-shaped piece; the pin for the seat track goes through that. So to install, you pull the handle that moves the pin, slide the seat back out of the front adjustment point, then drop the Y-shaped piece into the groove so that the hole lines up with the pin. While still holding the pin open and the bushing in place, slide the seat back into its track and adjust it front-to-back as needed.
1973 Front Seat Adjustment/RemovalAs we've discussed above, the seats in Dave's '73 Super Beetle are the kind that rest on three points, two on either side in the rear that slide forward and back in tracks, and one in the front-center with a piece running longitudinally down the center with holes in it for front-to-back adjustment. There are two adjusting levers between the seats, one for each.
The seat is adjusted fore-to-back by pulling the appropriate adjusting lever back. This pulls a pin out of the hole in the longitudinal center bar, enabling you to move the seat either forward or back to the position you desire. Lock the seat in place by releasing the adjusting lever and rocking back and forth a little bit to secure the pin in the proper hole in the longitudinal center bar. The seat is removed as follows -
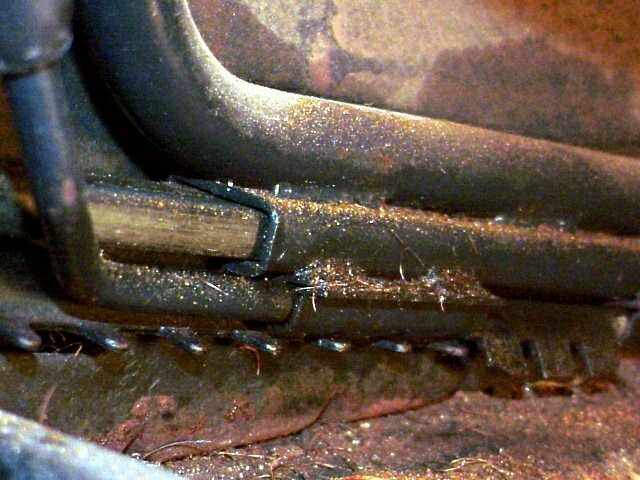
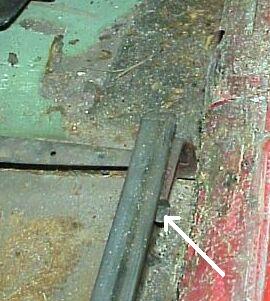
Note: This tab on the seat rail (center track) is a safety stop to prevent someone from flying into the back of the car if they adjust the seat too much to the rear while driving. This tab must be depressed to move the seat back enough to remove it from the car. To reinstall the seat -
Dave is quite tall, about 6'3". Even with the drivers seat pushed all the way back his thighs are right up against the steering wheel, even the new smaller one (Formuling) he installed. There remains about three inches in the two runners in the back, but if the seat is pushed back that far the center point in front slips out of its connection. Dave made some queries, hoping that some smart person would have devised something to extend the center adjusting rail a bit, but no such invention was found. The seats had a number of problems when Dave bought the car. The seats were rocking badly from side-to-side, and they were badly "dished" (there had been too many big, heavy bottoms in them!). And they were shedding horse hair all over the place, making a real mess.
Later Model SeatsSomeone wrote to ask about the seats in his 1974 convertible. He described his seat adjustment and removal mechanism, which appeared to us to be very similar to the mechanism used some years ago. In any event, this type of seat is not discussed in any of the service manuals, so we decided to discuss it a bit here.
 The 1974 SeatYou can see the adjusting/removal handle on the right side of the seat (left as you're looking at the picture). Following are two pictures that show the adjusting mechanism in more detail -
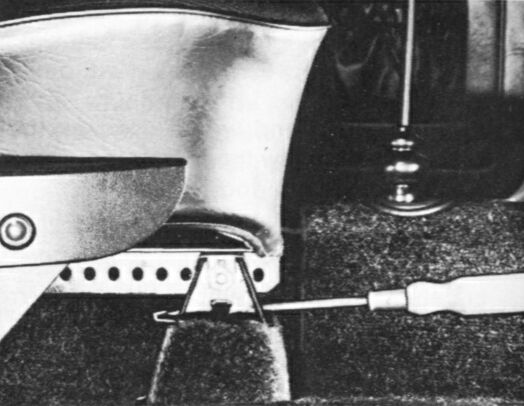
This seat slides on two rails on either side. Welded to the bottom of the outboard rail is a flat bar with a series of teeth. The adjusting lever is attached to a bar that runs underneath the rails that the seat frame rides on. This bar rotates as the adjusting lever is moved. Welded to it is a flat piece what has three teeth cut into it. These spring-loaded teeth move forward and back as the seat is being adjusted; when the desired position is reached, these teeth mesh with the teeth on the flat stationary bar on the bottom of the seat mechanism, locking the seat securely in place. To remove the seat, the release clip must first be pressed down (see the picture below). Then the seat slides out towards the front (as opposed to towards the rear for the 1973 seats).
 Seat Removal Release Clip
Rear SeatDave finds it a little fiddly getting the rear seat in. It was while horsing the rear seat bottom in that he had his first angina attack, back in July of 1997 (six bypasses resulted! :-(. Here's our we get the rear seat bottom out and back in again -
In this configuration the seat is easy to pull it out past the front seat. Putting the seat in is a bit more tricky, especially if you overstuffed the seat when you reupholstered it (like Dave did). At first Dave found it difficult to push the rear edge in far enough, so the front of the seat wouldn't fit into the frame (crossbar). Here's how Dave finally resolved the problem -
Note: Make sure there isn't anything protruding upward that will catch on the inside of the seat frame, such as a battery hold-down bolt. I had to use a crowbar to lift the seat forward so that its frame would clear the bolt and fit nicely into the crossbar.
Use of Seats from Other Compact CarsSomeone asked - Is it possible to remove the seats along with the runner frame and install seats from a newer compact car? Rob responded - This is certainly possible with the Standard Beetles and with the Super Beetle up to 1972. Both have the same slider type floor runners and it's a simple job to cut the steel runner section from the bottom of the Beetle seat and weld on a suitable sized seat from a compact car. The seats I have in my car are 1984 Subaru Leone seats. These give me a headrest (not available on the original VW seats in Aussie 1970 Beetles), are the same width as the VW seats and provide 7 backrest positions vs the three of the VW seat. Honda, Nissan and other smaller car seats will also fit - it's just a matter of finding a seat the right size and having a frame underneath sized to suit the runner section of the Beetle seat. The different style of later '73 and up seat runners I'm not too sure about - you'd have to have a good look at the arrangement under the seat to determine whether the under-seat frame can be removed from the seat and if it facilitates fitting another seat on it. Things to watch out for -
You can of course buy racing seats and such which will fit into a VW, but it may be a more difficult job fitting them, and then you also have more fun getting into and out of these "buckets". Rob wrote - I've been thinking of how much I'd do on my seats (stuffing etc). One problem is the front seats. Mine are actually Subaroo seats welded on to the VW seat frames -- one of the few non-standard items in the car, but looking very much like the later VW seats. My originals were low-back, and I didn't like the safety of them, so when the frame back cracked on the driver's side I looked at replacing them. I could not get VW seats at that time (I can only use 71 or 72 hi-back seats with slide rail mounts), so I gulped at non standard and got them. I like them a lot -- a bit more body-shape than the old seats, with headrest, and have multiple lay-back positions (the originals had only three). I may go back to '71-72 seats if I can get them. Dave responded - I know they have the '71-'72 seats in the Mid-America Motor Works catalog -- that should give you an idea of the price. You said, I think, that you have a West Coast Metric outlet there; Im not sure whether they carry them or not. And then, you could maybe get a couple of frames from a wrecking yard and build the seats up yourself -- not a hard job -- actually kind of fun (unless the springs are broken -- then it's a pain!
|
||||||||||
|
|