|
||

|
|
ShifterSubtopics in this article are as follows - Shifter DesignRegarding reinstallation of the shift lever assembly, our Shifter Bushing Replacement Procedure says - Make sure the ball socket on the end of the shift lever engages the slot in the cup on the end of the shift rod. Dave found that he had a little spring-loaded ball bearing on the ball on the end of the shift lever, but there was no slot in the cup on the end of the shift rod for this little ball bearing to fit into. The cup on the forward end of the shift rod is smooth all the way around on the inside. So -- a mismatch. After installing the shifter Dave found that it worked OK, even though it twirls around in the shift rod cup. Rob had a similar experience when he replaced the shift rod bushing in his Bug. He thought then that the spring-loaded ball was probably just an anti-rattle device, rather than a locating ball or anything like that. Later, while Dave was reading the Gene Berg catalog, the mystery was solved - From 1956 through 1967 VW installed a 12" curved shifter. To keep the curved shifter from rotating, the little spring-loaded bearing on ball at the end of the shift lever was designed to fit into a slot in the cup at the end of the shift rod. In 1968 the location of the shifter on the tunnel was moved back and a 12" straight shifter was installed. Since the later shifter is straight, it doesn't matter whether it rotates, and little ball socket on the end of the shift lever was eliminated. Gene Berg ShifterSpeaking of Gene Berg, Dave installed a Gene Berg shifter in his Bug in August 2004, which made a marvelous improvement. The following is adapted from the blurb on the Gene Berg Web page - The shifter is designed with 40 percent shorter travel than stock. Operation of the shifter is far more comfortable, with less reaching to shift. Extremely strong and positive design brings you the smoothest, most positive shifting available of any shifter in the world for a VW. There is a push button release in the T-handle for reverse, eliminating the necessity to push the shifter down into the floor to find reverse. All sedan shifters feature a massive one piece 7/8" steel shaft that has a lifetime guaranteed against breakage. The shaft is accurately machined on a computer-controlled machine to give precision fit and smooth accurate operation every time. The shifter comes with a hardened shift gate that is hand-fitted to the base and reverse lockout pin, assuring proper location and shifting positions. Following is a picture of the Gene Berg shifter that Dave installed in his car -
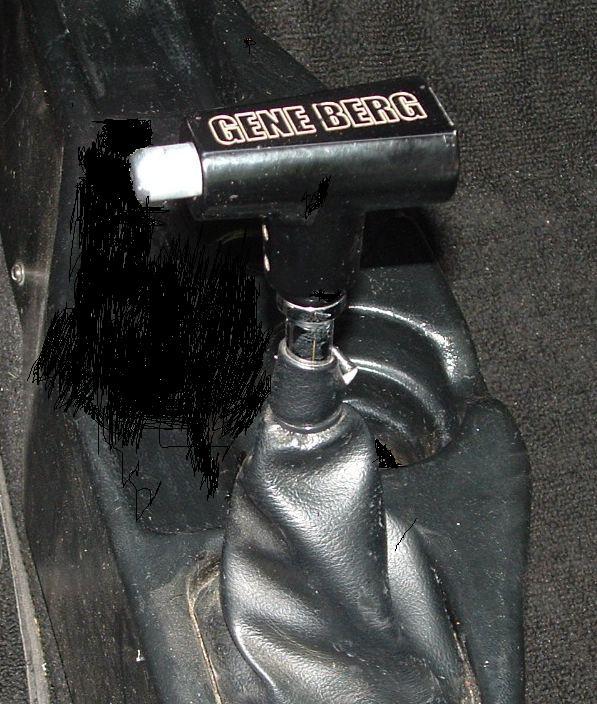 Gene Berg Shifter
The Gene Berg shifter is expensive, but it's very high quality -- the best in the business. Worth the expense, we think. It sure makes the car fun to drive! Shifter Removal and ReplacementThere are some tricks to removal of the shift lever that make the job very much easier.
Shifter OperationInside the gearbox the side-side action of the shifter stick results in the hockey stick sliding sideways between the three selectors, and then the push-pull on the gear stick results in push up/down to move the correct selector (or combination of selectors). As you move the lever down and to the left the "ball" on the end moves left and forward, so that "ring" slides along the ramp -- it's the ramp which therefore allows reverse, but only AFTER the gear stick is pressed down. In first and second gears, the ring slides forward and back on the tab on the left, and in third and fourth gears the ring slides forward and back on the ramp on the right. Position of the stop plate truly is critical, then, as it guides the ball on the shift lever. It's the position of the ramped side which is critical, since this is what allows/disallows reverse. The ball moves to the right as you move the stick to the left, so ramp-on-right is where the reverse "stop" occurs. But with the stick pushed down and left, the "ring" goes under the ramp, and the shape of the ramp then lets you move the stick far enough to the rear (ball to the front) to select reverse. If the stop plate is too far right, the stick moves right so when you push it left and down the stick is actually vertical instead of to the left. This means the ball and the ring aren't under up against the ramp - they are still in the middle of the hole in the stop plate, so it's possible to get reverse when trying for second. The plate has to be to the left so the stick moved down/left forces the ball and ring to the right -- against the ramp for guidance for reverse.
|
||
|
|