|
||

|
|
SteeringThe following subtopics are discussed in this article -
Steering AdjustmentRegarding steering adjustment, Muir writes - Stand alongside the car where you can move the steering wheel through the open window while you watch the left front wheel. Turn the steering wheel to see how much it moves before the front tire starts to move. Make sure your wheels are pointing straight ahead and try it again. This steering wheel play should be about one inch in most well adjusted Volkswagens; its 1/2 to 5/8 in the Super Beetle. Dont rush for the tools yet as there are several places this play could be, so you cannot he sure the steering is at fault until youve checked everything. Visualize the path of the steering column (the column under the steering wheel that the signal light switch is on) through the bottom of the car to find the steering box at the lower end. Its practically the frontest thing in the car so you cant miss it. Its a steel box with gears in it at the bottom end of the steering column. If you cant see it right away, put your head under the front of the car while someone blows the horn, the steering box is right next. The wire coming out of the horn goes into the steering column and up to the button on the steering wheel. If your horn ever sticks blaringly in the middle of town, this wire has probably shorted out against the steering box. Dont pull it out in your excitement, as its hell to replace. Just tape the bare place in the wire. The steering box has a steering arm coming out of the bottom of it. Have someone move the steering wheel while you get down on your back under the car to watch the way the steering arm works. At the end of the steering arm are attached two tubes that go over to the wheels to move them. These tubes, tie rods, are attached to the steering arm with tie rod ends, those bolts through the arm with hall joints to let them twist as you steer. In the Super Beetle, you also have a swing lever arm assembly called an idler arm, but its mounted on the other side of the frame from the steering box, not on the torsion arm tube (which you dont have). The two tie rod ends that turn the wheels are bolted into a center tie rod which runs between the steering arm from the steering box and the idler arm. The idler arm should not move up and down, only sideways. If it does move up and down, it makes your car wander all over the road and youll have to take it to the pros. All Models - The tie rods are attached to an arm on the wheel assembly with another tie rod end. Look under the car, back at the steering arm in the Type I or the idler arm in the Super Beetle, and youll see a tube that either goes over to the frame or over to a torsion tube. This is an hydraulic thing like a shock absorber called the steering dampener and it stops the road shocks from coming up through the steering wheel to your hands. The steering dampener is a horizontal shock absorber. If your car shimmies on rough roads, potholes, etc., or at about 45 mph, 9 times out of 10, its caused by a worn out steering dampener. Thats the steering system of the VW and it terminates in an arm on the steering knuckle with a tie rod end. Go back to the steering box and find the exterior adjustment. Its a screw with a lock nut around it and is on top of, to the left of or on the bottom of the steering box. Dont touch it now, just recognize it when you see it again in the procedure for adjusting the steering box. There is an interior adjustment as well, but youd better leave that one to the experts. - John Muir, "How to Keep Your Volkswagen Alive - A Manual of Step-by-Step Procedures for the Compleat Idiot." 1976 Edition. DiscussionDave wrote to Rob - I need to pick your brain regarding steering adjustment. The freeplay in the steering wheel is significantly greater than the 1" specification (it's like 3 4 inches). I know it's not worn tie rod ends -- I just replaced those. The Bentley Manual gives instructions for making adjustments at the steering gear box (p. 6-21) -- looks straightforward. Rob responded - I've done this twice on my car. It helped both times, but was not a complete fix, because I still had old bearings on the Pitman arm and so on. You might get very good results in yours, since you've had a lot of the front joints done. Check the oil in the steering box at the same time. I forget what grade it is, 140 or somesuch. Cracking the locking ring on the front of the steering box was a little difficult -- ended up with a metal spike on one of the castellations and hitting it around with a mallet. Then had to find a piece of metal which I could fit into the huge allen key shaped plug to turn it. Not biggie -- just needs a little inventiveness. Follow the Bentley and it should go OK. The Bentley tells it the same way my manual does. Dave wrote to Rob after seeing a 1973 SB undergoing restoration in Edmonton - The gas tank was out of the car, so I had my first look at the steering wheel shaft with the U-joint that sits directly beneath the tank. I told the guy about the play in our steering; he said this U-joint may need to be replaced, the steering box may need to be adjusted, or the steering box may need to be replaced. The steering in our Bug is loose -- there is much more play in the steering wheel than the 1" that is specified. I looked over the procedure for adjusting the steering in the Haynes manual this morning, and it doesn't look to be too hard. I just checked the Bentley Manual (p. 6-21), and it's even more clear (pictures are better, too). From Fig. 9.7, the steering gearbox appears to be right up front and easy to get to. As always, I have questions. They show a "special wrench" (Fig. 9.6 in Bentley) being used to adjust the worm adjuster. Looks like a large Allen wrench to me -- they don't say what size. Has this procedure been part of your vast experience? Is it something I can easily do? If so, do you know what size the "special wrench" is? Or should I just have the guys at the alignment shop do it when they replace the front suspension bushings? Oh, and when you turn the steering wheel hard over (as in a tight U-turn) the tires rub on the inside of the fenders. Rob responded - That last might simply be badly adjusted "stops". There are two locking bolts somewhere near the steering box which adjust the travel limit -- easy to adjust them -- just set the wheel on each lock so they are clear of the fenders, and screw the bolts up to touch the stop plates. Dave wrote - I'm still perplexed by the steering lock situation. While they had the car up on the rack I compared the Pitman (drop) arm with the adjusting bolts that I got from TopLine Parts with the one on the car -- the new one won't fit . I just don't understand it -- no way to prevent the wheels from rubbing on the inside of the wheel wells -- no adjusting bolts either on the Pitman arm or the idler arm, as the manual shows. I've looked at them both -- neither has the steering lock bolts. Not a big problem, just perplexing. Rob responded - Hmmm -- I think there are two arms aren't there -- Super and non-Super or something. I just had a look at mine. The pitman arm has an arm which sticks out sideways and there are two adjustable bolts on the torsion bar tubes. The "side arm" contacts the bolts to prevent versteering. Dave asked - I am just a little bit unclear on this! Another difulgalty associated with the '73 SB? Rob responded - I guess my arrangement wouldn't work on the SBs (no torsion bar tubes) but there has to be SOME limiter for the turns. The steering box CAN be adjusted -- a BIG nut and lock ring on the front, and a smaller adjuster and lock nut on top. I forget the precise procedure, but I think I did the front one first (loosen the lock ring hammer and cold chisel worked) and screwed the large "nut" in until it touched (it needs a giant allen key or anything else you can get into the recess, I used a piece of flat steel) maybe 1/2 turn I guess, then backed it off a few degrees. The top one is adjusted with the steering at full lock, and then checked on the other lock for binding loosen a little if necessary. Even if you give it 1/2 a turn of so (without fully adjusting it to spec) it might help a bit. The top adjuster pushes the worm drive from the steering column closer to the driven gear, and the front one adjusts end play in the driven gear with the steering arm on it. Helped a lot on mine not a total fix, but now only just over 1 inch slop in the steering wheel rim should be 1 inch or less. The worm drive wears more in the "straight ahead" position and less at the full lock ends, so you can't get rid of ALL the wheel slop without replacing parts, but it sure helps. I think the steering box uses 140 weight gear oil. Dave wrote - The steering gear procedure in the Haynes Manual is excellent. Rob responded - Yes -- I like that procedure too. My memory wasn't exactly right (90 degrees of wheel turn, not full lock as I thought). But the essential elements are -- adjust the big adjuster on the front of the box first, and test drive, then adjust the small adjuster on top (yes -- I'd forgotten "loosen then tighten until it touches...") -- testing for tight spots. I don't think there is any set procedure for replacing the oil periodically. Just top it up (have to check the weight -- I thought 140, Muir says 90) and check for wet areas -- leaks. I don't even think it has a drain plug. I've put a small amount of oil in mine 2-3 times in the 27 years. I don't remember if the Super Beetle steering box is different to the Standard Beetle. Steering U-Joint Shaft ReplacementSteering Shaft Replacement procedure.) Dave wrote to the RAMVA Newsgroup - The lower U-joint in my '73 SB steering linkage is shot. I need some advice re removing the U-joint shaft from the steering gearbox. The Bentley Manual says it has to be "pried off with suitable levers." It doesn't say anything about the very tight space you have to work in. I have the gas tank out and the upper U-joint disconnected -- it's the lower one I'm having trouble with. "Speedy Jim" responded - If memory serves, you have to pull the steering shaft toward the rear a bit. Use a tool like a screwdriver to wedge the slot in the lower coupling apart. The bolt has to come out. If the steering box shaft looks rusted, the coupling may be on there really tight. Dave wrote to "Speedy Jim" - I am essentially pulling the steering shaft toward the rear. I just ran out of time and patience last Friday, and I haven't had time to get back to it since. A concern is how much I dare pry against the rubber disk between the U-joint and the steering gearbox. I sure don't want to ruin it! I'm hopeful that the new shaft (should be arriving today) has the corrugated rubber covers over the U-joints -- both of them are missing in my car. "Speedy Jim" responded - You can put a reasonable amount of force against the steering box but pry the coupling open as much as possible. Dave responded - Thanks for that. It shifts my focus a little bit -- from just trying to pry off the shaft to opening up the coupling as much as possible first, which makes a lot of sense. I did that with the top one :-) A healthy squirt of Kroil helped, too. My next nagging worry: The re-installation procedure in the Bentley Manual says: Set the steering in its center position. Install a centering bolt through the drop (Pitman) arm until the point just touches the conical hole in the aluminum plug above the drop arm. No got the centering bolt. Just how critical is this? I'm sure I can line it up pretty close by eye. Could I maybe use something like a punch? Also, I notice that the splined shaft on the top has a groove in the side of it where the connecting bolt goes -- I wonder if the bottom shaft into the steering gearbox has such a groove. If so, it's going to be a bugger to get it lined up just right, given the clearances. Dave wrote to Jon Chabot at TopLine Parts - I've finally narrowed my steering problem in my '73 SB down to the universal joint shaft in the steering linkage. I'm gearing myself up to removing the gas tank and replacing the shaft with a new one. Might you possibly carry this part, including the necessary connectors (bolts, etc.)? You've supplied me with a number of good quality parts before, so I'd like to get the shaft from you if I can. Jon at TopLine responded - Yes, we carry the shaft. Its $83.00 + shipping. Sorry, but I don't think we have the bolts for it. (I might, but no car here right now to study the bolt needs.) Suggest you clean up the old bolts and use them. Steering BoxDave wrote - The steering box is very awkward to get to. Rob responded - I do think it's worse on the Super Beetles than on the Standards, so I can sympathise with anyone contemplating removing it. Steering Wheel (Formuling)Advice from John Connolly (Aircooled.Net) - Add a 14" Formuling steering wheel takes about one hour. You get some choice in color and style and the Formuling has a thick padded grip. The only drawback -- the smaller the steering wheel, the more difficult the steering effort! I don't recommend trying this modification on Type 2s, since steering effort becomes too difficult, especially in parking lots! Dave wrote - The main reason we're changing out our steering wheel is because the old one is really shot. It looks very shabby, and I'm sure it's a safety hazard. The plastic cover over the horn mechanism won't stay on any more (we have taped it on), and the steering wheel itself is cracked in several places. My son wants to buy one of these Formuling jobbers that John Connolly recommends. Any experience?
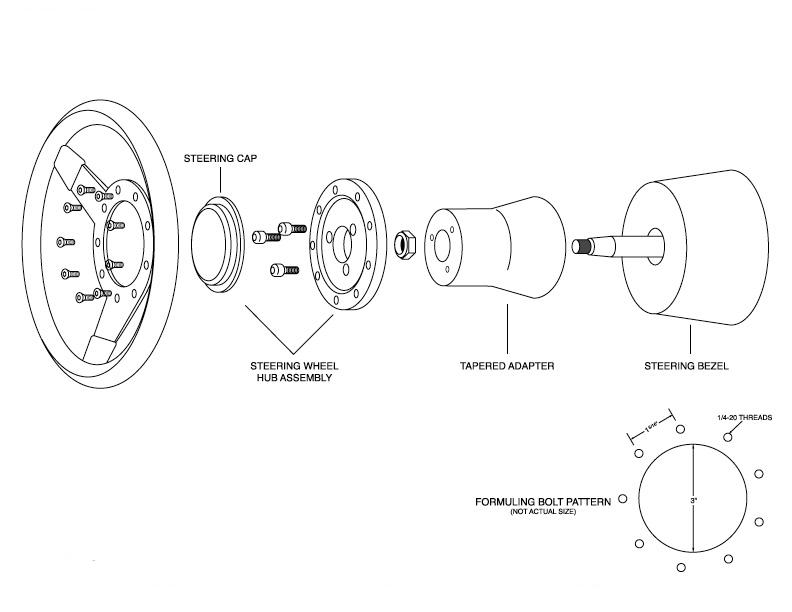 Formuling Steering Wheel System (Generic)Steering Wheel RemovalRob wrote - The old wheel should come off by hitting it with a rubber mallet from 'behind' the wheel. Dave responded - I didn't have to resort to that -- a little back-and-forth movement and it came right off. I borrowed a puller from a friend, but it was only his 27mm socket that I needed. Once I had the nut off the steering wheel came off without much effort. So I went ahead and put the new Formuling steering wheel on. Formuling PerformanceThe smaller (14-inch - 36cm diameter) steering wheel is sure nice -- it doesn't rest on my knees anymore, but it makes it difficult for both my son and I to see the speed on the highway (top of the dial). The steering is a bit heavier with the small wheel, but the car turns even quicker than before. Its very maneuverable -- really fun to drive. Turn Signal CancellationThe biggest problem with the Formuling steering wheel is that the turn signals will not cancel automatically. Poor design, I think. Someone wrote - I've got a '72 Ghia with an aftermarket Formuling steering wheel. I'm not too fond of it but I'm especially irritated that it won't cancel the turns signals automatically. I took it apart and it appears to be missing that thingamajig that cancels the turn signal. Is this a fatal flaw of the design or was the guy who put this on an idiot? I've damn near killed myself on numerous occasions by driving blissfully through intersections with my turn signal on. People think I'm an idiot on the freeway. Dave wrote - Yes -- this problem bugs my son something fierce, to the point that he's almost willing to sacrifice the "cool" steering wheel for the properly functioning switch. I called Rocky Mountain Motor Works (now Mid-America Motor Works) and talked to a technician. He assured me that if the hub adaptor is installed correctly and the proper pins are used (some measuring is necessary), the directional signals will work just fine. He said here is a little hole in the hub adapter that a pin fits into; this pin simply acts as a lever to cancel the turn signals. There's nothing exotic about this pin; I just can't figure out how it's installed. John Connolly (Aircooled.Net) wrote - The adapter has a gold colored ring (with a black, rubber center) that comes in the box. Install this "wire side up", and slide it on. On the adapter (the part the horn ring slid onto), there is the center with the splines to slide onto your steering shaft. The hole for the pin is right next to the shaft on a little outcropping of metal. It IS in the same place that you deduced by looking at the stock wheel. They used a pin instead of that longer thingy. The pin taps straight into that little hole. It IS a tight fit, but of course you want it to be. It will go in with a small hammer. Tap slowly at first, and also pinch the end a little with something so it "starts" into the hole. Dave responded - This pin needs to extend down into the turn signal switch at the same location where the little plastic tang was on the original contact ring. I turned the hub adapter over, and there, sure enough, was the little hole for the turn signal cancellation pin -- totally ignored in the sketch provided with the hub adapter installation instructions. In fact the sketch doesn't show the cancellation pin at all. Note: There's not much to say about the pin. It's a cylinder about 3mm in diameter and about 15 -16mm long. The one that came in the hub adapter kit was open all the way down along one side (that is, the cross section looks like a "C"), but I don't think that's important. Maybe just so it could be crimped a little on the end to get it started into the hole, as it fits very snugly (as it needs to considering its function). You might be able to make your own pin out of a nail or something similar -- there's certainly nothing exotic or special about it, as long as you can get a good tight fit so it won't come loose and fall out. Dave tapped in the pin, carefully aligned the hub on the spline, and put it all back together. And it worked great -- for a while. Dave later wrote - Last night my son informed me that the turn signals were no longer canceling. So this afternoon I pulled the steering wheel for the FOURTH time (that 27mm socket is sure paying for itself!), and sure enough, the cancelling pin had fallen out and was nowhere to be found. So I got myself a nail, cut it to the right length with a hacksaw, and hammered it into the hole in the hub assembly. Then for good measure I put a ring of JB Weld around the joint. So we'll see how long this fix lasts. I've come to the conclusion that the Formuling steering wheels are really nice, but the associated stuff (like the hub assembly, contact ring, cancelling mechanism, etc.) are junque. When replacing the ignition switch, Dave finally resolved the turn signal cancellation problem. Dave discovered a little indentation down inside the steering hub that a longer pin will just fit into, thus providing two support points. Dave secured both with Gorilla Glue! Horn Operationin our article on the VW horn in general.
|
||
|
|