|
||

|
|
Cooling Vanes and ThermostatSubtopics related to operation of the cooling vanes and thermostat include -
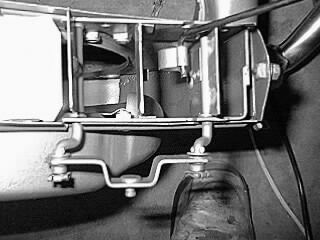
A Humorous But Dead-Serious "Sermonette" from Bob Hoover Regarding the ThermostatRemove the thermostat? Do it! (Not!) The thing will run without it, the better the climate, the better it will run. And if you're running a full-flow oil filter the main bearings will last about as long. But that's it; that's the limit of the 'benefits' you'll receive from re-designing the Volkswagen engine, because that's what you've done; you've told generations of superbly qualified engineers to stick it in their ear, you know a better way to do it. Unfortunately, without the thermostat your jugs will wear like a bitch, as will your valve guides; you'll burn more gas, suck a lot of oil and have a hell of a time passing your smog check. Of course, all the experts in the VW-specific rags say no thermostat is a wizard idea, along with blue coils and yellow wires and itty-bitty fan pulleys and all the other bitchin' tricks that made them rich and famous as builders of fine automobiles. What? Oh. Well, then make them famous as builders of winning racers. What? Gee... you mean all they do is TALK about it? Ummmmm..... Put the thermostat back in. To a real mechanic, anyone who builds an engine without a proper cooling system -- and that includes a thermostat and air-vanes -- is like a guy going around with his fly unzipped. Here's how to do it. You need a blower housing with a working set of air-vanes. The connecting-rod across the front of the blower housing connecting the air-vanes together. Plus the spring that holds the air-vanes OPEN. The right-side set of air-vanes must have a thermostat link-rod. Under the engine you need the thermostat bracket and the thermostat. To install, make sure the thermostat link-rod slides down through the head and projects between the push-rod tubes under the engine. Secure the blower housing and generator (I'll assume you took the opportunity to replace the modified intake manifold). Under the engine, reach up and thread the thermostat onto the link-rod. Run it all the way up. Now put the thermostat bracket onto the thermostat. Make sure the base of the thermostat fits the opening in the bracket, which is flat-sided to prevent the thermostat from unscrewing itself as it expands and contracts. Now pull DOWN on the whole assembly and fit the bracket over the stud on the side of the sump. Install a flat washer, a warpy washer and a nut. Pull DOWN on the assembly until the air-vanes are fully closed. Don't over-do it. Tighten down the nut securing the bracket. I'll assume you tested the thermostat before you did all of this, and that your engine has all its tin-ware. The lower tin provides a plenum that insures the thermostat is bathed in heated air from the cylinders and heads. The bottom line is that your engine warms up faster, idles better, runs sweeter and lasts longer. On the other hand, you may wish to make your personal style statement to the VW world! :-) - Bob Hoover Operation of the Cooling Vanes and ThermostatDoes your Beetle still have the thermostat and cooling control vanes? The cooling vanes (often referred to as "flaps") sit in a frame inside the upper cylinder tin, at the very bottom of the fan shroud. Their function is to control the airflow as the engine warms up. The frame also has fixed plates, and it's these which direct the flow of air more to the heads and cylinders. When fully open, the movable flaps stand up and down, parallel with the fixed plates. When closed, they mostly block the flow of air from the fan down around the cylinders and heads. If you follow the 'path' of the air as it leaves the fan -- it is forced to the outer edges of the shroud, and the fixed plates help prevent is 'spilling' back towards the crankshaft, so the heads get more air, and the cylinders a bit less. You can feel for the cooling flap hinges and linkage on the front (front is front of car) of the fan shroud. That is, between the shroud and the firewall, and under (lower than) the fan. Without them, you'll simply feel a few holes in the tinware where the pivots poked through to the (missing) linkage bar. This linkage bar is just a flat strip of steel which links the right and left sets of flaps.
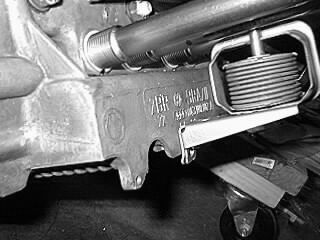
 Cooling VanesIf you haven't got cooling flaps -- GO GET THEM from a wreckers etc, as the engine will NEVER get properly warm in your climate without them. Some misguided folks think the engine will run fine without them. It will..... but not for long as a cold engine wears fast. The thermostat is a cylindrical copper-colored bellows-shaped device which sits under the right cylinders and has a pushrod going up between the cylinders. The thermostat is easily visible from under the rear of the car. First of all check to make sure the thermostat is there. Than also check it's condition. The bottom end of the thermostat clamps to the side of the engine case by a bracket and one bolt, which can work loose. The thermostat should be compressed -- short -- when the engine is cold. Short means each section of the bellows is almost touching the one next to it -- it looks like a stack of large-diameter copper coins.
 Old-Style ThermostatThe thermostat is attached at the top to a small-diameter control rod, which runs from the top of the thermostat up between the #1 and #2 cylinders. It's upper end attached to a horizontal control bar which runs in front (front) of the fan shroud and connects all of the cooling vanes together. At the temperature of the air running over the thermostat increases, it expands. Since the bottom of the thermostat is fixed, it can expand only in one direction -- upward. As it does so it pushed the control rod upwards, gradually opening the cooling vanes and allowing more cooling air to be directed over the engine heads and cylinders. If the thermostat fails, air gets in and it expands (lengthens) to it's rest position, which means it supplies full cooling air (like it wasn't there), and you get a cold running engine. In older models, the thermostat also controls the carburetor pre-heat air through a pull-wire which loops around behind the carburetor to a flap in the air cleaner intake. This pulls warm air up through the paper tube from near the cylinder head until the engine warms up. If you don't have the thermostat or cooling vanes, you're going to have a big problem in cold weather. So many people remove the thermostat, and its a big mistake! What the thermostat does is to close the cooling vanes when the engine is cold, thus limiting the amount of cooling air flowing around the engine. That way the engine warms up faster, and as it does, the warm air flowing over the thermostat expands it, pushing up on the connecting rod to the cooling vanes, and opening them to supply the necessary cooling air. Warm air into the cabin sooner is a nice side benefit. Note: Even fully closed, the cooling vanes still direct a flow of air to the places around the engine and cylinder heads where it is needed. Without the vanes, this function is lost. The problem with a missing thermostat is that the engine warms up more slowly, because with the cooling vanes fully open the fan is blowing very cold air by the cylinders and heads. But the automatic choke opens normally, since it is electrically driven. The choke was designed to open at the same rate that the engine warms, assuming that the thermostat and cooling vanes are present and operative. Without them, the choke warms up faster than the engine does, which means that the choke butterfly opens too quickly, and the fuel/air mixture becomes too lean. The stepped cam on the left side of the carburetor rotates down too fast, the idle drops, and the cold engine dies. The bottom line is -- the VW engineers included the thermostat and cooling vanes in the engine design for a very good reason, and they designed the automatic choke to operate in concert with the engine as it warms up. If your thermostat (and possibly even your cooling vanes) are missing, make it a priority to replace them, especially as colder weather approaches. The stock thermostat is almost impossible to find. Our Mexican friends have adapted the thermostat from the Type 4 VW for use in the Type 1, and it works very well (even better than the original, in our experience). Take a look at it at California Import Parts, Ltd.. "Not Needed" PhilosophyA prevailing philosophy in the VW world regarding cooling vanes and thermostats is summed up by Rob -- "The (stupid) engine builders here (in Australia) all say "you don't need them - we junk them" "you don't need them" in a warmish climate. This is the attitude of many engine rebuilders and (unfortunately) many VW owners in the United States. Some engine rebuilders take the 'easy route' of not bothering to reinstall this stuff -- it takes more time for them, and the engine will wear out a bit quicker and get the customer back again. :-) The 'experts' know better than the VW engineers. "What idiot would want to put the thermostat back in after I've so carefully torn it out and thrown it away!" It's very hard to find cooling vanes in Australia now (most were chucked out years ago), and new ones are unobtainable - except via the US. I've been asking at every opportunity, but haven't found a set yet. Many VW shops these days have come to realize these days just how important the cooling vanes and thermostat are, but in the past there was such a culture of "we know best", and most have been junked. :-( Some time ago the popular magazine VW Trends reported that - Here in Southern California, you are correct in assuming that most of the thermostats have been disconnected. Flaps/Thermostat MissingDave wrote to Rob regarding his missing thermostat - My inspection of the thermostat situation was discouraging. The area between the tin and the pushrod tubes on the right side is totally bare. Not only is the thermostat itself missing, but so is the linkage rod. I can't tell whether the cooling flaps are there or not -- they should be inside the fan housing, and I couldn't get to them. But the thermostat is GONE, as is the L-shaped tube and the pre-heater tube to the air cleaner. I can't imagine why anyone would go to the trouble of removing them completely -- simply deactivating the system does the damage! Sigh. Rob wrote to discuss how to determine if the cooling vanes are also missing - If the cooling flaps are gone there will probably be no connecting rod between the two sections, and you can check this quite easily. It's a flat connecting rod on the front of the fan housing, between the housing and the car body (front of housing). It's horizontal, and at the bottom of the fan shroud, just above the cylinder tin. Stand on the right side of the car and put your hand down between the engine lid and the body, down past the fan opening, and see if you can feel the flat horizontal link that runs along the front of the fan shroud between the two sets of flaps. It should be just under the fan opening, and perhaps a little towards the center of the engine. If the linkage is there, the flaps must be there for it to link onto. You may even be able to feel the holes in the side of the fan shroud above each bank of cylinders where the connecting levers for that pushrod should be poking through the fan shroud. Got holes and no horizontal pushrod then you've got no cooling flaps. Also, on mine, you can see the flap pivots from the rear (carburetor side) of the engine, just where the fan shroud meets the engine tins. They are mounted inside the top of the engine tins, but there are small holes front and back through the tinware for the pivots (and of course at the front the pivots also include a 'crank' for the horizontal link.) It is a little more difficult to see/feel on yours because the doghouse cooler takes up some space on the left side in front of the fan shroud. I can shine a torch down there on mine and see the horizontal link mechanism. Effects of Having No Cooling Vanes |
|
|
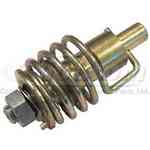
New-Style Thermostat |
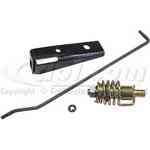
Mexican Thermostat Kit |
As Dave was considering the Mexican thermostat, he wrote - Before I fork out fifty bucks for this conversion kit, I am very anxious to learn what (if anything) I could have been doing wrong that has caused two thermostats to fail. Any insights would be very much appreciated.
Bob Hoover responded -
The thermostat push-rod only moves about half an inch from fully closed to fully opened. Takes a fair amount of pressure -- twenty pounds or so -- to overcome the spring because the push is on the end of a lever.
You may not have done anything wrong in the installation. I've heard stories similar to your's from a couple of guys. One of them said his the bellows-folds of his thermostat had cracked at the bottom of the fold. The other said the folds were 'corroded' (no details).
California Import Parts, Ltd., the Canadian outfit, also sells the replacement kit ($29.95).
Unable to find either the bracket or the bellows, a local machinist used some kind of greenhouse window-opener as the thermostat on a new engine he has built on a stud-less Mexican case. The actuator looks like a strap hinge, about 8" long. It lays horizontally, fastened to a brackect secured to the lower in-war 'ears' on the sump. When it gets hot, the 'hinge' opens itself up... and in doing so, pushes on the connecting rod to the air vanes. Seems to work.
Dave did install a "Mexican-style" thermostat in his '73 SB with very good success. Again, please see also our Mexican Thermostat Installation and Adjustment Procedure.
Questions and Answers
Dave wrote - I want to make very sure that it's going to contract on cold mornings and pull the connecting rod down and close the flaps in the cooling vane assemblies, thus assuring that the fan blows relatively warm air through the heater boxes and on into the car. My major driver for removing the engine from the car was to get those cooling vane assemblies installed and connected to a working thermostat.
Rob responded - Just take a look at it with the engine cold. Even on a hot day it should be compressed flaps shut. Then after the car is warmed up it should stretch out. If it's doing this, it's working. Then as a double check, after the car has had a run you should still be able to touch the dipstick without it burning your finger (it will feel hot though) if this is OK, the engine is getting enough cooling.
I imagine that in REALLY cold climates the flaps may not open much at all, but they will always allow SOME cooling air through, (otherwise there would be nothing to activate the thermostat when needed if you follow me).
So this would make sure the heads (and therefore the exhaust headers) get up to a good temp, so the cabin heaters should be much better.
Dave related the following horror story - What a night! We just got back from our "shake-down" run (after reinstalling the engine with new cooling vanes and thermostat). The car ran just beautifully for about 50 miles -- then all of a sudden when we left the freeway I noticed that the oil light was on. So I pulled into a gas station and discovered that the engine was extremely hot -- so hot that I burned my fingers on the dipstick. I knelt down and took a look at the thermostat -- it was not expanded AT ALL! Which meant that the cooling vanes had been totally closed the whole way!
We drove slowly to my mother's home and ran the two right wheels up onto the curb in front of her house... I took off my tie and laid a cloth out under the car and pulled out the thermostat. Once it was out the return spring opened up the vanes and the rod moved up, just like it's supposed to.
I discovered that the wire from the oil pressure switch had a burned spot, probably from the hot intake manifold, and the insulation was burned through, causing it to short out. This was what caused the oil light in the instrument cluster to come on. An easy fix before returning home -- no more red oil light. We drove home without incident.
Tonight I'm going to do the little test the John Muir (or maybe it was Bob Hoover) suggests put the thermostat in a Pyrex measuring cup and then fill the cup with boiling water. The thermostat should expand; if it doesn't, it's defective.
I tested the thermostat last night -- put it in a pot of water and heated it to boiling -- the thermostat hardly budged. It's supposed to expand to 1-3/16".
I called RMMW and got connected to their quality control person. I told him my tale of woo with the thermostat and stressed that even in water at a rolling boil the thermostat refused to expand. They guy was very good about it and is going to send another one (hopefully one that works this time) to our daughter's address by overnight express.
Rob responded - I can't see anything wrong with the procedure. And if the flaps opened OK when you removed the thermostat, there doesn't appear to be any problem with the linkage sticking.
The Muir test (thermostat in hot water) should work OK. Of course, if it's a defective thermostat, it should be expanded -- roughly 3 inches long, as this is it's 'rest' condition. That is, it should fail in in the expanded condition, not the compressed condition. It has a special low boiling point fluid in it (about 85c), and all air extracted, so when cold and the fluid is condensed, it has a vacuum drawing it closed. But when hot, the fluid vapourises, allowing it to expand to it's natural length.
If the Muir test shows it's OK, another on car test which might help is to blow a hair dryer (hi heat setting) on to it whilst mounted in the car. If this works (never tried it myself just thought of it), you should see the pushrod working.
Pushrod not binding on the hole through the air deflector plate between the cylinders is it? If the thermostat is defective, it should be expanded. But yours definitely seems to be defective, but it is completely contracted. That is odd indeed -- I wonder if it missed out on the liquid it should have inside. This would explain the slight expansion (partial vacuum -- leaving a few air molecules to expand).
One other small check as you install it -- make sure the brass top (the threaded tube where the push rod screws in) doesn't bind/rub on the small cut out in the top of the bracket. The design should prevent this happening, but there is just a little play in the bracket mount as you tighten it (on mine anyway), so check to make sure it doesn't rub.
Dave wrote regarding thermostat types - I checked Aircooled.Net and found Part #ESM0002 with two options:
- A 65-70C unit that is indicated as being original equipment on 61-74' Type 1s -- for $22.95.
- A 80-85C unit that is recommended for "earlier" engines -- for $24.95.
A question regarding operation of the Type 1 thermostat - Weve gone through two thermostats in our 73 SB in the past few years. The first one we found deformed almost into an S-shape; the second one (removed recently) was completely expanded even when cold.
I dont know what Ive been doing wrong, but a couple of things come to mind -
- Is the connecting rod hanging up and causing the thermostat to press upward to hard that it deforms itself? Just how far up and down does the connecting rod go from the vanes completely closed (down) to the vanes completely open (up)?
- Is it possible that the thermostat could have hung up on the bracket and possibly become punctured?