|
||

|
|
Defrost DiscussionDave's Experience, with Rob's InputFrom the outset Dave was anxious to do a very careful and thorough job of restoring his windshield defroster system, as it had never worked properly in his '73 Super Beetle. It gets cool enough during winter where Dave lives to need heat, so Dave was hopeful that the heat/defrost system was working or easily fixed. To begin with, Dave took the hood (bonnet) completely off, to provide better access to the "black hole" on the left side. (See the above-referenced discussion of the Windshield Defroster System to learn more about the "black hole.") The hood is easily removed, but it's a two-person job. It's a good idea you before you remove the four bolts to place some masking tape or similar just in front of the bonnet bracket as a marker so you can line it up easily when putting it back on.
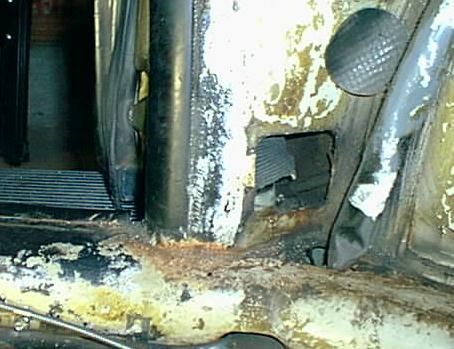
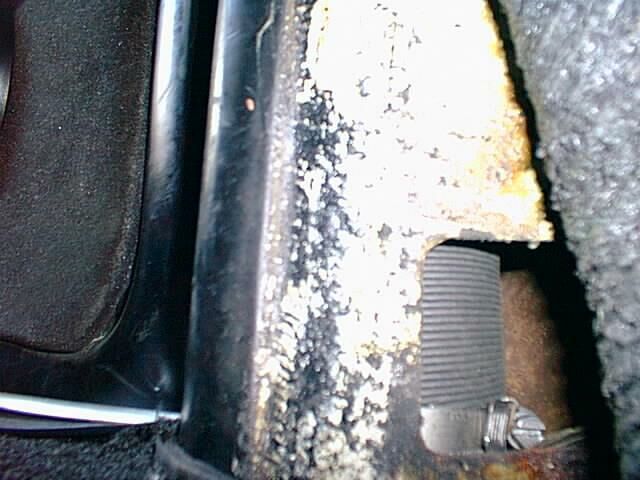
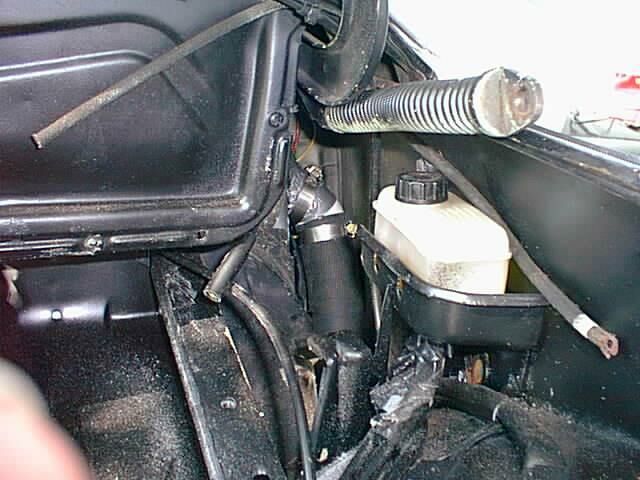 Top End of the Defroster Tubethe cobbled-up defroster tube. On initial examination Dave found that his system seemed to be intact. The defroster tubes up front were all there, and a quick look under the car showed the heat exchangers and body tubes were there. Note: The defroster tube is 1-1/4" in diameter, slightly smaller than the fresh air tubes in the engine compartment, which are 2" in diameter. Aircooled.Net sells the tubing for $7.95 for a 2-ft piece. Upon examining the above picture, Rob found the difference (with mine) at the top interesting. On his '68 Bug, the top of the upright defroster tube ends in a three-way splitter -- one to the corner defroster, one to the "inner" vents on the bottom of the windscreen, and one to the airbox for the center vent under the windscreen. Rob reported that on the left he would be getting warm air to the windshield as soon as he got the shroud paper tubes reconnected via the new muffler's heater fittings. On the right the vertical tube in Rob's "black hole" was missing, but Rob had a spare from his '70 Bug's old body, so he guessed that oversize fitting on the bottom so it covers the "snout" would fix that up. Note: The "snout" Rob mentioned is the rounded end of the heater channel that points upward inside the door frame, at the bottom of what Rob calls the "black hole." The top end of the "black hole" is in the luggage compartment. The "snout" on the driver's side is right next to the driver's left foot (right foot in right-hand drive cars) and in later model cars can be seen through a (too small!) square inspection hole at the base of the door frame. A flexible tube (similar to the fresh air tubes that connect to the fan shroud) attaches to the "snout," then runs upward through the "black hole" and turn inward through a hole in the body and up to the bottom of the windshield, where it connects to a warm- Dave had a look under the edge of the old carpet on the left (driver's) side. He found there a small inspection hole, built into the car, through which the "snout," can be seen (see the picture below). Dave noted (as you can see in the picture below) that the paper tube was not well positioned over the "snout," and it was raggy on the end anyway. A go at that was next on the list. Dave initally thought that he might need to enlarge the inspection hole so he could feed the defroster tube down onto the snout properly, but that turned out to not be the case. Rob found only 3/4-inch inspection holes in his cars ('68 Bug and '70 Bugs). Rob thought he might have to enlarge the holes with a cutting torch or a "nibbler," but he hoped he could just feel for the snout and get a tube over it. Not much chance of getting a hose clamp in there, though. Rob reported that on the flat screen cars you can see down the "black hole" (just) with the bonnet off, so access is better than on the Super Beetle. See our discussion of the Windshield Defroster System above for more information about this. Though it was nice to have the inspection ports in his '73 SB, Dave reported that they don't give much room to work -- just barely enough. But -- Dave was just delighted to find that there were inspection holes at all! It was VERY fiddly, but Dave was finally able to snake the defroster tube down from the top and get it positioned properly over the "snout." He then secured the tubes on both sides with hose clamps -- see the picture below. "No mean trick," Dave reported, "with such a limited space in which to work. Much muttering under my breath!" :-) Dave found working with the top end of the defroster tube in his '73 SB very difficult. The tube has to make a right-angle bend to pass through the hole in the body and connect up with the distribution plenum. Dave tried making that bend from the top down and the bottom up -- with the very limited space and the configuration required, Dave just couldn't get it to work. He finally went to Home Depot and bought a 45-degree angle plastic fitting for an irrigation system that just fit the tube; with that and a bit of duct tape, Dave finally succeeded in getting the defroster tube through the hole in the body and on to the distribution plenum -- see the picture above.
All said and done, Dave's defroster system is still marginal at best, as clearly demonstrated by the onset of Winter weather. There is just too little fan pressure and too many leaks for the necessary quantity of warm air to make it all the way to the windshield. At this writing (December 2004) Dave is thinking about installing a defroster booster kit. If he does, Dave will later report the experience and the defrosting results.
|
||||||
|
|