|
||

|
|
Heating Your VWSubsections herein are provided as links, as follows -
Purpose of This TreatiseAs we will discuss below, there are two schools of thought regarding the aircooled VW heating system: 1) it isn't worth a damn, and 2) it is adequate and can be made to work well. The purpose of this treatise is to explore the latter premise. It is motivated by my own experience (and frustrations!) with the VW heating system. Two Schools of ThoughtAs we indicated at the outset, there are two schools of thought regarding the VW heating system: the first and most common is that it isn't worth a damn; the second is that is adequate and can be made to work well. Following are some comments on these opposing views:
John S. Henry, one of the VW pros we all look up to, says that questions about the VW heating system are the most commonly asked questions about Bugs, and it bothers him. Here's what he has to say: It aggravates me because sometimes I hear really stupid advice from people who live in areas where they don't even need heat. And I get just a bit aggravated when I hear people comment, "Beetles don't have heat, do they?" I drove my '68 winter beater for four years in northern New England. This period included the winter of '94 - '95 which during the entire month of January, where I live, the temperature never got above 32 degrees (F) day or night. I performed the same modification to three of the Beetles that I drove over 13 years, and it was always adequate, even in the northeast. Primer on VW HeatPrior to doing anything with the heating system in your Beetle, you must understand the dynamics of the stock system. Most of the air output from the fan housing is directed down between the engine cylinders, heads, etc. to keep the engine cool. Since the 1961 model (40hp) some of the air is ducted out of the fan housing through two 2-inch "fresh air" tubes on either side of the fan housing. These tubes proceed down through the engine tin and direct the air into the heater boxes on either side of the engine. Thus the volume of hot air that is blown into the car depends on the speed of the fan in the fan shroud, which in turn depends on the speed of the engine. These heater boxes are simply housings around the exhaust pipe that connects to the exhaust ports from the front-most cylinders on either side of the engine. These exhaust pipes continue through the heater boxes and connect to the muffler. Inside the heater boxes the exhaust pipes have large fins to provide heat transfer from the exhaust pipe to the fresh air from the fan housing. The heater boxes are equipped with internal flappers that direct the heated air either out underneath the car or forward to the passenger compartment. These flappers are controlled by a cable attached to right-hand control lever located between the front seats. The control cable divides in two and attaches to the two lever arm assemblies, one on each of the two heater boxes. When the lever in the cabin is raised, the cable is pulled and the flappers in each of the heater boxes are opened. This directs the warm air through a corrugated tube on the front of each of the heater boxes and into a heated air channel that runs along each side of the car. Air from this channel branches off to heater vents under the rear seats, to footwell vents in the front footwells, and to the windshield via hoses in the A-pillars to provide defrosting. The destination of the warm air flow is controlled by the left control lever between the front seats. It is important to realize that the heater boxes are an integral part of the cooling system for the engine. Even if you never want heat in your car, it is important to keep the system intact to prevent the engine from running hot and possibly warping the heads. - Adapted from John S. Henry, "Heating Your Beetle" Problems with Heating the VWFollowing is a general discussion of the most common VW heating problem areas. Each of these (and more) will be discussed in more detail in the following pages.
Thermostat/WarmupThe first thing to check in your VW heating system is the thermostat and movable flaps in the fan shroud. If this system is missing or not working properly, then the engine will not heat up properly on cold mornings and you will not have heat in the car as soon as you should. Worse, your cylinders and valve guides will wear more rapidly, you'll use a lot of oil, and you'll burn more gas. There are those who claim that the VW engine runs better without the thermostat. Bob Hoover expresses his opinion about that in no uncertain terms (see his "Sermon" on Cooling Vanes & Thermostats). Rob's opinion is the same - the VW engine cooling and cabin heating system works as a whole - if you leave parts of it out, you affect all parts of it. Many folks who say "the engine doesn't need those cooling flaps" are often comparing the aircooled VW engine with an aircooled motobike engine or a lawn mower engine, thinking that all aircooled engines are the same. They most certainly are NOT. The VW engineers were clever folk and never put anything extra on a car that wasn't needed - it was built to a price, so if they spent money on some small part - that part is needed. The thermostat is a cylindrical bellows shaped device which sits under the cylinders on the right side of the car. It is easily visible from under the rear of the car. It clamps to the side of the engine case by a bracket and one bolt. This bolt can work loose, so check the system out even if it is clearly visible. It has a pushrod going up through an air gap in the middle of the cylinder head, and there are cooling flap hinges and linkage on the front (front is front of car) of the fan shroud--that is, between the shroud and the firewall, and under (lower than) the fan. If this hardware is missing, you will simply feel a few holes in the tinware where the pivots poked through to the (missing) linkage bar. This linkage bar is just a flat strip of steel which links the right and left sets of flaps. The flaps are inside the shroud and control the airflow as the engine warms up. These flaps are essential to provide both controlled warmup (they close off about 75% of the cooling air until the engine warms up), and they direct the cooling air where it's needed most. No flaps means more air to the cylinders (which run cooler anyway), and less air to the heads, which run hot and need more of the cooling air. The thermostat also controls the carburetor pre-heat air through a pull-wire (on some models) which loops around behind the carburetor to a flap in the air cleaner intake. With the engine cold, warm air is pulled up through the paper tube from near the cylinder head to the air cleaner and on to the carburetor. On cars from 1972 onwards, the pull-wire is replaced by a temperature sensitive air-line switch/valve in the top of the air cleaner - when the engine is cold the switch/valve is open allowing vacuum from the inlet manifold to open the warm air intake in the air cleaner inlet snout - once the air inside the air cleaner warms up (the engine is now hot), that switch closes and the air cleaner gets cool air. This mechanism helps prevent icing until the heat riser pipe under the inlet manifold heats up. As the engine warms, the carburetor pre-heater shuts off, so the carburetor then breaths cool air. If the thermostat is there, check its condition. It should be compressed (short) when the engine is cold--that is, each section of the bellows is almost touching the one next to it. If the thermostat fails, it expands (lengthens) to it's rest position, which means the cooling flaps open and the maximum amount of cooling air is supplied to the engine (just as if the thermostat wasn't there), and you get a cold running engine. This is a fail-safe system - if the thermostat fails, it fails in the OPEN position for maximum engine cooling, so you wont cook your engine. The modern wax plug replacement thermostats don't have that safety feature - they can fail in any position. If your car is missing the thermostat or any of the associated hardware, get the parts from your favorite VW parts outlet or from your local wrecking yard and REPLACE THEM. Without the thermostat system the engine will NEVER get properly warm in a cold climate, so both your engine and your cold toes will suffer. Here are the components:
If the control flaps, connecting rod, return spring and thermostat link rod are all in place, the thermostat can be easily installed as follows:
Don't forget to replace the lower tinware; this provides a plenum to insure that the thermostat is bathed in heated air from the cylinders and heads. If the air vanes and associated hardware are missing, it will be necessary to remove the fan housing to restore the thermostat system. This is most easily done with the engine out of the car, but it can be done with the engine installed if the engiine lid and its hinges are removed so the fan housing can be lifted straight up to clear the oil cooler. Before the fan housing can be removed the following must be done:
In summary: If the thermostat and associated hardware are disconnected, not adjusted properly, or the system is not functioning as it should, then the air vents that control the amount of fresh air to the engine are probably wide open and you will not heat up your engine properly and will not have heat as soon as you would if it were working correctly. Nor will you engine maintain a proper operating temperature. This will shorten the life of the engine as well as lower the optimum amount of heat that could be used for warming up the cabin. A word about the heating system operation: it is important that you not turn on the heat into the passenger compartment until the engine is fully warmed up. If you turn on the cabin heater too soon, the heat exchanger won't be hot and you will get a blast of cold air in the cabin. VW recommends that you drive off straight away without warming up the engine first, even in cold weather. This warms the engine up faster and reduces engine wear. It also means that the cabin heat will work sooner than otherwise. Just take it easy on the throttle until the engine is warm. SealsThe engine compartment seals--the rubber seal that runs around the engine between the tin and the body of the car and the seal that goes over the back of the engine/transmission area and attached to the bottom edge of the firewall--are key components of the overall air flow mechanism in the Beetle. It is vital that these seals be in place and intact. It is also important that all of the engine tin be in place and have no holes. Always remember that this is an air-cooled engine. Clean air is sucked through the louvers in the rear of the car (under the rear window) plus the engine lid slots where fitted, and into the fan housing, from which it is dispersed to cool the engine and to direct fresh air through the heater boxes to be heated as a source of warmth for the passenger compartment. It is important to keep the air above the engine totally separated from the air below the engine. Poor engine sealing can result in dusty, dirty, hot "road" air being drawn up into the fan housing intake and ultimately into the car. An airtight front hood-to-body seal is essential. This is very often overlooked (an old blanket stuffed behind the dashboard will never work). A lot of air pressure is built up against the nose of the bug at highway speeds, and if it is cold air, you probably would like to keep it outside. No matter how much heat you can get inside the Beetle, it will be for naught if you have the arctic express blowing through your dashboard when you cruise down the road. Getting a good air-tight seal is sometimes difficult if your lower front body is not perfect. If your Beetle is not "showroom," you may need some home weatherstripping glued with RTV to the hood edge, particularly under the bottom where the hoods meets the apron. To test the seal's effectiveness, open your window a crack and feel for incoming cold air around the dash, gauges and glove box when you are running down the highway. This creates a bit of a vacuum in your car's cabin and "invites" cold air in. If you detect air, go check out the seals again. Be sure to check the door and window seals, too. If these seals are bad, you are going to loose a lot of precious heated air, especially at higher speeds as it is literally being sucked out of the car. Replacements are cheap, but you usually get what you pay for. Conversely, if you have a pre '71 model (without the eyebrow vents behind the rear window), which has good door and window seals, it can sometimes be beneficial to crack open a quarter vent, so the hot air from the cabin heater has somewhere to go. The VW doorseal design is so good when new that it can effectively prevent ANY air (including cabin heater air) from entering the car. If you have eyebrow vents in your car (1972 and later cars), opening the quarter vents is not necessary. Check the air ventilation box too make sure that the flaps are sealing when they close. It's a bear to get too, but again, if it's cold where you live, then it's worth it. FanThe fan, which is located within the semi-circular shroud in front of the engine (front means front of the car, remember), serves several functions. It sucks cool, clean air in through the louvers underneath the rear window (and engine lid where fitted), which it then blows around the cylinders and heads to provide engine cooling and around the oil cooler within the fan housing to cool the engine oil. In addition to these vital functions, the fan also provides the air that is heated within the car's heating system so the occupants can stay snug and warm. It is important that the bottom of the fan shroud fits snugly into the tinware on top of the cylinders--that there are no gaps for precious cooling air to leak out. Go to Fan for a more complete discussion of the fan and its function. Fresh Air HosesThe fresh air hoses are the cardboard/foil hoses that connect the outlets on either side of the fan housing to the heater boxes. These hoses carry fresh air from the engine fan down through the engine tinware where they mate with the heater boxes, providing air to be heated for use throughout the vehicle. These hoses must solid, sealed, and secured with hose clamps on both ends. Rubber grommets around the hoses where they pass through the tinware will help to prevent chafing and premature failure, and also helps to seal the upper part of the engine from the lower part, keeping your cooling air clean. Be sure to check the condition of the hoses under the engine tinware. Sometimes the configuration of the exhaust headers leading to the muffler will necessitate some very tight bends in the fresh air hoses. Crimping of these all important hoses in this very cramped space is a common problem. Plenty of frustration has been encountered here. On our '73 Super Beetle, equipped with a GT Sports Style exhaust system, we found it to be virtually impossible to run the fresh air tube around the exhaust header and to the heater box without crimping it. Rob Boardman reported to me that to solve this problem (actually caused by a less than perfect after-market muffler and associated heater fittings), he had to construct a special fitting on each side to poke up through the tinware, mating to the metal tube which surrounds the rear cylinder exhaust pipes. These special fittings look like two very short tubes soldered one on top of the other, but slightly offset, and with a slight kink as well. Rob says he made these special fittings from a baked beans tin and just soldered them together. He reports that these homemade fittings worked very well, but of course they shouldn't be necessary. The standard system (as I understand it), as well as some aftermarket systems, employ a tube-through-a-tube system. The rear exhaust headers pass through a fattened cabin air tube which in turn pokes up to just under the tinware, and at the bottom mates to the heater boxes. Then from the top of the tinware there is inserted a short (about 3 inch long) extension metal tube, and the paper tube attaches to the top of this. This fattened tube fits loosely around the exhaust header, so it can be jiggled a bit to line up top and bottom with the tinware hole and the heat exchangers. Rob says that these fittings didn't quite mate up to the tinware holes--hence the offset "baked bean" tin plumbing described above--so he could drop in the 3-inch pipe through the tinware. Lacking the tube-through-a-tube system, we were successful in preventing the fresh air hoses from kinking by routing the hose through a different place in the tinware. To avoid interference with the rear exhaust header on the left side, we enlarged the hole in the tinware to the right and down over the shoulder. Of course, this necessitates some patching, as holes in the tinware will allow the dirty "road air" into the engine compartment and thus into the fan and the heating systems. Heater BoxesHeater Box Removal and Installation. To review: The air that warms the passenger compartment of the air-cooled VW is heated by the exhaust headers from the front-most cylinders (#1 on the right and #3 on the left). These headers connect to the front of the engine on either side and then turn 180o to carry the exhaust to the muffler in the rear of the car. These headers, because of their shape, are called "J-tubes." The heater boxes are roughly cylindrically shaped and surround the J-tubes as they pass rearward to the muffler. Fresh air is blown into the heater boxes from the fan by way of the fresh air hoses. This air is warmed within the heater box by radiant heat from the exhaust header, and by convective heat from the fins attached to the exhaust header, which fill the heater box. A flap at the front of the heater box directs the flow of warm air; if heat is not needed in the car, the flap is kept closed and the heated air is exhausted underneath the car. If warm air is needed, the flaps in the heater boxes are opened and the warm air is directed through the flexible tubes that connect to the front of the heater boxes and on into the heater channels on either side of the car and into the passenger compartment or to the windshield as needed. Typically the heater boxes are the weakest links in the aircooled heating system. This is because most VWs are fairly old and most of the heater boxes are worn out and are leaking exhaust into the outer cavity of the box. Because of this, many people just leave them off or plugged and live without heat. Next to brakes and a tune-up, the purchase of new or rebuilt heater boxes is probably one of the best investments you can make for a VW, especially if you plan to keep it for a while. Even if you sell it sooner, you can make the new heater boxes a good selling point. The heater boxes are known to rust out and/or get really oily. If they are rusted, the boxes should be replaced because of the potential for exhaust to get into the hot air stream. Be especially cautious if you have even a hint of exhaust smell in the passenger compartment. Exhaust contains the deadly gas carbon monoxide, which is colorless and odorless. Only the smell of exhaust may give the hint that there is carbon monoxide in the car. We will have more to say about exhaust in the heated air in a moment. If the heater boxes are just oily, take them out and clean them with soapy water and a high-pressure washer. (A coin-operated car wash is handy for this purpose.) While the boxes are out, make sure that the flappers inside of them work smoothly. You should also take care when adjusting the valves, as the valve covers are just above the heater boxes and are prone to dribble oil when removed. When reinstalling the valve covers, be sure to clean the sealing surfaces completely and install new gaskets, using gasket glue on the valve cover side. Apply a thin coat of wheel bearing grease on the face of the gasket that fits to the head. All of this will help to prevent oil from leaking out of the valve covers and down over the heater boxes. Corrugated Heat DuctsWhile you're fussing with the heater boxes, inspect the corrugated heater ducts that run forward from the heater boxes to a connection in the body (from whence the heated air proceeds through ducts under the rear seat into the heat channels on either side of the car). If these corrugated ducts are defective in any way, they must be replaced to prevent loss of heated air out of the system. Don't settle for the cheap plastic substitutes; get the heavier duty ducts that are insulated on the inside, held in place with spiral-wound wire. These are available from Aircooled.Net for $22.95 each.
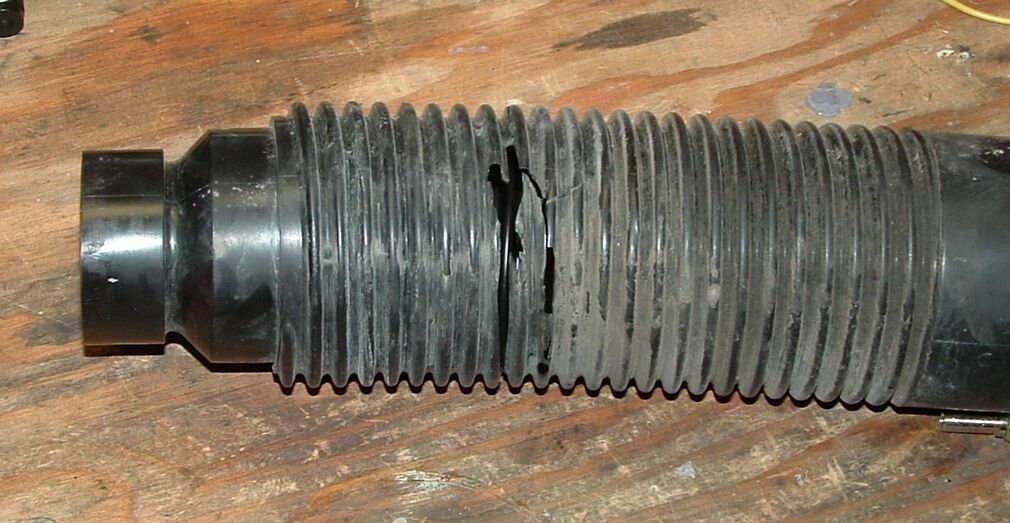 Old Corrugated Heat Duct
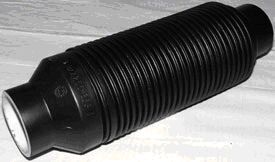 New Corrugated Heat DuctExhaust can get into the heated air in a number of ways. Each of these is addressed as follows:
Rob wrote, after examining a picture Dave sent - Looking at that exhaust port, it looks very much like you've been getting some exhaust leaking out both sides of the joint -- the area around the studs is clean but in between is very black. Might this be the source of smelly cabin heaters? Might need two gaskets so you can get a bit more "squash" to seal the area better. If you find that replacement of the heater boxes is necessary, don't be tempted to cut corners! Get good, high-quality boxes; you will have to pay a little more, but they will be more than worth it in the long run. Remember, you generally get what you pay for. The most emphatic advice I have received with regard to exhaust gas in the heater air: If you smell exhaust in the car, get the problem fixed FAST! Carbon monoxide is a colorless, odorless killer. Lever Arm Assemblies and CablesLocated on the center-of-the-car side of each of the heater boxes is a lever arm assembly consisting of a flat piece of metal with a slot in one end, a pivot point in the middle, and hardware for attaching a cable on the other end. The cables run through tubes toward the front; then join in the passenger compartment and attach to the right-hand heater control lever between the front seats. When this lever is raised, the cable pulls the bottom of the lever arm forward and thus the top of the lever arm moves back. In the slot in the top end of the lever arm carries the arm from the flap inside of the heater box, which opens when the lever arm is pulled back and closes when it relaxes forward. A spring in the lever arm assembly assures that the flap closes completely. Make sure that both lever arms are in place, the cables are attached, and that the flaps open all the way when the heater control lever is raised. The flaps must also close all the way, otherwise you will get heat in the passenger compartment all the time, making it even more apparent that the car is not air conditioned! The spring that returns the lever arm and closes the flap gets weak over time and may need to be replaced. When we first purchased our 1973 Super Beetle we found that the heater cables were missing and the channels in which they ran were plugged. The lever arm assembly on the right was completely missing. We were told by the local "experts" that the only way to get heat was to wire the flaps in the heater boxes open in the Winter (thus getting constant heat) and then to remove the wires (close the flaps) in the Spring. We set about the restore the system. The first challenge was running new heater cables back to the heater boxes. We quickly discovered that the plugs in the heater cable tubes were near the rear end of the tubes. We attempted to drill the plugs out, but to no avail--they were very tight and solid. We ended up cutting off about two inches of the cable tube, which effectively cleared the tube so we could install the new cable. We then set about installing a new lever arm assembly on the right side. The replacement assembly came with a spring of a very different design that the original (a spring about an inch long with hooks on either end, rather than the original coiled spring that fit over the pivot pin). I called the supplier (RMMW) and was told that the old style spring didn't keep the flapper in the heater box closed very well, so the design was changed to this new style of spring. The new spring attaches on one end to a hole at the bottom of the lever arm; you have to a bit creative to find a point of attachment on the other end. On our car there was a place that it could be attached on the right side but not on the left. Heater ControlsWe have had considerable discussion with folks on the VW Newsgroup regarding the operation of the heater controls and footwell flaps. Apparently things changed with our model year, 1973 (or thereabouts). Following is a direct quote from the 1973 Beetle Owner's Manual (thanks to Steve Prescott for sending us the manual!) about the operation of the system: There are four footwell outlets, two in the front and two in the rear. The front outlets are located just beneath the doors, the rear outlets are under the rear seat. Front and rear footwells are opened and closed with the heat distribution lever (the LEFT one). With the lever on the tunnel next to the driver's seat (LEFT one) you can control the distribution of heat to the front and rear footwells. Lever down -- front and rear footwells closed. Lever up -- front and rear footwells fully open. You can select any intermediate position to regulate the distribution of heat to the front and real footwells... Defogging and defrosting your windshield will be more effective if you direct the total air flow toward the windshield. Here is what to do:
To increase the fresh air flow, turn the left fresh air knob (on the dash) to the left ... and turn on the fresh air fan. Now all the air is directed toward the windshield and the front side windows. DefrostDave's experience with restoring this system. One of our biggest challenges with the heating system in our '73 Super Beetle has been the defrosters. Our goal was simple: we just wanted to restore the system to its original configuration and get nice warm, clean air all the way to the windshield. Friends on the VW Newsgroup have reported that the system works well if everything is put together properly, it is kept well maintained, and there are no leaks. Someone even reported having melting plastic CD cases with the air blowing out through the defroster vents! Others say that whatever you do the heat/defrost system will be insufficient, the only hope being plenty of windshield defogger and warm clothes! We chose to believe that the system can be made to work and charged ahead. Once we got the heater cables replaced and the flappers in the heater boxes working, we still got only a trickle of air on the right side and none at all on the left. The flappers in the front footwells were missing, so we covered them over from the inside with cardboard and duct tape on the theory that it's more important to keep your face and hands warm then your feet, and to have a defrosted windshield. This helped on the right, but still no airflow on the left. We got a real good hint as to the nature of the problem on the left when the plastic distribution plenum that connects the defroster tube in the pillar to the underside of the dash fell out! Then, in the process of rewiring the interior light, I pulled the defroster tube itself completely out, not realizing how difficult it would be to replace it. (This is the tube that runs up from the "snout" on the heater channel, through the forward door jamb, then around ("kind of" accessible from the luggage compartment) through the body to the defroster distribution plenum.) We became quite discouraged with this problem when we were given the following advice by someone on the VW Newsgroup: To replace the defroster tube in the pillar you must either:
Others said if could be done if you have lots of patience and small arms and if you take off the front hood to provide more room. In response to a desperate plea to the VW Newsgroup, John Henry sent the following: Actually, lifting the body off the pan doesn't even get you access. This is the infamous "black hole" in the Beetle. There should be a male "snout" sticking up from the top of the heater channel at the bottom of the door jamb. To view this area, open your hood and get a mirror and a flashlight. Illuminate the hole on either side of the car (yes, one at a time) just under the hood hinges. You will need the mirror to be able to see the bottom. Now before you go shoving you arm way down there to try and reach some old tool or some coins that you now see at the bottom, let me give you a pointer that the inside, tender area of your arm will appreciate. At least on the '57 through '68 Beetles I have owned, the carpet in the inside firewall is held in place by glue and nails. That's right, little short nails with twisted splines so they get a grip when pounded through sheet metal. And the sharper sides of these nails poke into the dark hole that you are looking down into. But they are small and can be easily missed. So before you shove your arm down there, get some pliers, go into you car, under the dash and, even if new carpet has been glued up there, pull it down and pull out any nails that you see. Rob's comment: I found these the hard way and got a "leaky" arm for my troubles! Now with regard to the defroster tubes themselves: These are identical in construction to (but smaller in diameter than) the fresh air hoses that run from the fan housing to the heater boxes. The bottom of the defroster tube, down inside the "black hole," slips over a metal "snout," which is oriented vertically on the front end of the heater channel that runs up the side of the car, right in front of the door hinge pillar. The problem is snaking the defroster tube down the "black hole" so that it slips neatly over the "snout." Concerning this John Henry writes: Unless you have large forearms and hands, you should be able to reach down there (from the luggage compartment side) and "feel" it in. Just make sure all the carpet nails are removed from the inside. You might also use a good silicone too. If the area down there is all rusty, a rust converting (not just inhibiting) paint is warranted. What John didn't say was that in order to do this it is necessary to remove the hood and the springs, which are directly in the way. According to a mechanic friend of Rob Boardman's, "There's no easy way, just fiddle fiddle, and it helps if you can bend your elbow backwards!" Might help to find some good padding and lie down across the luggage compartment so you can use you left hand down there (in the left side "black hole"), with the left shoulder under the windscreen - so to speak. At least the arm would be bending in the right direction. And of course visa-versa for the right "black hole." Use of a stiff plastic downpipe has been suggested, something just a bit bigger than the 'snout' so it would fit over it nicely. Even if it didn't totally seal against the snout it would be bringing the air up to where you could attach some pipework for the dash vents. This sounds feasible; we haven't tried it. Fresh-Air FanA related part of the defroster system in the Super Beetle is the two-speed fresh air fan. The "flat-window" Super Beetle was the first to get the two speed fan, in 1971 The design of the fan on the curved window Super Beetle differs substantially. Depending on the position of the knobs on the dash, fresh air can be directed either to the windshield (toward the center from where the defroster air comes in on either side) or directly into the passenger compartment. Currently our fresh air system is not directing air to the right side. Regarding this, the Bentley Manual states: If turning the control knobs does not change air output, remove the radio or the radio aperture cover. Then see if the control cable eyes are properly in place on the cranked ends of the fresh air flap shafts. If not, repair the cable ends working through the aperture. If the knobs cannot be made to turn freely or if the flaps are stuck in the air control duct, the dashboard must be removed to gain access to the air controls. Bentley then gives detailed instructions on removal of the dashboard and repair of the control bracket and/or flaps. We have not yet attempted this repair; when we do we will report our experience in a future revision.
|
||
|
|