|
||

|
|
Engine (Deck) LidThe following topics are discussed in this article -
Engine Lid SpringSomeone wrote - I can't for the life of me remember how the engine lid spring attaches. It looks like the spring hangs free on the little slot that I have it hanging from, and the other end is "pinched" and then inserted into the bracket on the deck lid. But I just can't figure out the mechanics of it. Rob responded - The way you get it on is to remove three of the four bolts holding the lid in place and rotate the lid sideways on the remaining bolt (loosen it a little). Place the spring in the lid first, pinching the ends as you say and placing them in the holes closest to the edge of the lid - The coil part of the spring will be hanging down as you do this. Then rotate the coil part of the spring to insert the U shaped centre of the coil spring into the body bracket, and push the whole engine lid back sideways on that hinge bolt to compress the spring and line up a bolt hole on the other side hinge. Once you get that second bolt started, you can insert the other two bolts and finger tighten them, adjust the lid so it closes without too much gap at the top, then tighten the four bolts. Engine Lid AdjustmentDave has experience frustrations with adjustment of his engine lid right from the start, and it still isn't exactly right. Theoretically, to close the gap around the top of the lid you need to slide the hinge brackets toward the front of the car and then pull the decklid adjustment further back up. Easier said than done. At one point he decided to take the whole thing apart and start over. He took the brackets off and discovered two things -- his helper had put them together wrong, and the brackets themselves were cracked! Fortunately Dave has a friend across the street who restores vintage cars as a hobby and is an expert welder. He ground and hammered the brackets back into shape, welded the cracks, wire brushed them down with his little air-driven unit, and primed them! Wow! What a service. Dave brought them back home and painted them black. Then back to the frustrating job of trying to get the rear bonnet lid on and adjusted. Dave put the brackets on correctly (U-shaped piece on the bottom rather than on the top), then fiddled and fussed with the two bolts on either side, moving the lid up and down to try to make it fit properly. He ended up stripping the two holes in the hinge on the right; fortunately a nut fit on the back. Dave finally got it as good as it was before, but there still was too much space around the top. Two years later, Dave wondered whether it is possible to bend the ends of the U brackets together slightly? He couldn't think of any other way to alter the gap. Sliding the lid on the hinges would produce a small change, but not enough to fill the gap around the top of the lid. Dave checked out the rear bonnet lid on another '73 SB, which fits perfectly. Dave decided that his brackets must be bent. He called Russ' Recycling in Duarte, California to see if he could get some new/used ones. He did get some new/used brackets, but they made no difference. A year later, during reassembly of his SB after having it painted, Dave expressed frustrations trying to reduce the size of the gap around the top of the engine lid. He had the brackets all the way forward and the hinges pulled all the way up in the brackets, but there was still too much clearance between the top of the lid and the body of the car. Rob was in a quantry as well. Somewhere Dave recalled John Henry as saying he's had to use shims to get the lid adjusted right. It wasn't obvious to Dave just where to put shims. Rob suggested putting shims between the lid hinge and bracket (lifting the open lid a little) -- that would probably reduce the gap with the lid closed. Putting washers between bracket and body would probably have the opposite effect. Dave wrote to John Henry - I have too much space between the top of the lid and the body, and I'm at the limits of adjustment on the brackets (all the way forward) and the hinges (all the way to the top). Some time ago you mentioned that you needed to use shims to get the lid adjusted properly. Could you give me a little elaboration? Like what to use for shims (washers?), and where to put them. I need to pull the brackets back out a tad, as the lid is recessed too far inward (toward the front of the car), but the gap is too wide and I'd like to narrow it up if I can. John Henry responded - The biggest lesson to be learned here is to do all this fitting and aligning *before* paint. (I didn't either). You can shim stuff, but I have learned that it is easier and more effective to *bend* stuff. You can remove the brackets and bend them gently in or out. You can also bend the louvered panel mounts a bit. But none of that bending is fun with fresh paint!!! I might have told you before, but put a couple layers of tape on the upper lip of the decklid and the lower edge of the body cowl until you get it all worked out. I quite frankly forgot where I used shims, I think it was between one end of the bracket to body mounts. A also remember elongating holes with a grinder. But in the end I think it was bending that fixed it. The situation remains unresolved to this day. Dave finally gave up and moved on to more important things. Slots in the Engine LidRob provided the following description of the evolution of the engine lid - Here's how it happened -
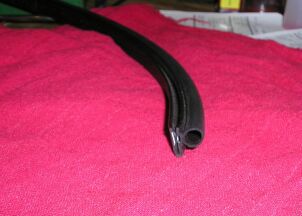
So if someone puts a lid with no slots on a dual-port engine, it will be running short of cooling air, particularly at higher speeds. A "2-slot" lid from 70/71 cars is the minimum extra inlet afrea needed, and "4 slot" lid from any '72+ beetle will enable the larger fan to work at it's best. As a direct example of this - Rob's 68 bug (solid engine lid) had a 1600 twin port engine in it when Rob bought it. It ran OK in winter but in summer it started to overheat at any speed over 80KMH/50MPH. After borrowing the engine lid of my 1970 beetle with it's two sets of slots, the problem instantly dissappeared. That engine was using the smaller 30PICT/2 carburettor so horsepower was down a little, clearly demonstrating that the VW engineers had it right, you REALLY need a "4-slot" engine lid with the stock 1600 twin port engine with it's 60HP or more, particularly as the bug's weight increased after 1970 so the engine is working a little harder at all speeds. Engine Lid LatchDave replaced the rear apron on his '73 Super Beetle with a fiberglass one (with no cutouts for the muffler peashooters). The new apron did not have the lower latch piece for the engine lid, so Dave had to cut the lower latch piece off of the old apron and bolt it to the new fiberglass apron, using Locktite on the bolts and nuts. Dave found it very difficult to get the nuts on up underneath the top lip of the fiberglass apron - not much access for fingers. Light into the Engine CompartmentDave cleaned the little plastic disk that fits in a hole in the lid right under the license plate light. It had been painted over on one side and was all gunky on the other (inside). Dave wondered if perhaps the purpose of this hole and disk is to transmit light (e.g., from the license plate light) into the engine compartment on a dark and gloomy night. Rob also has one of these plastic disks under the license plate light -- clear (or rather slightly yellow with age). Rob had thought of it as providing light in the engine compartment, but he assumes that's what it's for. He always gone in there with a torch (flashlight to US folks :-) in hand, and never noticed it as a light! Engine Lid SealAs indicated above, Dave found it necessary to replace the rear apron on his '73 Super Beetle. It had been badly damaged in a rear-end accident, then very poorly repaired with layer after layer of Bondo. Because Dave's car is equipped with a Sports GT muffler with two sets of peashooters protruding rearward beneath the apron, Dave needed to install a new rear apron that did not have the cut-outs for the standard peashooters. Dave finally found such a rear apron at Innovations in Fiberglass in Phoenix, Arizona. One of several problems with the new fiberglass rear apron is that it doesn't have the slot for the standard engine lid seal. It was suggested by someone that a long piece of thin foam material be glued around the edge of the engine lid. Dave tried this, but it didn't work well and didn't last. Finally, Dave found a seal that clips onto the inner edge of the engine lid, with essentially a long rubber tube attached to the continuous clip to provide the seal. The pictures below show the seal more clearly. Dave originally found the seal at BTLMEX, Inc.; unfortunately BTLMEX, Inc. is going out of business and couldn't provide the seal. Dave bought it from Aircooled.Net.
|
||||||
|
|