|
|
|
Engine Removal and
Reinstallation Discussion
~~~
Please see our Engine Removal Procedure, developed as a result of the following interchange between Rob and Dave, This "conversation" documents the saga of Daves first experience in removing the engine from his Bug (he was later to do it three times more!).
If you want, you can skip to some Pictures of Dave's First Engine Removal Experience.
~~~
Rob wrote (before Dave dropped the engine in his '73 Super Beetle for the first time)... dropping the engine is no big deal. I do it with just a trolley jack and car stands. Just get the whole car up about 3 feet off the floor so the engine can be pulled out from under (or you can work on it sitting on the floor under the car but there is less room that way). Remove the engine electrical connections and poke the wires up out of the way. Take off the engine lid to make more room to work, remove the fuel line flexible coupling over the gearbox, and the heater cables and flexible heater pipes; and undo the four bolts on the bell housing (two bottom ones from under the car, two top ones from in front of the fan shroud).
Support the engine on the trolley jack (piece of wood across the sump so you can tip the engine forward and back - read on) and remove the rearmost engine tins (breastplate). the engine should then slide back about an inch, and you then lower-pull-lower-pull. The rear of the engine tips lower than the front until it pops free of the gearbox shaft, (a bit fiddly getting the fan pulley past the rear engine seal - not much room to spare), and lower the engine on to a block of wood each side of the trolley jack (under the heat exchangers works good). pull the trolley jack out from under, and lift each side of the engine at one time and remove the wooden block that side, so the engine is then sitting on the floor. A length of thin plywood etc under the engine is useful here, as you then wriggle the engine out from under, backwards.
Installation is the reverse. Takes me less than an hour to get it out with no help. It takes the experts less than 20 minutes with two guys working on it.
One tip -- DON'T turn the engine whilst it is out of the car if you can avoid it. That way the clutch splines will still line up with the gearbox input shaft when you put it back in -- less pushing/shoving to get it to line up.
~~~
The Saga of Dave's First
VW Engine Removal Experience
(A lot of stuff to plow through, but many a nugget to be found!)
Dave has a tendency to be very meticulous and just a bit obsessive (Rob's comment: - smile). Before he tackles a job for the first time he reads everything he can find and asks a million questions and makes sure he has everything he needs -- then he writes a complete set of detailed procedures, many of which are now preserved on this Web site. The process results in good procedures!
Rob (the more experienced of the pair) said that he can get the engine out (without help) in less than one hour, but that it would probably take Dave about four hours on his first time. A good Bug shop can get the engine out in about 20 minutes.
Rob wrote the beginnings of the Engine Removal Procedure that finally ended up on this Web page. I (Rob) like to lift the whole car off the ground. Lifting just the rear means you have to pull the engine uphill when removing it, and makes lining it up for re-installation much more difficult.
I use a small (two foot long) trolley jack, with a lift of about 10 inches, two axle stands (under the rear torsion bar tubes) and a pile of bricks and a few bits of wood (to make stands for under the front axle tube - if you have 4 axle stands, so much the better). I also have a heavy piece of plywood, about 2.5 feet by 15 inches, for the trolley jack to sit on (all will be revealed...)
This procedure assumes you have very simple tools, jacks etc, not necessarily any full workshop equipment - it's written for the Home Mechanic so if you have some better equipment, adjust the procedure to suit.
- Disconnect battery earth cable.
- Disconnect the wiring harness in the engine bay, Coil, idle cut-off solenoid, auto choke, reversing light etc, and move the cable up to the left out of the way (tie it to the engine lid hinge bracket if you like).
- Remove all the rear tinware (breastplate) from around the engine pulley. You may need to remove the two small pieces of tinware around the heat riser where it runs downwards at each end too. You should now be able to see the ground underneath the engine pulley.
- Raising the car. Start at the front, and raise it as far as the jack allows (jack it in the centre of the car, under the back seat floor area, just in front of the torsion bar tubes). For the front, use jack stands if you have them, or make two bulky stands of bricks etc (not just one-on-top-of-one please) for each side of the car. Your (Dave's) superbug doesnt have the torsion bars in front (a good support point for standard bugs), so you will need to work out where best to support the car - but don't put it under the suspension or the car could 'rock' when you least expect it. One possible place is under the front of the door frames. Place a piece of wood on top of the bricks - it's a bit softer and wont scratch the paint on the pan. Once the front is up part way - go to the back. I place a piece of wood across the trolley jack and jack the engine across the sump plate. This is not recommended by some, but I have had no trouble at all, and I'm carefull to lift and lower steadily, so the engine case is not stressed. Having it supported under the sump plate also means that you can rock the engnine a little when pulling it backwards, to help release it from the gearbox. Get the rear as high as the jack will allow and place the axle stands under the rear torsion bars. Now go back to the front, and make a platform out of a few bricks and the plywood for the jack to sit on, so it can lift higher. Of course if you have a high lift trolley jack, so much the better. You need the plywood or work on a concrete floor, so the jack has a firm flat surface it can roll on - they roll a bit as they lift and the angle of the lift arm steepens. Raise the brick/wood pillars (of course if you have 4 axles stands this bit is easier), and lower the front on to the raised pillars. Return to the back and repeat the process there. This is why it takes me an hour of so to get the engine out - a lot of it is just getting the car high enough so the engine will slide out under the rear valance.
- Once you have the car about three feet off the ground (high enough for the engine with shroud attached to be slide out from under), you can start removing the engine.
- Remove the accelerator cable and withdraw it towards the front of the car, over the gearbox area. It has to be free of the guide tube through the shroud, and the front tinware.
- Remove the cabin heater cables from the heat exhangers.
- Disconnect the flexible fuel line (near the gearbox), at the engine end and have something handy to immediately plug the end with. It helps if the tank is nearly empty before you start this process - less fuel spilt. Tie it back out of the way of the engine tinware.
- Support the engine by jacking it slightly under the sump cover plate (use a piece of wood across the case for added support). Remove the four nuts which hold the engine in place. The lower two nuts are at the ends of the frame forks - these are studs, which come out with the engine. The upper ones are free bolts, and the right one is also the starter upper bolt. This one has a round head with one flat side, so it won't turn as you turn the nut (access is too tight underneath at the starter motor to get a tool on to it). The nuts for these are INSIDE the engine bay, in front of the fan shroud. Access is not great - but not too bad. A 17mm ring spanner (sorry - box wrench :-) works best - they are longer for better leaverage that open-end spanners. Once loose you should be able to spin them off with your fingers. They have flat washers under them. The right side one, with the D shaped bolt head, will spin if you push the bolts towards the front of the car, but if undoing it with your fingers, you can easily keep the bolt head snugged up to the starter motor and turn the nut.
- You should now be able to pull the engine back on the trolley jack (which is sitting on the piece of plywood or smooth concrete so it will roll isn't it?). Now comes the interesting part. You have to lower the engine VERY slowly - just a bit, whilst pulling it back enough to clear the gearbox drive shaft. The alternator pulley is sure to snag a bit on the rear engine sealing rubber - there is only JUST enough room. Careful not to put any weight on the gearbox drive shaft, it can be bent (ruined) if you are not sensible. It's a case of lower a bit, pull back, wiggle the rear seal away from the pulley, lower a bit etc. You'll need to look past the front of the engine tinware to ensure you can see the gearbox shaft and that the engine is clearing it.
- All of a sudden you'll find the engine is supported only on the trolley jack. Now I make a brick pile on each side of the plywood, under the heater boxes, so I can lower the engine on to the bricks and remove the trolley jack and plywood- on-bricks from under the car. This bit is why I mention the size of the plywood. about 15 inches wide should be wide enough to support the jack wheels, but narrow enough so you can construct a support under the heat boxes, either side of the plywood. And about 2.5 feet long, so you can roll the trolley jack in under the engine easily. Longer would be fine too - depends a bit on the jack you have. If you have a high lift jack you might not have to do this step in two operations but might have enough lift to get the engine down to about 1 birck height to get the trolley jack out in one shot.
- Replace just the plywood on the floor under the car. Then lifting one side of the engine at a time, remove one brick each side at a time - lowering the engine until it sits on the plywood. It's heavy-ish (about 125lb per side) but can be lifted one side at a time OK.
- You should now be able to wriggle it out on the plywood to the back of the car.
The process is easier with two people - particularly the last few points, as you take the weight of the engine. But it is quite do-able by one person.
John Henry (The Bug Shop) has fashioned an engine dolly that is very easy to construct and looks to be very useful. See John Henry's Engine Dolly. Rob's note: 2019...I looked through John Henry's site but could not find this image. I've left the link there just in case, or you can go to his excellent pages at www.thebugshop.org and have a look around yourself.
~~~
Installation is the reverse of the above, with a couple of tips. If you can avoid it - don't rotate the engine or gearbox shaft whilst the engine is out of the car. This means the splines on the gearbox shaft will line up with the clutch plate easier when it goes back in. Unavoidable if you are changing clutch or flywheel seal, but this just means extra shoving to get then to go back in. Take your time getting it back in. It's easy enough to get the bottom two studs roughly into position in the bell housing, then it takes some real shoving to push the engine forwards. I find it useful here to put my feet on the back of the case (just in front of the muffler), and push forwards whilst pulling back on the bumper with my hands. You can get some good leverage that way. It also helps to look carefully at the jack height so you get the engine 'lined up' with the gearbox shaft (the gap around the bell housing is the same top and bottom) before the final push. It will usually resist for a while, and then 'pop' into place. That's when you start smiling.
Some useful things to do with the engine out -
- Check the clutch and throw-out bearing. The throw-out bearing is in the bell housing. Spin it with your fingers. If you feel the slightest grumble or resistance to turning - replace it. The clutch spring 'fingers' (diaphram spring) should not be grooved or marked near the centre (indicates a worn throw-out bearing), and the fingers should all be the same 'height'. I had two fingers go soft on mine - made for a very shuddery clutch, and a damaged throw-out bearing and mount.
Note: There are two clutch rlease (throwout) bearing styles. The early style has round mounting ears and uses simple horseshoe or round shaped retaining clips. This release bearing must be matched with a clutch pressure plate havoing a metal ring in the middle of the daiphragm fingers. The later style of release bearing (from about 71) has square mounting ears, a locating collar in the middle of it, and complex metal clips. It uses a clutch pressure plate with bare metal fingers. You can NOT mix n match with those items. The pressure plates are identical apart from the metal ring in the middle. And of course the clutch operating arm is shaped for either the round or square/flat style release bearing.
If you replace the clutch plate, there is a VW tool used to line it up in the centre of the pressure plate. I've never had one, but I found a piece of steel rod which would go into the pinion bearing in the centre of the flywheel, and stick out through the clutch plate, so you can see if the plate is centred. This is important, as getting the engine back in means getting the gearbox shaft through the clutch plate and into the pinion bearing in the centre of the flywheel. You don't have to have the steel rod, but you need to do some careful eyeballing of the hole in the clutchplate with the pinion bearing in the flywheel to try and get it centered. It's odd really, when in use, the clutch rides freely on the gearbox shaft splines, between the two steel friction plates. But putting it in is done with the friction plates grabbing the clutch plate, as these can NOT be released until the engine is snug with the gearbox and throw-out bearing - so it has to be carefully lined up before the engine is put back in.
- Always clean the pinion bearing in the flywheel and regrease it before reinstalling the engine - dont go overboard with the grease as you dont want any excess thrown off near the clutch components. The bearing is brass, and is replaceable (special puller needed) if damaged.
- The flywheel is removed using the same sized socket for the rear axle nuts (36mm). The same socket fits the cooling fan mounting nut. You need a 3/4-inch drive bar. Don't even THINK a 1/2 inch drive bar will do. Make a mark on the flywheel and nut so you can torque it up the same again (254 ft-lbs on most models - that's a LOT). You can construct a flywheel holding bar from a piece of angle iron or similar, about 4 feet long. Drill two holes in it to suit two of the clutch mounting holes, so the angle iron is clear of the centre - you have to have both the angle iron and socket in place at the same time to remove the flywheel. the outer end of the angle iron sits on the ground whilst you pull down on the socket and bar (an extension piece of 1 inch water pipe is useful here to increase your leverage). The nut is a normal left hand thread so you'll be rotating it counterclockwise when looking at the clutch plate, to remove it.
- Replace the main (flywheel) oil seal. The flywheel should come off with some taps from a rubber or brass mallet. The main seal is behind this. Take careful note of how far the seal projects from the engine case - different models have different seals. (specify your engine prefix - AE, AS, AD etc) to get the right one. There are also three large shims in there. make sure they go back in the same order they came out. The centre one spins inside the other ones, and you will probably be able to see this from the appearance of each shim. the new seal can be pushed/tapped in - keep it even as it is tapped in - take your time tapping round and round if it is a bit tight.
- Replace the oil cooler seals.
- Cooling flaps if they are missing.
- Retorqueing the heads is a good idea, even if you are not removing the heads. The cylinders sit in a lip inside the heads, and this lip is cut a few thou larger than the cylinders to allow the cylinders to 'work' a bit as they expand and contract at a different rate to the heads. This causes a tiny amount of wear on the head sealing lip, and old engines do sometimes start to leak here. Retorquing helps tighten it all up again, provided the heads have not been damaged by blow-by from the cylinder gases. Also have a good look around the cylinder tops to see if there is any 'blow-by' leakage there - it should show up as a discolouration compared to the rest of the cylinder top. If your compression is good, this should not be a problem. Any visible leak here means head work is necessary unfortunately.
The torque sequence is first to 7 ft-lbs (hopefully they are not THAT loose) and second to 18 ft-lbs for 8mm studs, and 22 ft-lbs for 10mm studs (measure that across the top of any stud).
Tightening sequence -
First tightening to 7 ft-lbs:
top of engine
7 5 6 8
4 2 1 3
Second tightening to 18 (8mm studs) or 22 (10mm studs) ft-lbs:
top of engine
8 2 4 6
5 3 1 7
- Check the 'sag' in the bowden tube too. This is the flexible tube next to the gearbox which the clutch cable runs through. It must 'sag' in the middle by between 0.8 and 1 inches to allow the engine/gearbox to move a little on it's rubber mounts, without pulling on the clutch cable. Insufficient sag = kangaroo clutch or bunny hops. It is adjusted by placing C shaped washers at the outer end of the bowden tube, in front of the rear tube-mounting bracket. The C shape allows the washers to be inserted over the cable without completely removing the cable. I had no spares, so I cut a segment out of an appropriate sized washer, and it has worked fine ever since.
- Clean out any gunk in the fan shroud and on the cylinder/head fins.
- One thing Rob noticed about the casting of VW heads...looking through the finning there are often areas where the casting is imperfect and has left very little space/holes for airflow right in the middle of the heads. Rob used a rat tail file to remove the casting "dags" to improve airflow through the fins. It desn't take much to open up those small gaps to the full width gap between the fins, and it's sure to help with head cooling.
~~~
Dave's very first question about engine removal - Everything I've read says, "First, raise the rear of the car THREE FEET in the air and support it on jack stands." How in the world do you go about raising the rear of the car that high? My jack certainly won't do it.
Rob responded - Mine won't either, but I've explained above how to do it in stages. The engine is only about 250 lbs, so weight on the jack is not a problem, just the lift.
My 'stubby' (very short design) el-cheapo floor jack has a lifting capacity of 1.5 tonnes. Size doesn't really matter here. The job can (just ) be done with a bottle jack, but not nearly so easily, as you can't roll the engine back-forward properly.
Once I've got the engine out, I work on it on the floor, but that's because I don't usually have anyone to help lift it on to a bench. Some stuff IS best done on the floor (flywheel for example).
And it's much easier to remove/replace the muffler with the engine removed -- it's much easier to get to the rear manifold mounting (muffler to head) bolts. The peashooter exhaust tips make great grab handles when remioving/installing the engine too.
Dave wrote regarding the height of the lift - I understand that you want to pull the engine (on the jack) back and clear of the car, so the top of the fan housing has to go under the rear apron and bumper. So the distance from the deck to the lowest point on the rear of the car must be the height of the engine (sump to top of fan housing) plus the jack and board. Rob indicated that this is correct -- he uses the 'top hole' on his two axle stands which he knows is enough, so he haven't measured it. Try removing the rear piece of tinware and you should be able to see the bottom of the sump and the top of the fan shroud at the same time to get an approximate measurement.
Also, once you have the engine out of the car, you (Rob) talk about making a pile of bricks on either side and lowering the engine onto the bricks. The heater boxes are now sitting on the bricks, right? I guess since you've done this the heater boxes and their connection points (exhaust manifold on the front, muffler on the back) can handle the weight of the engine. And all of the handling on either side as you lower the engine (brick by brick) is on the heater boxes -- just seems like there is potential for damage to the heater boxes or the connections (I especially worry about the rear connection to the muffler). Bottom line question: Are the heater boxes and connection points up to all this abnormal stress?
Rob responded - Yes, that's correct. So long as the engine isn't 'dropped' onto the heater boxes, they can take the weight OK...
Rob wrote regarding axle (jack) stands - I bought my axle stands many years ago since I decided I'd be keeping the car for a long time, and might need to drop the engine maybe once in 5 years. As it turns out, I've used them on the other car several times too, so they have been a good investment. Better than ramps too, as they can support the car off the wheels, and take up much less arm/body room under the car. Mine are simply a light steel plate about 8"x8" (slightly domed so it sits on the outer rim) with a central vertical square tube about 1-1/2" square about 12" high. This has another 'inner' square tube, with a (shaped saddle (lying horizontal of course) welded to the top, and about 6 holes up the sides, so you can insert a large pin (maybe 3/8") through the single set of holes in the outer tube, and one set of holes in the inner tube to set the height. Very stable, and dont take up much room in the shed when not in use.
Dave asked about "axle" stands - It's not clear to me what the difference is between "jack" stands and "axle" stands. I have a set of (2) "jack" stands with three legs that can be adjusted to three different heights -- maybe up to 16 or 18 inches. I usually set these under the rear axles (correct terminology? My knowledge of the rear suspension is poor -- certainly not the axles that run down to the CV joints on either side, but the round tubular things (I'm not expressing myself very well -- hope you know what I mean.)
Rob responded - I call those axle stands, as in "STANDing still". Whereas I call a jack something which moves the weight of the car, as in a bottle jack, trolley jack, screw jack, hydraulic jack etc. My axle stands could be called PIN stands as they have only a single standing element - your's are probably a heavier duty style with three legs.
'Jack stands' is, I guess, American for 'axles stands'. So you've got good stands for the rear of the car, now all you need is something suitable to support the front off the ground too. Of course, you CAN just jack up the back of the car, and remove the engine that way, but you have to pull it up hill to free it from the gearbox, and it weighs about 250lbs with tinware and generator on, so I find raising the front end makes the job a bit easier. Also means the car is less likely to move on you if it's not resting partly on rubber tyres...
Dave asked - I usually set these under the rear axles (correct terminology?...
Rob responded - I think you mean the torsion bar tubes (with the flat spring plates on the outer ends), at the front end of the rear fenders (mud guards in Aussie). The torsion bar tubes are the strongest part of the rear suspension, so a very good place to support the car. Also well forward of the engine, so they are out of the way for crawling under the engine etc.
Dave wrote - Yes, Ive found this a very good place to put the stands. Glad to hear they are the strongest part of the rear suspension! They looked like it, so that has always been my choice for the location of the stands in the rear. In the front there are two bolts that I think hold the frame to the body (or something); I always put the front stands under these bolts, as it looks like the sturdiest point.
Rob wrote regarding Dave's worries about dropping his engine - I remember the first time I did it with my engine. The job seems 'bigger' than it is -- perhaps because it's such a major component, and if you can't get it back in -- the car's not going anywhere! (Make sure any cars you might want to use are BEHIND it in the driveway :-)
But the only really fiddly bits I found were in gently easing the engine down and off the gearbox drive shaft, with the generator pulley threatening to rip the rubber seal at the back of the engine compartment (there is just barely enough room); and the final bit of getting it back in so the gearbox drive shaft slides through the clutch plate into the pinion bearing in the flywheel properly. This last bit took about 10 minutes of hard shoving, whilst rocking the engine side to side slightly (with my feet on the muffler doing the pushing and my arms holding the bumper bar for leverage.) It was a very satisfying 'clonk' as it slid that last inch home, as I was beginning to get annoyed with it. My slight worry on this last bit was that the lower two engine mounting studs have to be lined up fairly closely with the bell housing mounting holes I was worried that my wriggling the engine side to side might cause the stud threads to rub hard in the holes and 'grind' them out a bit, and fill the threads with aluminium too. Turned out not to be too much of a problem just careful alignment on the jack. It actually helps a lot when these two studs enter the holes in the bell housing, as then you only have to worry about the HEIGHT of the jack, so the mating surfaces of engine and bell housing are parallel to each other (vertical). You then spin on one of the two top bolts finger tight (left one might be easier -- doesn't involve the starter, but either will do) and the engine won't go anywhere.
Dave worried a lot about how he was going to get the car high enough off of the ground. He wrote - My whole concern is getting the jack stands high enough. Like I said, I think 18 inches is about the max. Should I get some boards (2x6's or so) to slip under them as I jack the car higher?
Rob responded - With my little floor jack at maximum height, I can just slip the jack stands under the torsion bar tubes with the pin through the first hole in the adjustable tube in the stand. Then when I lower the car onto the stands that wheels are just barely off the floor and I can wiggle under the car without scratching my nose on the sump plate (but just barely!). So the next step in getting it higher is to slip a couple of boards under the jack and take it on up, right? Then repeating the process, placing boards under the jack and the stands as necessary, to get the car to the necessary height. Sounds tedious, but do-able.
Dave wrote, in his typical obsessive fashion - I've got to outline it step-by-step. I've prepared preliminary draft procedures for Engine Removal/Replacement and Cooling Air System Restoration. These are pieced together from your procedure, from the Bentley Manual, and a little bit from others. As you have time I would really appreciate your trained and critical eye, with additions and corrections as you see fit. I found my detailed procedure on the Shifter Bushing Replacement to be immensely helpful -- I went through it item by item and got it all greasy in the process. I'm hoping to do the same thing here. I hope to be able to convince my son to take a day off work, as I think it would be a wonderful experience for him to help me drop the engine from his car and then fix things and put it back together again (besides, I need his strong back!).
(The Engine Removal Procedure included on this Web site resulted from this and later engine removal experiences.)
~~~
Dave wrote to Rob in preparation for his first engine removal experience - First Im going to measure as closely as I can the height of the engine, sump to the top of the fan shroud. This plus a little bit will be how far the rear of the car needs to be above the deck to pull the engine back. Then Im going to measure just how high my jack stands will go so Ill know how much 2" (actually 1-1/2" finished) wood Ill have to put under them.
Then -- and this is what Ive been obsessing about -- Im going to make a sort of pyramidal pedestal out of 2x6 stock consisting of layers that I think I will loosely connect with carriage bolts resting in holes drilled through. Each layer will consist of two 30" pieces of 2x6, with three cross members holding them together. Each layer will be successively narrower than the one below it (maybe 2-3 inches or so) until the top one (number of layers to be determined, as dictated by the required height) is 15" wide to accommodate the 15 x 30" piece of plywood. Then since the layers are only loosely connected together, I can use just the number that I need, with the trolley jack on top.
When we get the engine loosened and ready to drop, Ill build a couple of pedestals on either side consisting of stacked 2x6's, higher than the center pedestal but lower than the top of the jack. Thus I will be able to lower the engine onto the two stacks of 2x6s, releasing the tension on the jack so I can pull it and the central pedestal out. Then remove 2x6s one at a time from each side and lower the engine onto the 15" x 30" piece of plywood on the floor...
Then just gotta keep honing my procedures and psyching myself up for the engine removal job. I also need to explore the Bentley Manual for more information on the main seal and the pinion bearing. Ive had absolutely no experience with these things.
And then before we put the engine back in I want to get all the rubber in properly -- I put the rubber around the engine compartment, but its not in the grooves as it should be -- most difficult to do with the engine in the car. And I want to check the condition of the rubber around the front, over the tranny. I have that piece and might as well put it in while the engine is out.
One last thing -- the insulation on the firewall is pretty ratty -- a PO painted it, but it doesnt look very good. Theres a good procedure in the September 1998 VW Trends for replacing it.
Dave sent Rob the following list of Work To Be Done On Engine Removal Day (all per procedure) -
- Raise the car and remove the engine.
- Remove the fan shroud and replace the cooling vanes and thermostat.
- Remove the oil cooler and replace the seals; replace the oil cooler.
- Remove the clutch plate and inspect it.
- Inspect the clutch release (throw-out) bearing and replace it if necessary.
- Inspect the clutch disk for wear and replace it if necessary.
- Remove the flywheel.
- Replace the main oil seal.
- Clean the pinion bearing and regrease it.
- Replace the flywheel, clutch disk and clutch plate.
- Retorque the heads.
- Check the sag in the bowden tube.
- Check the O-ring that surrounds the fuel line as it goes through the firewall. Replace if necessary.
- Throughly clean and paint the fan shroud.
- Replace the firewall insulation.
- Replace the rubber around the engine compartment and over the transmission.
- Reinstall the engine and lower the car.
Rob's comment: That's a great list.
~~~
Dave wrote regarding measurements - Last night I knelt down behind the car and took some measurements. The rear apron sits about 10 inches off of the ground. The engine is 26 inches high from the bottom of the sump to the top of the fan shroud. The jack stand, set at its highest point, is 19 inches high.
So what does all this mean. In order to slide the engine out from under the car, I will need the height of the engine--26 inches--plus the thickness of the plywood--say 1 inch--plus a little to spare. I think I will use 28 inches as the height the rear of the car will have to be above the garage floor for the engine to clear.
This means that I will need to raise the car 18 inches so that there will be a total of 28 inches under the rear apron. The total height of the jack stands will have to be 28 inches plus a little bit, as I think the torsion bar tubes are up a little higher than the rear apron. So maybe 30 inches on the jack stands. Which means I will need platforms 11 inches high under the stands--thats 7 layers of 2x6s.
And then theres the adjustable wooden platform to support the trolley jack. The bottom of the engine will be 28 inches off the floor (maybe a little less, as it hangs just a bit lower than the rear apron). If we set the jack at about its midpoint, it will be on the order of 10 inches high (havent measured it yet). And then there will be a 1-1/2" thick piece of wood supporting the engine. So were left with 28 - 10 - 1 = 17 inches. That means my platform will have to consist of 6 separate layers, each 3 inches thick (two 1-1/2" pieces 30" long, three 1-1/2" cross members nailed to them).
Lotta wood. Need to run out the numbers and figure out how many linear feet of 2x6 I need...
When Dave finally finished his ruminating, the final specifications for the jack platform, jack stand shims, etc. were as follows -
Jack Platform:
Six 3" layers, each consisting of two pieces 24" long and three cross members.
Numbering from the top:
#1: 2 2x6 24" = 48"
3 2x4 15" = 45"
#2: 2 2x6 24" = 48"
3 2x4 17" = 51"
#3: 2 2x6 24" = 48"
3 2x4 19" = 57"
#4: 2 2x6 24" = 48"
3 2x4 21" = 63"
#5: 2 2x6 24" = 48"
3 2x4 23" = 69"
#6: 2 2x6 24" = 48"
3 2x4 25" = 75"
2x6s: 12 - 24" long. Total 2x6 = 288" = 24'
2x4s: 3 - 15", 3 - 17", 3 - 19", 3 - 21", 3 - 23", 3 - 25" Total 2x4 = 360" = 30'
Jack Stand Shims:
- Both Front and Rear -- Supports to give a total rise of 30" (wooden blocks, etc.).
Engine Pedestals, ~24" high (to support the engine on either side, underneath the heater boxes, once it is pulled free):
- We Used cement blocks, with lengths of 2x6 on top.
Other Wood Needs:
- 2 - 2x6s, about 12" long, to attach to the bottom of the jack.
- 1 - 2x4, 18" long to support the engine on the jack.
- 1 - 2x4, 18" long for use when jacking the car on the side.
Dave wrote - I bought six 2x6s and six 2x4s, eight feet long, and a piece of 3/4" plywood, 2'x4'. I think this will do it, with all the other stuff I have laying around and things I can borrow. Going to begin construction of the jack pedestal as time permits; also going to add a couple of 2x6s to the bottom of the scissors jack and prepare a piece of wood for use in supporting the engine (on top of the jack) and later to keep in the trunk for use with the scissors jack when lifting the car from the side (per your good advice!).
A question for you, since you've done this: does the "runway" for the trolley jack have to be 30 inches long? The jack only creeps forward a couple of inches looks like I might be able to get away with 24" (but I don't want to cut it too close). If 24" is sufficient it would save a lot of lumber (and I would only have to cut a 15" strip off of my 2'x4' piece of plywood, rather than taking a big chunk out of it a leaving a L shaped piece that's not good for much). I'm thinking about using a couple of old wheels that I have in the shed, and I'll have to lay a piece of wood on top of them (laying flat, of course) before adding another cement block or jack stand.
Rob responded - 24 inches should be ample. I was covering my bases cause the larger trolley jacks are about 2 feet long anyway. If you have the compact type, 24" should be fine. The longer board does mean you can just roll the jack in from the rear, rather than half lifting it on to a shorter board which is mostly under the rear apron, but that's only a minor inconvenience.
One minor problem I have with mine is that when I use it under the engine, I can't get quite enough movement of the jack handle under the rear apron, and only get about 1/8 inch lift for each stroke until I get the car up about an inch. The longer trolley jacks don't have this problem.
Dave wrote - Yes -- I have the same problem. I use the cross-member at the engine/tranny junction as my rear jacking point (others have too -- its pretty beat up), and of course its a ways under the car and the handle wont move up and down very far. My handle has a little dog leg in it; I find if I turn it over I can get more leverage.
A friend who works in construction has quite a collection of ends of heavy beams and trusses and the like. He said he would throw a bunch of them in the back of his pickup and bring them over. So I think Im set!
Most of the rest of the day was spend sawing wood (thank goodness for the circular saw my father in law gave me years ago !) and making the pedestals for use in removing the engine. I discovered (after I had it all made) that the jack pedestal was too wide at the bottom, such that the engine pedestals on either side wouldn't be under the heater boxes. So I took three of the sections apart and made the six (each 3" tall) successively 1" (instead of 2") narrower than the one directly beneath it. Then cut the 15x24" piece of plywood for the top, and assembled the engine pedestals out of blocks and pieces of 2x6. I think we're set. I will use the blocks my friend brought to me under the jack stands.
~~~
Some suggestions -
- It's certainly more convenient if you can acquire a second floor jack dedicated to lifting the rear end of the car.
- Be sure to label all the connections well with tags in indelible ink...
- There is minimal front to back space, and to clear the alternator pulley from the rear apron, I had to tilt the engine backwards (using the tailpipes as handles) and roll the floor jack forward while lowering the the jack.
Dave responded - I always worry about that. I grabbed the tailpipe recently to pull myself out from under the car and almost broke it off! Of course a new muffler was the next thing on the list.
- Although not absolutely necessary, it helps to remove the rubber engine seals to gain a little more wiggle room.
Dave responded - Yes. I was going to do this anyway, as the rubber was completely missing when we bought the car. I bought the new rubber, but it's never been installed properly -- just stuffed in around the engine. Proper installation is on the list of things to do during this engine removal.
~~~
Dave wrote to Rob - Im getting a bit apprehensive about clutch realignment and engine re-installation.
Rob responded - I don't think it will be a major problem. At worst, if the engine refuses to mate up that last inch, pull it back a bit for access to the clutch plate bolts, loosen them one at a time so there is not much pressure left on the clutch plate (just 'snugged' up), then try pushing the engine back in to line up the friction plate (now just gently held by the bolted clutch plate), then pull the engine back again to tighten the clutch plate bolts back up. Forget the 'opposite bolt' tightening sequence (it's probably overcuation on my part anyway), just rotate a bit at a time and retighten as you go, then push the engine home again.
Dave wrote - My neighbor has a couple of ramps that I could probably borrow. I wonder if it would work to run the front of the car up onto ramps, and then raise the rear onto jack stands. Any comment?
Rob responded - Ahhh -- good idea. Even if they are not quite high enough and the front and back aren't exactly level it should be 'close enough'. They won't get in the way of the work at the back at all. It would save a lot of jacking time. Just be aware that the car might move a tiny bit with any pushing/shoving, as the front will be sitting on it's tyres. This should not cause any special problems as the back will be sitting on good stands anyway.
(Dave ultimately did not use the ramps, as he found that they didn't raise the front of the car high enough. He used jack stands with wooden blocks under them, just as in the rear.)
Dave wrote to Rob on the day of Daves first engine removal experience - It starts tonight! As soon as things get settled down from dinner we're going to back the Bug into the garage, leaving as much space as possible behind the car. Then down through the engine removal procedure we go disconnect the grounding strap, remove the air cleaner and emissions hoses, remove the fresh air hoses, remove the alternator wires and all of the other wires in the engine bay, disconnect the accelerator cable, remove the tinware, and remove the engine rubber.
And then we proceed to raise the car. I've made up a little table so I'll remember the configuration of the supports at each step in the process pedestal under the jack, riser under the jack stand, and jack stand height. Then when I go to bring the car back down I'll be able to do it in just the opposite way. I made the mistake once of lowering the top of the jack stands below the lowest point of the jack, thus pinning the jack under the car when it was lowered. Didn't have enough space to get any leverage on the jack, to had to use a second jack to get the first one out! Dumb! But I know you'll laugh at me and my little "Raising the VW for Engine Removal" table!
Tomorrow we will:
- Remove the fan belt and loosen the alternator on it's stand.
- Remove the fan shroud.
- Thoroughly clean and paint the fan shroud and clean the top of the engine.
- Replace the oil cooler seals.
- Replace the cooling vanes and thermostat.
- Inspect the main oil seal; replace if necessary (remove clutch plate, disk and flywheel).
- Regrease the pinion bearings.
- Retorque the cylinder heads.
- Replace the fan shroud, reattach the alternator, and replace the fan belt.
- Replace the firewall insulation; check fuel line grommet thru the firewall.
- Replace the engine rubber.
- Reinstall the engine and lower the car.
Then button things up replace the tinware, reconnect the accelerator cable, reconnect the alternator wire and all other wires, replace the fresh air hoses, replace the air cleaner and emissions hoses, reconnect the grounding strap.
~~~
Dave wrote to Rob regarding his first engine removal experience - It took me three hours this morning to get everything disconnected and raise the car, running back and forth, front-to-back, back-to-front, front-to-back. And then getting the three nuts and one bolt out -- the three nuts weren't too bad, but the bolt on the lower left was a real pain. I found it almost impossible to get a wrench on it; finally took the advice of the Haynes Manual and used a universal on a half-inch ratchet, coming at it from above. Still VERY fiddly, but finally got it.
Then pulling the engine out we ran into a major problem that was impossible for foresee. We have a non-stock muffler on this car, you recall -- well, we got it back and down just far enough to bind the muffler up thoroughly against the rear apron. Had to take the muffler off, but that didn't even do it completely. Had to take off the left heater box, which was also a major pain because the top nut is almost totally inaccessible. Finally got it, though, and got the muffler off; then the engine came out without too many more hitches (except that I didn't take all of the tin off and the corners bound up as it was coming down, and we had to remove the rear bonnet).
Anyway, it took us till about 1:30pm to get the engine out of the car -- that's (count em!) eight hours! How you are able to do it in a hour is absolutely beyond me. It wouldn't take that long to do it again, but I'd have to practice for a LONG time before I could get it down to an hour! And not the funnest day I've ever spent, either, but we learned a lot. And we took a lot of pictures (and we'll take more tomorrow) that we'll scan and send to you. We lowered the engine onto a creeper, which made moving it around very easy. By the way, we ended up with about 28-1/2 inches of clearance between the floor and the bottom of the apron -- just barely enough.
With the engine on the floor we cleaned up and took a break at Burger King!
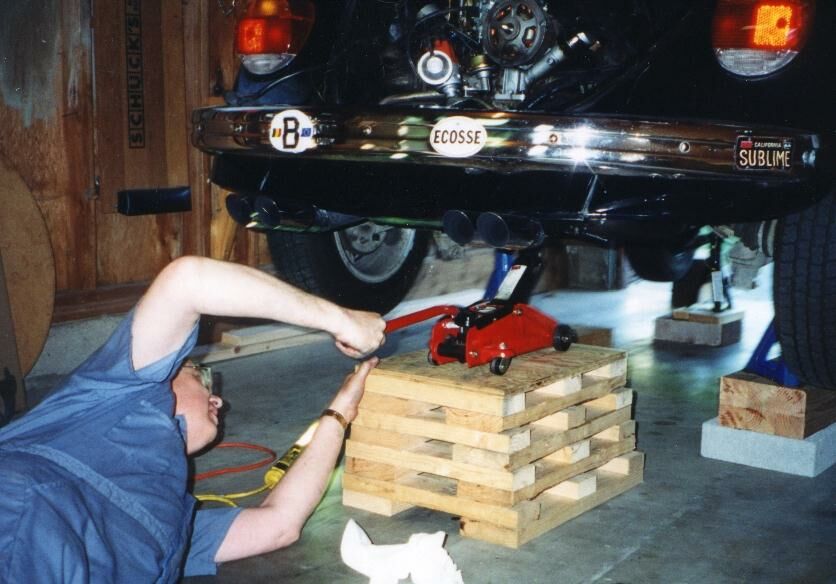
Dave's First Experience
Removing His Bug's Engine
~~~
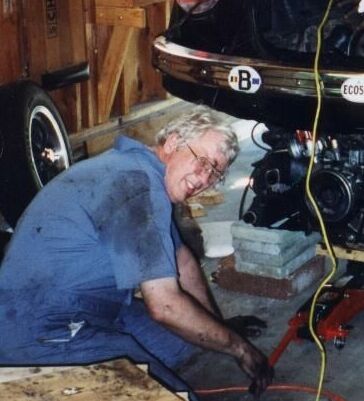
Dave and His Son Enjoying Success
~~~
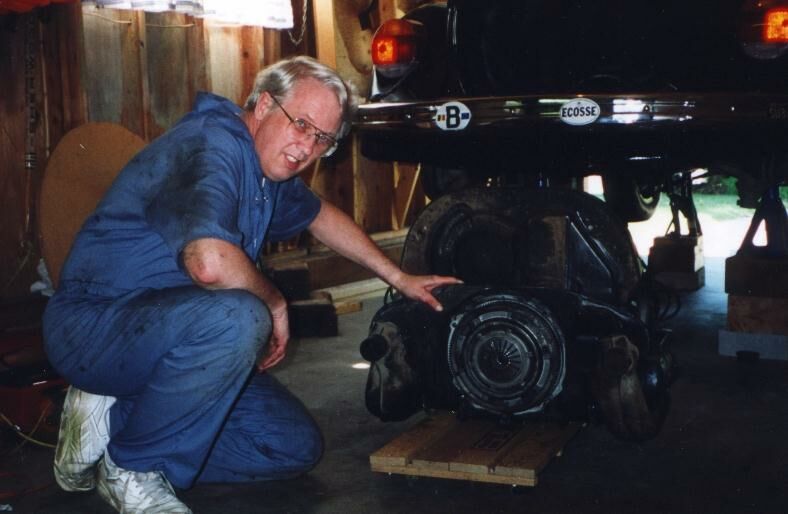
Engine on the floor!
~~~
Dave wrote to Rob regarding reinstallation of his engine - Once Ive got the engine rubber reinstalled properly, we're ready to wheel the engine back under the car, lift it by hand onto the first layer or two of the pedestals, then raise it gradually and hope for the best on reinstallation. Then reconnect everything, replace the muffler, put the rear bonnet back on (needed to adjust it anyway), replace the two rear wheels, and lower the car. Have to retime it, as the vacuum chamber on the distributor was going to hit on the rear apron as the engine was coming down and I had to turn the dizzy completely to the left.
I'm not sure I want to do this again for awhile!
But we made great progress yesterday -- we worked for thirteen hours (5:30am to 6:30pm), but we're still not finished. Here's a rundown of yesterday's activities, with a few "lessons learned" to insert into the procedures:
- First I raised the front of the car a bit more (one more hole on the jack stand), as the front was a little lower than the back and we had to pull the engine uphill a bit. I kept detailed notes on each lift (nine all together); I'll fill in my lift table and send it to you.
- At that point we scooted the engine back under the car (with only about an eighth of an inch of clearance with the engine on the creeper) and up we went.
- As we got the engine up close we encountered our first major problem of the day. I think I discovered why my meatball mechanic left the engine rubber off when they installed this 71 engine in this 73 chassis. The engine may work in the car all right, but the engine tin and the engine bay are of slightly different design. The tin (the piece that fits around the spark plugs and up over the cylinders on either side) has a corner that sticks out on either side on the rear. These corners will not clear the sides of the engine bay, especially with the rubber in place. We had to rip the rubber back out and bend the corners up a little bit, then still had to rock the engine from side to side (one corner up first, then raise it and rock it the other way to get the other corner through). So now I have to order a new piece of engine rubber (we mutilated the old one) and stuff it in as best I can.
- Then, of course, to reinstall the engine. Had a devil of a time (rank amateurs!). Pushed and shoved and wiggled and raised and lowered (in tiny increments) to no avail. Finally I went in and called a friend of mine who was a VW affectionado in a former life. He said he used a transmission jack that would hold the engine perfectly level. Aha! A big problem with using a little trolley jack like ours for this job is that the engine wobbles all over the place, and it's difficult to keep it level. So I went back out (Michael was taking a break) and lined everything up very carefully, making absolutely sure the engine was perfectly level, front to back. Then popped the engine right in! Much rejoicing! (It helps to take a little break now and then!
Rob wrote - I was becoming very frustrated at mine not going back in the last inch, and the BIG relief when it popped in. I found the same -- need to get it lined up just square (I think I mentioned getting the bottom studs started in the holes, then getting the bell housing and engine faces parallel before the final push).
- Dave - Then I replaced the engine nuts and bolts. Yes, there are two bolts (in the top) and two nuts that go into the studs in the engine (on the bottom). The bolt just inboard of the starter motor did not move when I took the nut off, so I wasn't sure. Same thing happened when I put the nut back on -- I just pushed the bolt through, attached the nut, and tightened it down.
- Finally just put things back together-- heater tubes back onto the heater boxes, heater cables reattached, replaced the pulley and the fan belt, all of the wires reconnected, tinware reinstalled.
At this point it was 6:30pm, and my wife suggested that I break off and rest and finish up Monday evening when I'm fresh. Sounded wonderful...
Here's what's left:
- While the car is still up with plenty of working space I want to go under there and clean off the years and years of accumulated crud off, especially off of the transmission.
- Put the rear bonnet back on.
- Adjust the valves, clean up the valve covers and replace the gaskets.
- Put oil in (we drained it on the way up, then once the engine was in removed the plate and cleaned the screen, and replaced the gaskets).
- Put the rear wheels back on.
- Lower the car to the floor (lifts in reverse).
- Start her up and adjust the timing.
Thanks for letting me think through this. Helps to have thought it through and written it down before you do it (at least for me).
Rob wrote regarding Daves 28-1/2 inches of clearance (just barely enough) - That's useful for me to remember. I just took a chance with mine last time I did it, and eyeballed the height I needed, because I had to do it all in one evening (out - replace clutch - back in). I was lucky, and guessed just right. Of course, having done it previous to this, I had an idea of which hole to use on the stands and such...
Dave responded - Actually after I raised the front (lift #9) the rear of the car came down to 27-1/2 inches, just barely enough to roll the engine back under the car on the creeper.
Rob wrote - I think I mentioned getting the bottom studs started in the holes, then getting the bell housing and engine faces parallel before the final push.
Dave responded - Yes. This was exactly how we approached it. We got the bottom studs in the holes, and then worked from there. So satisfying to crawl under and find the engine snugged right up and the studs projecting through the holes!
Rob wrote - On reflection I have the advantage that I don't have a mixed engine/car combo, and being swing axle -- less bits in the way underneath; and non doghouse cooler -- slightly simpler engine layout.
Dave responded - I didnt have any interference with the swing axle (not really sure I understand what you mean -- need to go back and read your rear axle write-up again). And not really that much in the way underneath. The doghouse cooler didnt cause much of a problem either, other than the fact that that upper engine bolt was a bit fiddly to get to.
What took me the most time was just getting ready -- all of the disconnections and then the back-and-forth, front-to-back movement of the jack and all of the wood for the jack pedestal. Sure glad my chest is all healed up -- lots of lifting! (Dave had six coronary artery by-passes in July 1997.)
Our biggest problem was the square peg in the round hole situation. I would very much like to have a look at a 73 Super Beetle with a 73 engine in it. What it looks like to me is that the 71 engine has tin with squared-off corners (just outboard of where the pre heater risers connect to the muffler), and the 73 engine well is round. It is simply impossible to get those square corners through that round hole, especially with the engine rubber in place. Even without the rubber, there is about 1/2 inch of interference on each side. Makes it VERY fiddly! (This association is great! Im learning all kinds of new words and phrases!)
Rob wrote regarding the square peg in the round hole problem - This is a bit odd, as both years had 1600 dual port engines with doghouse cooler -- but obviously they saw a need to alter the tinware for some reason.
Dave responded - This problem really didnt have anything to do with the doghouse. You know the piece of tin that runs horizontally by the sparkplugs, with the cylinder numbers stamped into it. Well, it runs back to a point just past the pre-heater tube connections, then makes a right angle. There is a hole right there in that corner with a captive nut on the underside. These two corners, one on each side, will not clear the round engine well, right where the channel for the engine rubber is -- there is about 1/2 inch of interference on each side. We had to bend the corner back a bit, then tilt the engine down on one side so the projecting corner on the other side would make it past the interference, then jack the engine up and tilt it the other way to get the other corner through.
Rob wrote regarding the two bottom engine bolts - On mine these are totally exposed and a ring spanner does the job. Does the double joint axle assembly get in the way or what?
Dave responded - No. The two bottom nuts are right there looking at you as you crawl under the car, about eight inches apart on the transmission side. They attach to the two studs in the bottom of the engine mount. Yes, they are totally exposed, and a box end wrench (should I say ring spanner? :-) does the job. I had no interference with the double-joint axle assembly.
Rob wrote regarding the engine bolt just inboard of the starter motor - Interesting -- that bolt on mine is a very loose fit, which makes getting the nut started a bit of a fiddle.
Dave responded - We were just lucky, I guess. I pushed the bolt through and then reached down in front of the fan housing and turned the nut onto the other end -- tightened it as much as I could with my fingers and then put the 17mm (I think) box end wrench on it and snugged it down. The bolt didnt turn at all during the process. I was all primed with my 1/2-inch drive ratchet and a 6-inch extension to lay up there on top of the starter motor, but didnt need it. By the way -- it sure was a boon to have taken the wheels off. I could never have reached those top bolts (on either side) with the wheels on.
Now that Ive done this once it will be a lot easier and would go a lot faster when I do it again. Next time, though, I think Ill get a bigger jack with more lift. The main reason for the nine lifts (four in the front and five in the back) was because my little 2-ton trolley jack only has a lift of about ten inches. Makes for a lot of back-and-forth running around with heavy chunks of wood!...
~ Thus Ends Dave's First Engine Removal Experience ~
~~~
Dave's Second Engine Removal Experience
This Time to Have the Transmission Rebuilt
The following year (1999) Dave wrote - You may recall last August the trouble we had removing the engine because our non-stock muffler bound up against the inside of the rear apron. This time I'm going to remove the muffler BEFORE pulling the engine out so I won't have that problem.
Also, I'm wondering if there is any good reason why everything needs to be disconnected (emissions hoses, fresh air tubes, alternator wires, wiring harness connections, accelerator cable, etc.) before raising the car. This time, I'm going to get it raised per the meticulous little table I prepared last time, then do all of the disconnections, then remove the muffler.
You only need to remove those items which connect engine to car. Anything which is engine-to-engine but clear of the body as the engine descends could be left on.
Rob responded - In the revised procedure you could say something like "If you have a standard muffler set-up, it can remain in place and the peashooter exhaust pipes make good "handles" for maneuvering the engine. If you have a non-standard muffler, you may need to remove it to avoid interference with the body during engine removal."
Regarding the fuel line removal - The original fuel system has a metal pipe sticking forward through the engine tins, and coming to a point near the fuel pump (around the left side of the shroud), so that only short lengths of flexible tubing are needed at each end to connect to the body fuel line, and the fuel pump. With this set-up, you need only pull off the forward flexible tube near the gearbox (leaving the tube on the body fuel line) and plug that. Your description here assumes that it's a flexible line right round the side of the engine to the fuel pump (which it is on your car I know). It needs to be rewritten.
Regarding the upper left-hand engine bolt - The "Note section" ("the nut for the upper left bolt is captive, as there is no access in front of the fan shroud on the left") should be amended to ("on the left on "doghouse oil cooler" engines, the nut for the upper left bolt is captive, as there is no access in front of the fan shroud. Access is easier on the older "internal oil cooler" engines and this bolt is therefore free on these cars").
Regarding the tin clearance problem - After "and the engine bay is round, clearance may be VERY tight" add "(the shape of the engine tin at the back of the engine changed in about '73 but the earlier engine tinware will still "sort of" fit)".
At the end of the procedure - I suggest "If you don't have a creeper, lower the engine on to a sheet of plywood or similar. It can be pulled backwards, sliding on the plywood. It's heavy though -- about 250 lbs, so a creeper makes the job a lot easier."
Dave wrote - I need to mention loosing the lug nuts before raising the car, then removing the rear wheels once the wheels are clear.
Rob responded - Interesting to see how much detail can be missed unless it's all written down as it happens.
Dave wrote regarding replacement of the engine - I got the engine raised and the two bottom studs started in the holes in the bell housing, but no amount of pushing and shoving would get the engine in.
Rob responded - Possibly the clutch plate isn't near enough to centered to allow the gearbox shaft to enter the pinion bearing in the flywheel gland nut.
Frustrating for sure. If all else fails, try moving the engine back to get some clearance, loosen the clutch bolts as much as you can without them popping out, then slide the engine back in to center the clutch and pull it back out CAREFULLY just enough to tighten 1-2 clutch bolts before pulling it further to tighten the rest. This MIGHT fix the problem I hope it won't be necessary though. I'm assuming you don't have a clutch aligning tool there (metal rod which fits inside the splines and into the pinion bearing).
Dave wrote - I'll meticulously line everything up, top-to-bottom and side-to-side, and I'm sure it will pop right in.
The last time we put the engine back in neither the engine nor the transmission shafts had been moved, and it popped in fairly easily. This time, however, while the engine crankshaft has not been moved, the transmission shaft most certainly has.
Rob responded - So the clutch plate HAS to be lined up correctly. So rotating the engine a little was the right thing to do. The splines do have a sort of taper on the end (each spline is slightly "pointed" to help the engine slide in), but I guess yours had met the splines right on the peak of the spline, so a little rotation of the engine was enough.
Interestingly enough, when I last changed my clutch plate, it came with a small tube of "spline grease" -- a clear red grease. "A thin smear on the splines allows the clutch plate to move freely" or something similar was the instruction. I think I still have the remains of the tube at home in my box of VW parts. I guess even a little graphite powder would do at a pinch too -- like moly powder, it would help the engine slip in.
Dave wrote - Bentley calls it "molybdenum disulfide powder"... The engine reinstallation procedure says to "lightly lubricate the manual transmission rear drive shaft splines with molybdenum disulfide powder." My parts man has never heard of the stuff and recommends that I just use graphite powder. Would it hurt to very lightly grease the splines with moly disulfide grease?
Rob responded - I think that this would be fine. Just a very thin smear would be OK -- no lumps that could fly off into the clutch plate. The powder recommendation (graphite OR moly) surprised me a little anyway I would have thought this would not stick very well to the shaft, and may have affected the clutch. As I said -- my last clutch kit came with a small tube of "spline grease" which seemed to work very well.
Dave wrote - Also, the procedure in the Bentley Manual says, "on engines equipped with Bosch starters (which I think mine is) lubricate the starter drive bushing in the transmission case with multipurpose grease." I'm not sure where this is. I've never noticed a bushing up there where the starter gear sticks through -- do you remember one being there?
Rob responded - There are two types of starters. The normal one has an extended shaft (inch or so past the gear wheel) which pokes into a bronze pinion bearing in the bell housing (or is it the engine case -- I forget) when the starter is inserted into the bell housing. This pinion bearing (hole) needs a little grease in it.
The other kind has a very short shaft on the starter motor, originally developed for the semi-auto with a torque converter and "drive plate" rather than a flywheel. This starter shaft is "free standing" -- it doesn't need the extra bearing to support it. If your shaft is the shorter sort -- no extra lube required anywhere. (Either sort of starter can be used, but if you can get a semi-auto starter, they are actually a bit more powerful than the standard starter.)
Rob wrote, regarding the engine replacement procedure - I made only one tiny amendment to it, regarding the upper left mounting bolt -- "This is also a free bolt located just inboard of the clutch lever at the top of the transaxle. On doghouse cooler engines, the nut in the engine bay is captive (it's a free bolt and nut on older non-doghouse engines); the bolt must be removed from the front. Turn the bolt into the captive nut (on the non doghouse engines just push the bolt through then attach the washer and nut from inside the engine bay), then tighten with a 17mm socket on a 1/2-inch ratchet with a 6-inch extension (on non-doghouse engines you can use a 17mm box wrench (ring spanner) on the nut inside the engine bay)".
Just to cover both engine types.
~~~
Dave's Third Engine Removal Experience
While I was home at noon I dropped the engine for the THIRD time! Boy, that's hard with the rubber in place. I brought the engine down onto the more substantial creeper my Mom gave me -- handles the weight of the engine much better.
Rob responded - A very useful item. I don't have any creeper, so I just pull it about on a sheet of plywood (el cheapo method :-)
Dave wrote - You mentioned that before, and I've had a hard time visualizing how you do that. I would think it would be kinda tough to get a good grip on the plywood and slide it around with a 200-lb hunk of metal sitting on it!
Rob responded - I just use a longish length of plywood -- slide the engine out over the plywood and work on it just behind the car -- the plywood doesn't move.
Dave wrote regarding reinstallation of the engine this time - I'm getting really good at this! On Friday I had it up and in and the nuts/bolts attached in less than 30 minutes. I've found that if I make sure the two bottom studs are going in perfectly straight, then it if tweak the crankshaft just a tad once, maybe twice, it slips right in without any trouble at all.
I used to be absolutely terrified of removing the engine -- now it's getting to be routine! (I'm not sure if that's good or bad! :-)
Rob responded - I guess it just gets to that point of "sigh - I'll just have to drop the engine again..."
~~~
Some Advice from John Henry (The Bug Shop).
Remove muffler and engine bay rubber!? Don't see why, unless your procedure is of greater scope for some reason.
My "beyond the obvious" tips are:
- As someone else said, just jack up the back enough to get under it. Drop the engine to the floor, then lift the car to be able to slide the engine out.
- Don't forget to disconnect the heater box cables. Mentioned in Rob's procedure, but I have forgotten to do that more often than anything else.
- I don't believe in the "take off a wheel, slide it out the side" thing. Take the measurements, you will see that you only gain about 3".
- After I drop the engine, I place a 24" piece of 2x4 on the saddle of the jack, then place it under the FRONT of the frame horns, right where they start to split. A little lift there will get you a LOT of lift on the rear end.
- You can make an engine dolly easy out of casters and 2x4s. See: John Henry's Engine Dolly. (This will require that you lift the rear end a bit higher than if the engine were sitting on the ground.)
- Take the generator pulley and belt off. The outer half of the generator pulley is an interference point with the rear apron when removing and re-installing. This will give you more clearance. Rob says "hmm maybe - but the generator shoft is still the same length so you still have to be concious of that sticking out".
- Hold a tailpipe with one hand, the other hand on the back of the fan shroud. If you took it off, but it back on. Really, you need that leverage point to "steer" the engine getting in and out. DO NOT use the oil cooler.
- Tape the inner edge of the rear apron, just above the rubber with several heavy layers of tape if you don't want to risk scratching the paint there.
- Buy a clutch disk, pressure plate, throw-out bearing and throw-out bearing clips. You may also want to get a clutch shift fork (operating arm), some chance that is worn and will need to be replaced. In the US, you can get all that stuff for around $100-$120 (early 2000s prices).
- Make a clutch disk alignment tool (after every thing is out and apart) by wrapping layers of tape around a 3/8" socket extension bar. One layer for the disk bore, one for the gland nut on the end.
- Put a THIN layer of grease on the tranny input shaft splines before re-installing the engine.
- When re-installing, keep checking behind the fan shroud and make sure the tranny input shaft doesn't hang on the pressure plate throw out bearing face.
- Once the engine is lifted to within about 4" of its normal height in the engine bay, you will tilt it back a bit on the jack to clear the input shaft and get the lower studs to line up with the tranny.
- When you get the engine to start to slip in, turn the crank pulley with your hand every now and then, to make sure nothing is binding up.
- Once it feels like it is in all the way, turn the crank pulley. Then put the upper two bolts in place and go hit the starter (reconnect the battery temporarily if you disconnected it) real quick. Make sure it turns over, starter engages flywheel, no strange noises.
- While you are under there, check you bowden tube "sag" for proper setting.
Good luck, It is not all that hard, just take your time and be patient.
- John Henry
The Bug Shop
*
* * * *
|
|
