|
||

|
|
Remove/Install Instrument Cluster/Speedometer Cablefor more information. Note: For this procedure ONLY, "front" will mean the side of the instrument cluster from which the driver views the gauges; "back" will mean the side of the instrument cluster to which the speedometer cable and the various wires are attached. This use of "front" and "back" is opposite the convention normally used in discussing VWs, where "front" means the front of the car and "back" means the back of the car. It just doesn't make sense to refer to the face of the instrument cluster as the "back." this procedure ONLY. The following topics related to the instrument cluster are discussed herein -
Instrument Cluster Removal
Note: The instrument cluster is just pressed into the dash and held in place by a ribbed rubber boot that fits around it. Instrument Cluster Wiring
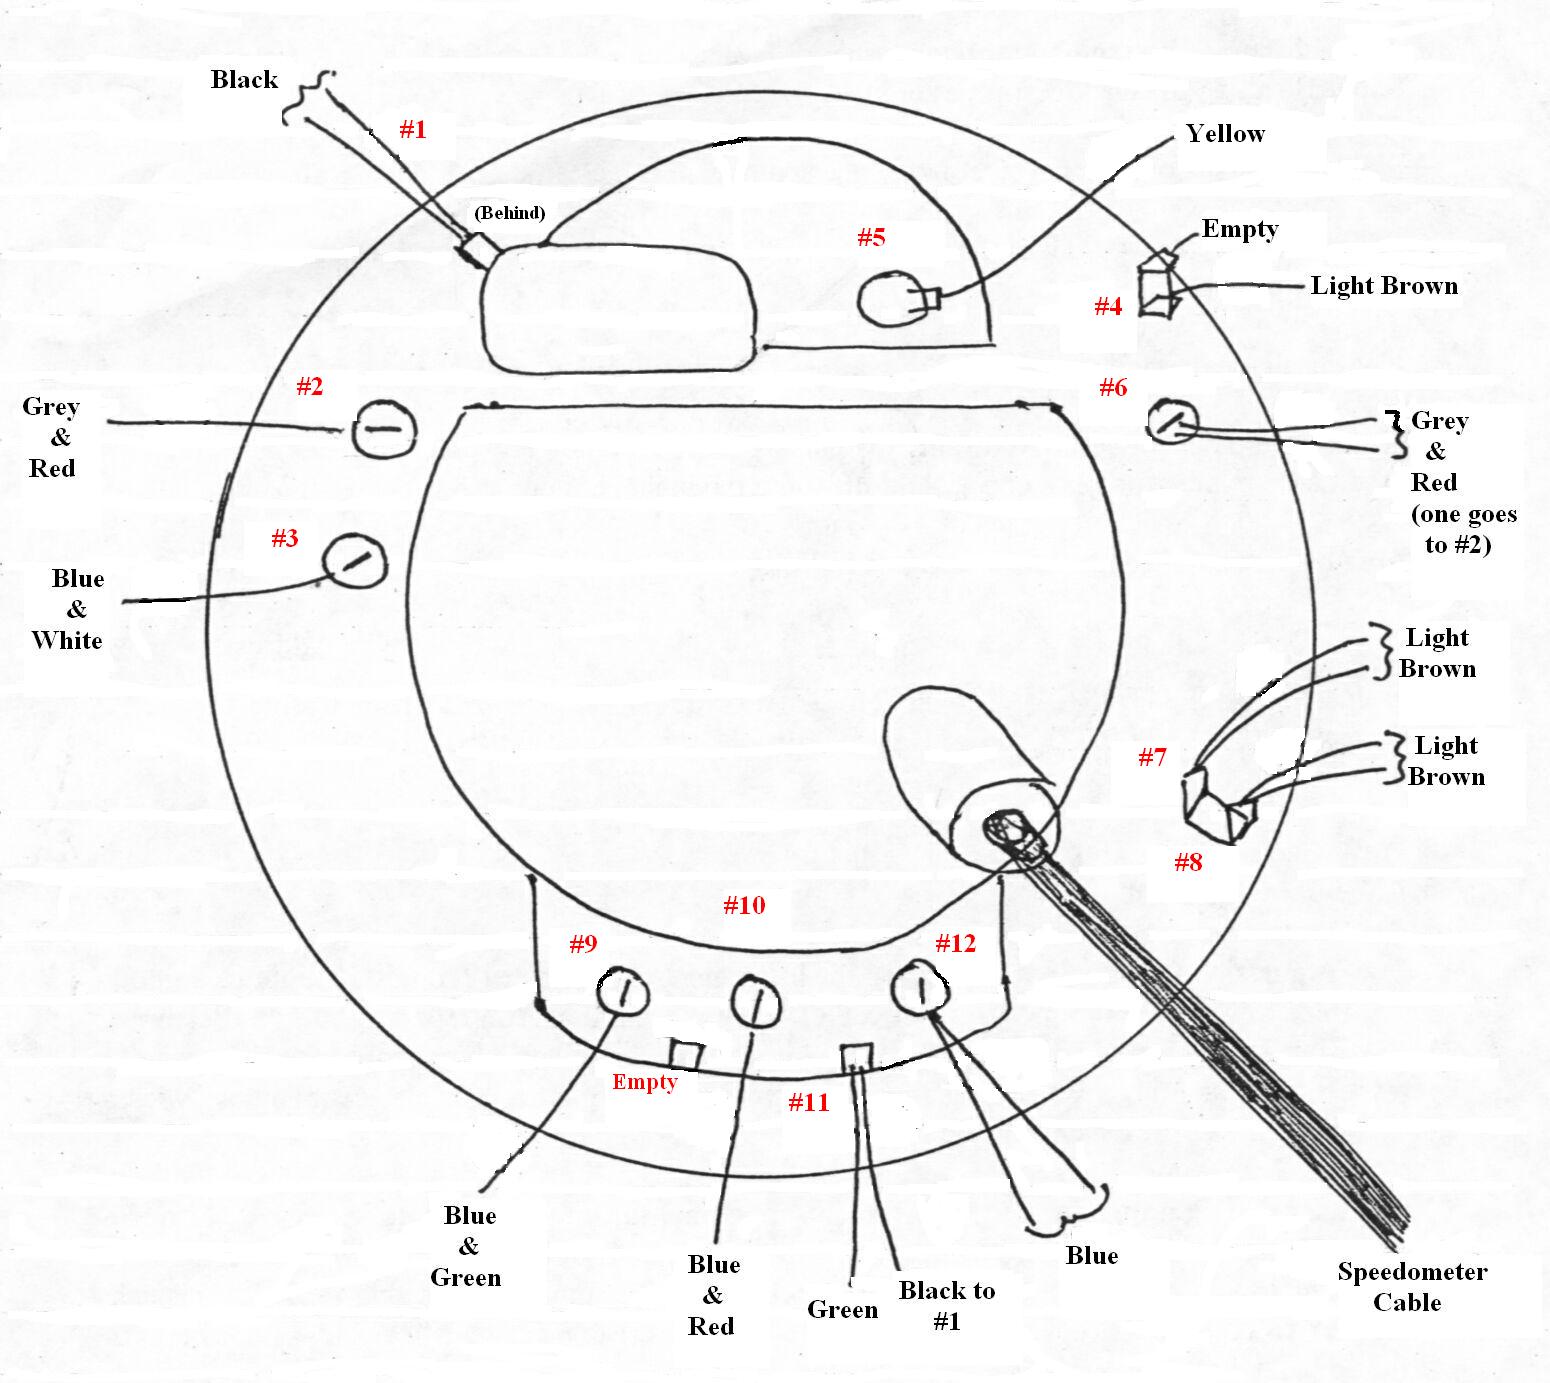 Backside of the Instrument Cluster Showing Wiring ConfigurationInstrument Cluster LightsSomeone wrote to say -- I have a 1972 standard Beetle. One of the bulbs in the instrument cluster by the speedometer is 'out.' The place I have taken my Bug (run by a German mechanic who is very knowledgeable about Bugs) says he can't get a new bulb to work in the socket where the extinguished bulb is. My question: is there a brighter type of bulb that I could use in place of the working bulb that would give me more light at night? Dave responded -- First, regarding replacement of the instrument cluster bulbs: These little 1.2-amp bulbs are readily available (for example, from Aircooled.Net). I replaced all six of them in my '73 instrument cluster, which I don't think is any different from the '72 instrument cluster. Check out our Instrument Cluster Wiring procedure. There is a diagram there of the rear of the cluster, showing the location of the six little lights at #2, #3, #6, #9, #10 and #12. You can easily do this job yourself; instructions are given earlier in the procedure. The hardest part is getting the speedometer cable removed and replaced.Be sure to follow the instructions carefully regarding the wiring -- label each wire per the diagram so you get them all back in exactly the right place. Other than that replacing the bulbs is way easy. Regarding brighter bulbs, Dave wrote -- I dont know of any brighter lights. I only see the 1.2W wheat-style bulbs available commercially, at about two bucks apiece. Personally, given the rheostat in the dash, I have found the standard bulbs plenty bright enough at night. The question continued -- I find that the sole working bulb sometimes goes out, but if I tap the glass it comes back on. The rheostat sometimes works, sometimes doesn't (in that when I turn it brighter, it brightens sometimes, and the bulb goes out sometimes). Does this indicate a different problem? Dave responded -- I would strongly suspect that problem is due to a loose or otherwise faulty connection. I would recommend taking the instrument cluster out (carefully marking the wires, of course, or you'll have a most interesting time rewiring the baby) and laying it on your workbench (or your wife's kitchen table :-) where you can ponder over it. Test the instrument cluster bulbs as follows (you don't want to go to all the trouble of reinstalling the instrument cluster (reattaching the speedometer cable is VERY difficult) only to find later on that one of the bulbs wasn't functioning). This is how I did it -
When you put it back together, make sure the bulbs are firmly seated in their sockets and the wiring connections are solid. I don't know exactly what causes the problem with the rheostat, but mine is the same way. It may just be the nature of the beast. Speedometer Cable Removal
Note: It will help to have an assistant under the car as you slowly pull the cable out so he can note the routing. Getting the new cable back in can be tricky. Another idea that we have used with success is to tie a string to the end of the cable, which is then pulled exactly through the route that the cable had taken. Speedometer Cable Installation
Note: If you are just lubricating a cable that you plan to reuse, grease it carefully, as you may find a 'sprung' wire or two, and wire punctures in the skin HURT. This will also tell you if it needs replacing again :-) The cable usually breaks near the wheel end, as this bit gets flexed in all directions and the wheel bounces and steers. Note: Route the cable to eliminate sharp bends (no radius less than six inches). Make sure it isn't kinked or pulled too tight anywhere in the turning radius of the front wheel. Be careful not to unseat the grommet when threading the new cable through. Note: It is actually the dust cap which turns the cable and thus drives the speedometer and odometer. You will note that the end of the cable is square and has a slot around it. This fitting protrudes through a square hole in the dust cap, secured there with a circlip in the slot. This causes the cable to turn as the front wheel turns, with speed proportional to the speed of the car. Make sure the end of the cable is seated securely in the dust cap. Also note: It's important to get the wheel diameter right, or the speedometer will read incorrectly. The correctly-sized tyre has a diameter of around 24 inches - the stock tyre is 165SR15. Note: This is the hardest part of the job. You need very small hands and very strong fingers! Instrument Cluster Installation
|
||
|
|