|
||

|
|
WeatherstrippingThe following topics are discussed in this article -
Window RubberWhen Dave's son purchased his '73 Super Beetle in 1997, Dave found that all of the weatherstripping around the doors and windows was quite deteriorated. Rob had a similar problem on his '70 Bug, but said that his '68 Bug must have been kept under cover a lot, as the window rubber was quite good. When Dave prepared the Super Beetle to be painted he removed all of the old window rubber -- just cut it out with a sharp knife to remove the fixed windows. Then when the car came back from the paint shop Dave reinstalled the fixed windows with new rubber. See our Windows article for a detailed description of this process. Door WeatherstrippingWhen Dave was reinstalling the doors after his car had been painted, he was undecided as to whether it would be better to put the rubber on first, or after the door is installed. Rob advised that the weatherstripping should definitely be installed after the door is in place. It's only held with contact cement, Rob said, so its easy to install with the door firmly held by the hinges (and a shoe under the outer edge of the door is very effective in holding the door still). Rob wrote -- I had to replace the rubber strips on my older car about 6-7 years ago -- an easy enough job. Dave purchased his new door seals from Rocky Mountain Motor Works (now Mid-America Motor Works). He installed the first one with contact cement, but a friend advised him to use 3M weatherstripping adhesive -- the black goop that comes in a red tube. To this Rob responded - I hadn't heard of 3M weatherstripping when I did my older Beetles doors about 10 years ago. I just used the contact cement since that's what was evident on the original rubber. The original glue held for 15 years, and the current stuff for 10, so I'll probably use it again. I don't know how easy spills of 3M are to clean up, but the contact cleans up easy with acetone (or paint thinners) too. Following are some tips and techniques that will help you to give your project a real professional finish. Engine LidDave found it necessary to replace the rear apron on his '73 Super Beetle (see our Rear Apron Replacement procedure). Since the car is equipped with an aftermarket Sports GT muffler, Dave needed an apron without the cutouts for the stock muffler peashooters. He finally found the apron he needed at Innovations in Fiberglass in Phoenix, Arizona, who make specialty parts for Volkswagens. Here's how the apron looked during the installation process -
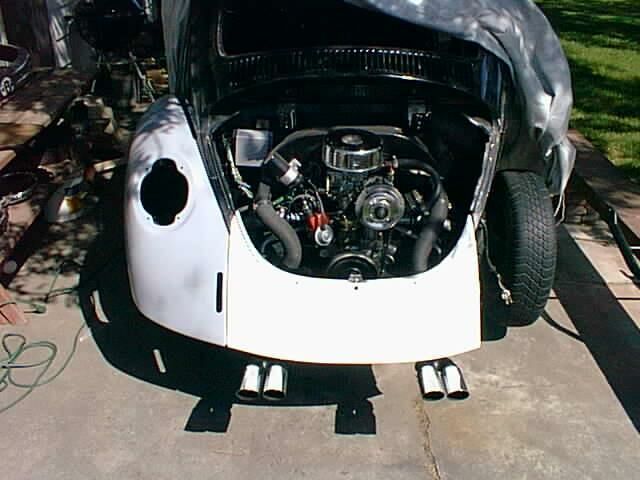 New Fiberglass Rear ApronWe show you this picture primarily to point out a problem -- the fiberglass rear apron does not have the groove running around the bottom in which the stock engine lid seal resides. So Dave, as is his fashion, started asking questions about the engine lid seal. Some of the responses he found very interesting - After some searching Dave found the seal that clips onto the inner edge of the engine lid at Aircooled.Net. The seal is essentially a continuous clip that fits over the inner edge of the engine lid; to this clip there is attached a long rubber tube which actually provides the seal. This clip-on seal provides a very solid seal against the fiberglass rear apron -- it's an excellent product. The pictures below show the seal more clearly than I can describe it.
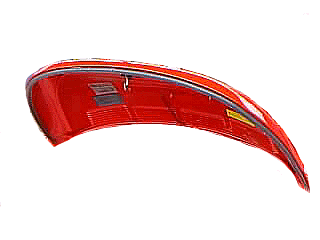 Engine Lid Seal
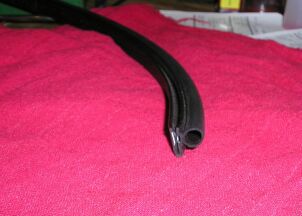 Close-up of the Engine Lid Seal
|
||
|
|